[Avg. reading time: 25 minutes]
InfluxDB Demo
Software
Cloud
Via Docker
mkdir influxdb
cd influxdb
docker-compose.yml
docker-compose.yml
name: influxdb3
services:
  influxdb3-core:
    container_name: influxdb3-core
    image: influxdb:3-core
    ports:
      - 8181:8181
    command:
      - influxdb3
      - serve
      - --node-id=node0
      - --object-store=file
      - --data-dir=/var/lib/influxdb3/data
      - --plugin-dir=/var/lib/influxdb3/plugins
    volumes:
      - ./.influxdb3/core/data:/var/lib/influxdb3/data
      - ./.influxdb3/core/plugins:/var/lib/influxdb3/plugins
    restart: unless-stopped

  influxdb3-explorer:
    image: influxdata/influxdb3-ui:latest
    container_name: influxdb3-explorer
    ports:
      - "8888:80"
    volumes:
      - ./.influxdb3-ui/db:/db:rw
      - ./.influxdb3-ui/config:/app-root/config:ro
    environment:
      SESSION_SECRET_KEY: "${SESSION_SECRET_KEY:-$(openssl rand -hex 32)}"
    restart: unless-stopped
    command: ["--mode=admin"]
Launch the containers
docker compose up -d
Create Token
docker exec influxdb3-core influxdb3 create token --admin
create a file at
./.influxdb3-ui/config/config.json
Add the following contents
  "DEFAULT_INFLUX_SERVER": "http://influxdb3-core:8181",
  "DEFAULT_API_TOKEN": "",
  "DEFAULT_SERVER_NAME": "InfluxDB3 - Docker""
Restart Docker
docker compose restart
Load Data
Login via UI
http://localhost:8888
- Create a Database, if prompted set retention period.
- Load data via Line Protocol or CSV or JSON or Programatically
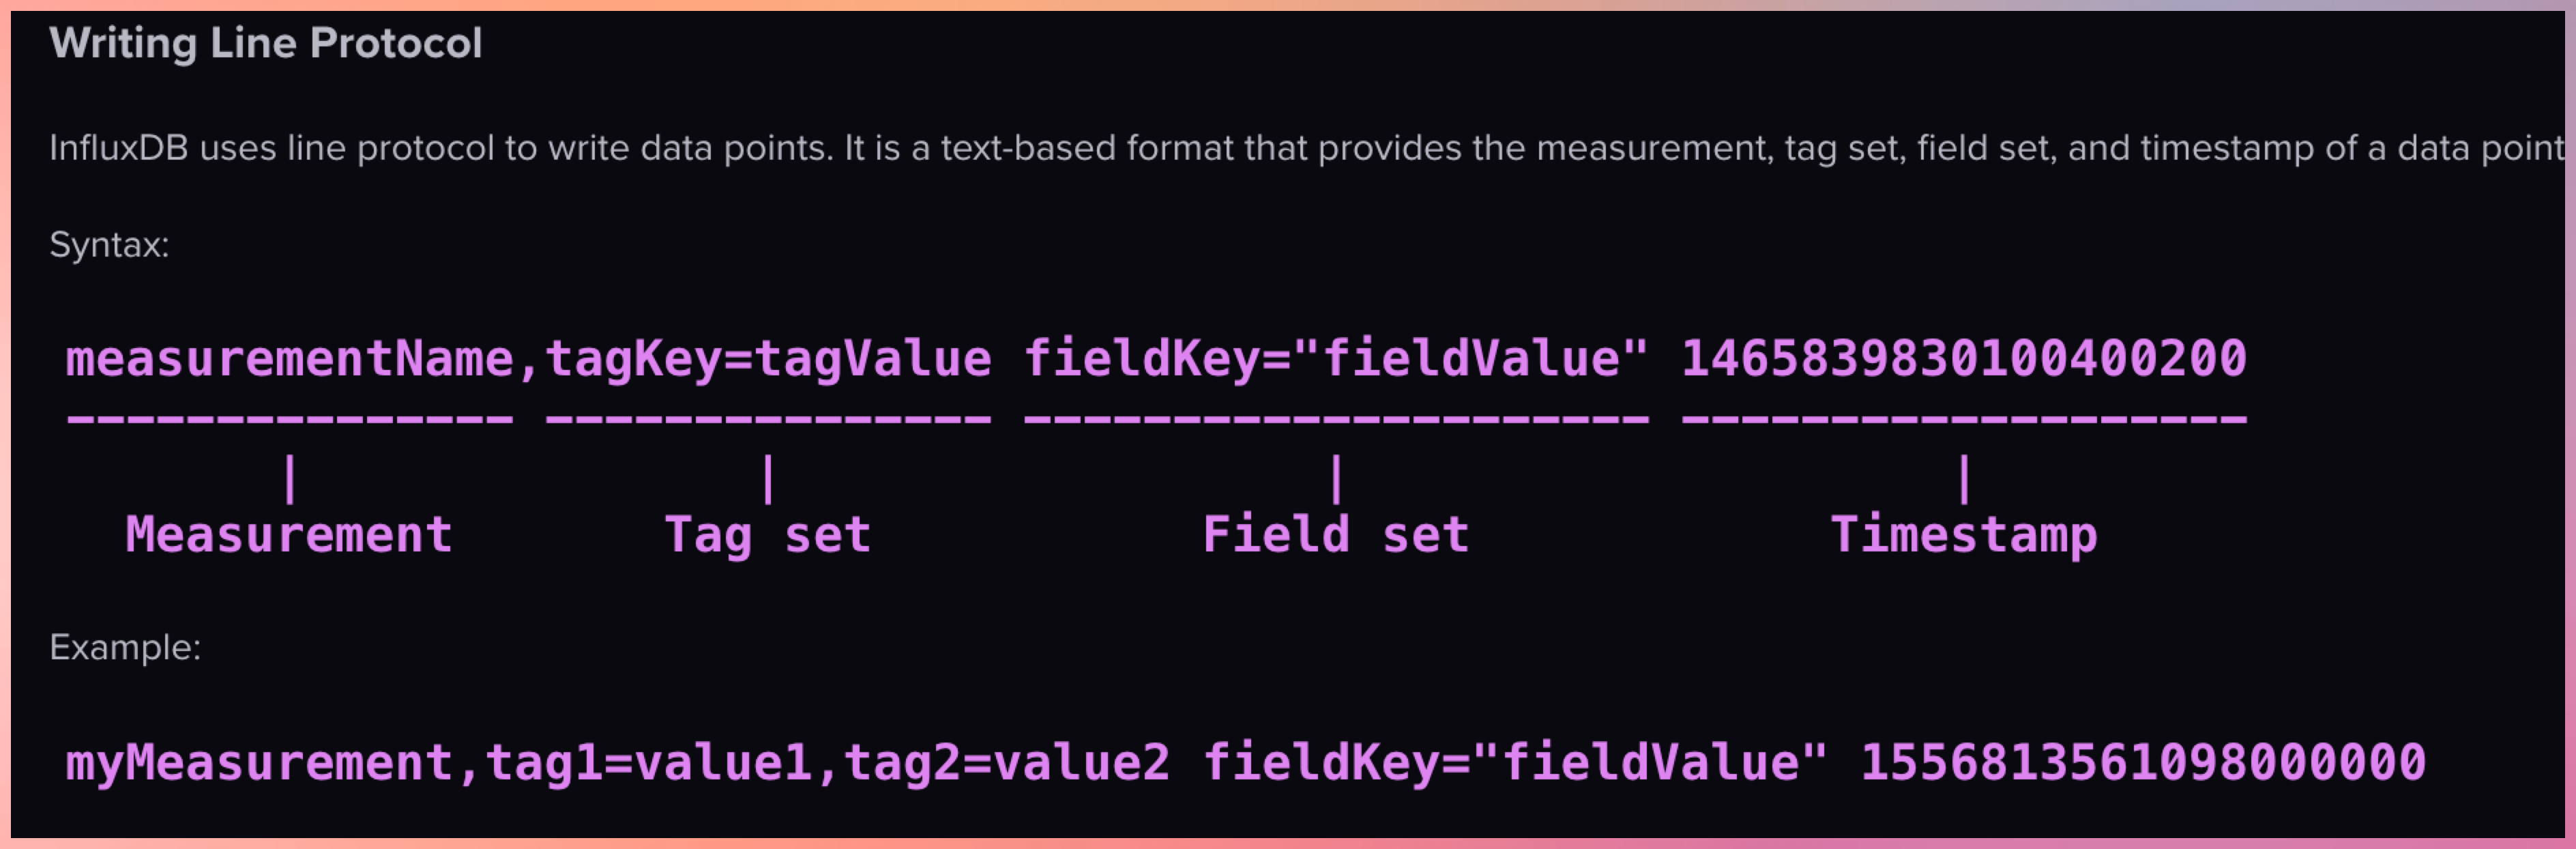
Line Protocol
Line protocol, is InfluxDB’s text-based format for writing time series data into the database. It’s designed to be both human-readable and efficient for machine parsing.
Format of Sample Data
In InfluxDB, a “measurement” is a fundamental concept that represents the data structure that stores time series data. You can think of a measurement as similar to a table in a traditional relational database.
Note:
Use singular form for measurement names (e.g., “temperature” not “temperatures”) Be consistent with tag and field names Consider using a naming convention (e.g., snake_case or camelCase)
Example 1
temperature,location=kitchen value=22.5
- temperature : measurement
- location=kitchen : tags
- value=22.5 : field
- if TimeStamp is missing then it assumes current TimeStamp
Example 2
temperature,location=kitchen,sensor=thermometer value=22.5 1614556800000000000
Example 3
Multiple Tags and Multiple Fields
temperature,location=kitchen,sensor=thermometer temp_c=22.5,humidity_pct=45.2
- location=kitchen,sensor=thermometer : Tags
- temp_c=22.5,humidity_pct=45.2 : Field
Example 4
temperature,location=kitchen,sensor=thermometer reading=22.5,battery_level=98,type="smart",active=true
Copy each section into Line Protocol window, bulk copying will only replace the data as it copies in the same timestamp.
temperature,location=kitchen value=22.5
temperature,location=living_room value=21.8
temperature,location=bedroom value=20.3

temperature,location=kitchen value=23.1
temperature,location=living_room value=22.0
temperature,location=bedroom value=20.7

temperature,location=kitchen value=22.8
temperature,location=living_room value=21.5
temperature,location=bedroom value=20.1

temperature,location=kitchen value=23.5
temperature,location=living_room value=21.9
temperature,location=bedroom value=19.8

temperature,location=kitchen value=24.2
temperature,location=living_room value=22.3
temperature,location=bedroom value=20.5

temperature,location=kitchen value=23.7
temperature,location=living_room value=22.8
temperature,location=bedroom value=21.0

temperature,location=kitchen value=22.9
temperature,location=living_room value=22.5
temperature,location=bedroom value=20.8

humidity,location=kitchen value=45.2
humidity,location=living_room value=42.8
humidity,location=bedroom value=48.3

humidity,location=kitchen value=46.1
humidity,location=living_room value=43.5
humidity,location=bedroom value=49.1

humidity,location=kitchen value=45.8
humidity,location=living_room value=42.3
humidity,location=bedroom value=48.7

humidity,location=kitchen value=46.5
humidity,location=living_room value=44.2
humidity,location=bedroom value=49.8

humidity,location=kitchen value=47.2
humidity,location=living_room value=45.1
humidity,location=bedroom value=50.2

humidity,location=kitchen value=46.8
humidity,location=living_room value=44.8
humidity,location=bedroom value=49.6

humidity,location=kitchen value=45.9
humidity,location=living_room value=43.7
humidity,location=bedroom value=48.5

co2_ppm,location=kitchen value=612
co2_ppm,location=living_room value=578
co2_ppm,location=bedroom value=495

co2_ppm,location=kitchen value=635
co2_ppm,location=living_room value=582
co2_ppm,location=bedroom value=510

co2_ppm,location=kitchen value=621
co2_ppm,location=living_room value=565
co2_ppm,location=bedroom value=488

co2_ppm,location=kitchen value=642
co2_ppm,location=living_room value=595
co2_ppm,location=bedroom value=502

co2_ppm,location=kitchen value=658
co2_ppm,location=living_room value=612
co2_ppm,location=bedroom value=521

co2_ppm,location=kitchen value=631
co2_ppm,location=living_room value=586
co2_ppm,location=bedroom value=508

co2_ppm,location=kitchen value=618
co2_ppm,location=living_room value=572
co2_ppm,location=bedroom value=491
Demo how to Query
Sample queries like MySQL
create database my_db;
CREATE DATABASE my-weather RETENTION 30d;
ALTER DATABASE my-weather SET RETENTION 30d;
select * from system.databases;
show tables;
Write CSV data
Set the measurement as csv_measurement
time,location,value
1741176000,kitchen,22.5
1741176000,living_room,21.8
1741176000,bedroom,20.3
1741176060,kitchen,23.1
1741176060,living_room,22.0
1741176060,bedroom,20.7
1741176120,kitchen,22.8
1741176120,living_room,21.5
1741176120,bedroom,20.1
Write JSON data
Set the measurement as json_measurement
[
  {"time":1741176000,"location":"kitchen","value":22.5},
  {"time":1741176000,"location":"living_room","value":21.8},
  {"time":1741176000,"location":"bedroom","value":20.3},

  {"time":1741176060,"location":"kitchen","value":23.1},
  {"time":1741176060,"location":"living_room","value":22.0},
  {"time":1741176060,"location":"bedroom","value":20.7},

  {"time":1741176120,"location":"kitchen","value":22.8},
  {"time":1741176120,"location":"living_room","value":21.5},
  {"time":1741176120,"location":"bedroom","value":20.1}
]
Login to Client CLI
docker exec -it influxdb3-core bash
Inside Container
export DEFAULT_TOKEN=""

influxdb3 query --database my-db "select * from yourmeasurement" --token $DEFAULT_TOKEN
Telegraf
Telegraf, a server-based agent, collects and sends metrics and events from databases, systems, and IoT sensors. Written in Go, Telegraf compiles into a single binary with no external dependencies–requiring very minimal memory.
Add your host details
Mac / Linux
export MQTT_HOST_NAME=""
export MQTT_PORT=
export MQTT_USER_NAME=""
export MQTT_PASSWORD=""
export INFLUX_TOKEN=""
export INFLUX_DB_BUCKET=""
Windows
set MQTT_HOST_NAME=""
set MQTT_PORT=
set MQTT_USER_NAME=""
set MQTT_PASSWORD=""
set INFLUX_TOKEN=""
set INFLUX_DB_BUCKET=""
telegraf.conf
# Global agent configuration
[agent]
  interval = "5s"
  flush_interval = "10s"
  omit_hostname = true

# MQTT Consumer Input Plugin
[[inputs.mqtt_consumer]]
  servers = ["ssl://${MQTT_HOST_NAME}:${MQTT_PORT}"]
  username = "${MQTT_USER_NAME}"
  password = "${MQTT_PASSWORD}"

  # Set custom measurement name
  name_override = "my_python_sensor_temp"

  # Topics to subscribe to
  topics = [
    "sensors/temp",
  ]

  # Connection timeout
  connection_timeout = "30s"

  # TLS/SSL configuration
  insecure_skip_verify = true

  # QoS level
  qos = 1

  # Client ID
  client_id = "telegraf_mqtt_consumer"

  # Data format
  data_format = "value"
  data_type = "float"

# InfluxDB v2 Output Plugin
[[outputs.influxdb_v2]]
  # URL for your local InfluxDB
  urls = ["http://localhost:8181"]

  # InfluxDB token
  token = "${INFLUX_TOKEN}"

  # Organization name
  organization = ""

  # Destination bucket
  bucket = "${INFLUX_DB_BUCKET}"

  # Add tags - match the location from your MQTT script
  [outputs.influxdb_v2.tags]
    location = "room1"
Run Telegraph
telegraf --config telegraf.conf --debug
Storing output in InfluxDB and S3
export MQTT_HOST_NAME=""
export MQTT_PORT=
export MQTT_USER_NAME=""
export MQTT_PASSWORD=""
export INFLUX_TOKEN=""
export INFLUX_DB_ORG=""
export INFLUX_DB_BUCKET=""
export S3_BUCKET=""
export AWS_REGION=""
export AWS_ACCESS_KEY_ID=""
export AWS_SECRET_ACCESS_KEY=""
telegraf.conf
# Global agent configuration
[agent]
  interval = "5s"
  flush_interval = "10s"
  omit_hostname = true

# MQTT Consumer Input Plugin
[[inputs.mqtt_consumer]]
  servers = ["ssl://${MQTT_HOST_NAME}:${MQTT_PORT}"]
  username = "${MQTT_USER_NAME}"
  password = "${MQTT_PASSWORD}"

  # Set custom measurement name
  name_override = "my_python_sensor_temp"

  # Topics to subscribe to
  topics = [
    "sensors/temp",
  ]

  # Connection timeout
  connection_timeout = "30s"

  # TLS/SSL configuration
  insecure_skip_verify = true

  # QoS level
  qos = 1

  # Client ID
  client_id = "telegraf_mqtt_consumer"

  # Data format
  data_format = "value"
  data_type = "float"

# InfluxDB v2 Output Plugin
[[outputs.influxdb_v2]]
  # URL for your local InfluxDB
  urls = ["http://localhost:8181"]

  # InfluxDB token
  token = "${INFLUX_TOKEN}"

  # Organization name
  organization = ""

  # Destination bucket
  bucket = "${INFLUX_DB_BUCKET}"

  # Add tags - match the location from your MQTT script
  [outputs.influxdb_v2.tags]
    location = "room1"

# S3 Output Plugin with CSV format
[[outputs.remotefile]]
  remote = 's3,provider=AWS,access_key_id=${AWS_ACCESS_KEY_ID},secret_access_key=${AWS_SECRET_ACCESS_KEY},region=${AWS_REGION}:${S3_BUCKET}'

  # File naming
  files = ['{{.Name}}-{{.Time.Format "2025-03-26"}}']