[Avg. reading time: 0 minutes]
[Avg. reading time: 0 minutes]
Disclaimer

[Avg. reading time: 4 minutes]
Required Tools
Windows
Mac
Common Tools (Windows & Mac)
-
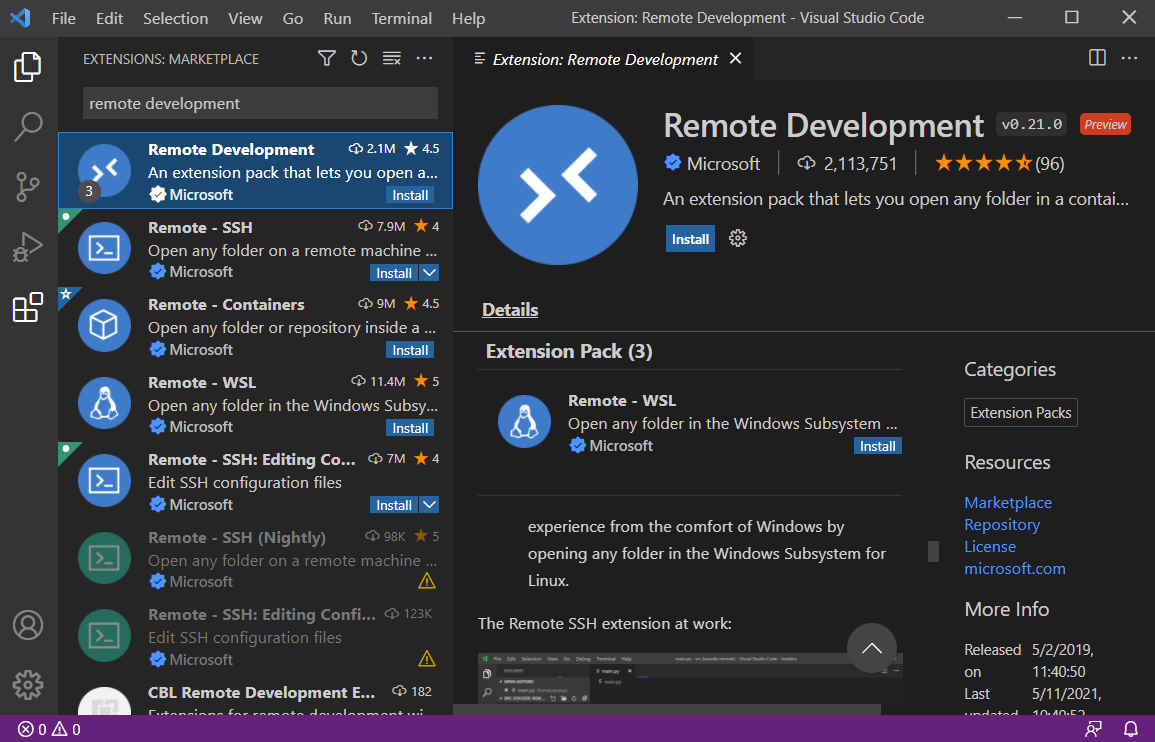
Install this VS Code Extension**
Remote Development
Configure Env using Dev Container
Goto Terminal / Command Prompt
git clone https://github.com/gchandra10/workspace-iot-upperstack.git
- Make sure Docker is running
- Open VSCode
- Goto File > Open Workspace from File
- Goto workspace-rust-de folder and choose the workspace.
- When VS Code prompts to “Reopen in Container” click it.
If VSCode doesnt prompt, then click the “Remote Connection” button at the Left Bottom of the screen.

Cloud Tools
[Avg. reading time: 1 minute]
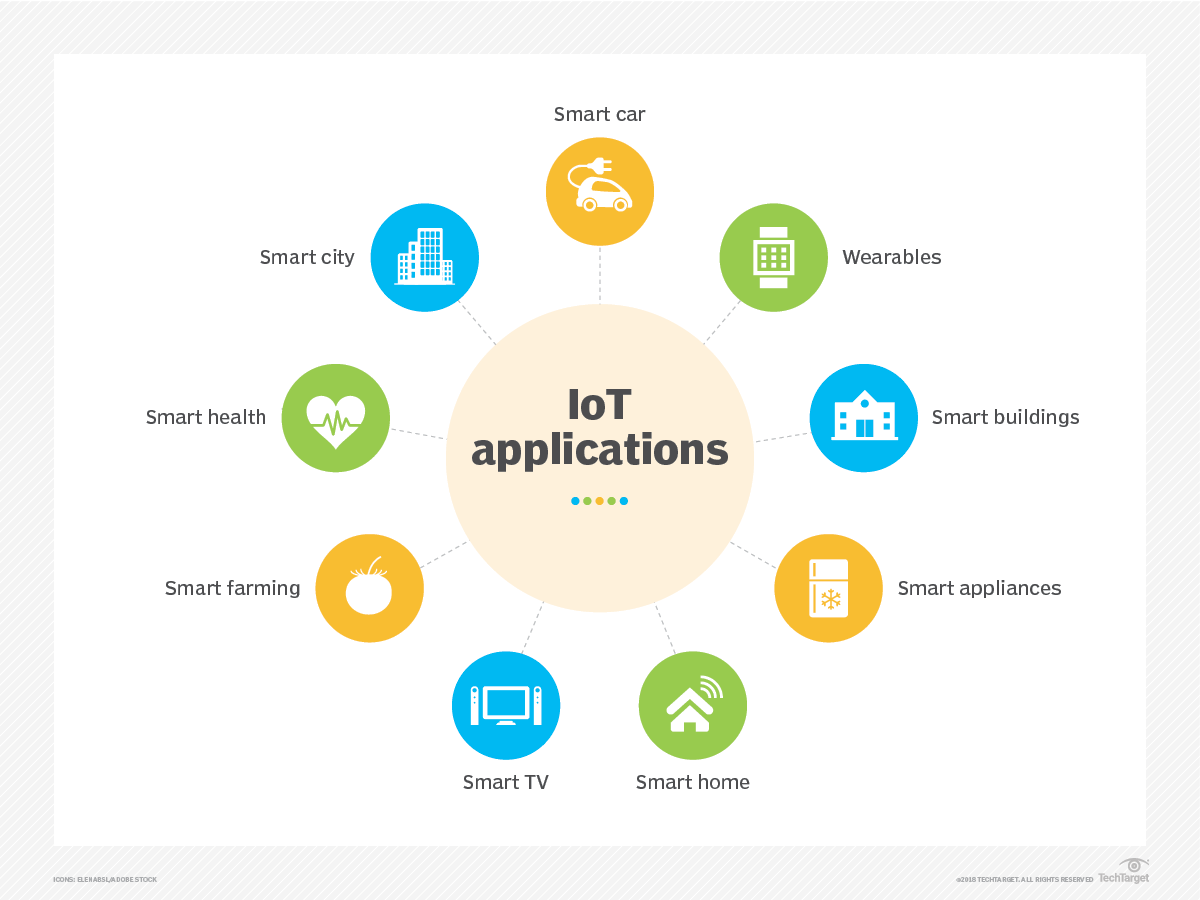
Overview of IOT
- Introduction
- IoT Use Cases
- JOBS
- Computing Types
- Evolution of IOT
- Protocols
- IOT Stack Overview
- Lower Stack
- Upper Stack
- Puzzle
[Avg. reading time: 6 minutes]
Introduction
What is IoT
The Internet of Things is a system where physical objects are equipped with sensors, software, and network connectivity so they can collect data, communicate over the network, and trigger actions without continuous human involvement.
IoT is not just the device.
IoT is devices + data + connectivity + action.

Why IoT Matters
Operational Efficiency
- Automates repetitive and time sensitive tasks
- Reduces manual monitoring and human error
- Enables real time visibility into systems
Data Driven Decisions
- Sensors generate continuous time series data
- Decisions shift from intuition to measurable signals
- Analytics and ML sit on top of IoT, not the other way around
Quality of Life
- Healthcare monitoring, smart homes, traffic systems
- Problems are detected earlier, not after failure
- Convenience is a side effect, reliability is the real win
Economic Impact
- New products, new services, new pricing models
- Hardware vendors become data companies
- Entire industries move from reactive to predictive
What is not IOT
Devices that work only locally
- A USB temperature sensor dumping values to a laptop
- An electronic thermostat controlling temperature locally
- No network, no IoT
Systems with no outward data flow
- Hardware that performs an action but emits no telemetry
- If data never leaves the device, it is automation, not IoT
What MUST exist for something to be IoT
- Continuous or event based data generation
- Network communication
- Backend ingestion
- Storage, usually time series oriented
- Processing or decision making
- Optional but important feedback or control loop
Examples
Watch vs Smart Watch
CO Detector vs Smart CO Detector
- Senses CO locally
- Triggers a buzzer or alarm
- Operates entirely offline
vs
- Transmits CO readings or alarm events
- Uses a network to communicate
- Notifies an external system such as a phone app, home hub, or fire department
Read more
Local intelligence is embedded systems. Networked intelligence is IoT.
#IOT #Importance #smart #network
[Avg. reading time: 3 minutes]
Use Cases
Every IoT use case follows the same pattern
sense → transmit → store → decide → act
1. Smart Homes
Use Case Home automation for comfort, security, and energy efficiency.
Example Smart thermostats like Nest adjust temperature based on occupancy and behavior. Smart locks and cameras like Ring stream events and alerts.
Temperature or motion sensed > data sent > rule applied > device reacts.
2. Healthcare
Use Case Remote patient monitoring and early intervention.
Example Wearables such as Fitbit and Apple Watch track vitals and activity and trigger alerts.
Vitals sensed > transmitted > analyzed > alert raised.
3. Industrial IoT (IIoT)
Use Case Predictive maintenance and factory automation.
Example Sensors monitor vibration, temperature, and pressure to predict failures before they occur using platforms like GE Predix.
Machine signals sensed > streamed > modeled > maintenance action triggered.
Similarly Smart Shelves inventory update, Amazon Go, Tesla Cars, Smart meters, Air Quality and so on.
Why IoT Works Across All Fields
- Sensors are cheap
- Networks already exist
- Storage is inexpensive
- Compute and analytics are mature
#iotusecases #logistics #environmental
[Avg. reading time: 3 minutes]
JOBS
| Role | What They Actually Do | Core Skills |
|---|---|---|
| IoT Application Developer | Build web or mobile apps that display IoT data and trigger actions | APIs, REST, MQTT, Web or Mobile frameworks |
| IoT Solutions Architect | Design the full IoT system from devices to cloud and apps | Architecture, cloud IoT services, security |
| Cloud Integration Engineer | Connect devices to cloud storage, pipelines, and services | AWS or Azure, MQTT, REST, data pipelines |
| IoT Data Analyst | Analyze sensor and event data to extract insights | Python, SQL, time series data, dashboards |
| IoT Product Manager | Decide what gets built and why from a business angle | Product thinking, requirements, communication |
| IoT Security Specialist | Secure data, APIs, devices, and cloud integrations | Encryption, auth, IAM, threat modeling |
| IoT Test Engineer | Validate reliability, scale, and failure scenarios | Testing, automation, system validation |
| IoT Support or Operations | Keep systems running and debug failures | Monitoring, logs, troubleshooting |
#jobs #iotdevelopers #iotarchitects #dataecosystem
[Avg. reading time: 15 minutes]
Computing Types
Modern software systems use different computing approaches depending on where computation happens, how systems are structured, and when decisions are made.
There is no single “best” computing model. Each type exists to solve a specific class of problems related to scale, latency, reliability, cost, and complexity.
As systems evolved from single machines to globally distributed platforms and IoT systems, computing models also evolved:
- From centralized to distributed
- From monolithic to microservices
- From cloud-only to edge and fog
- From reactive to proactive
Understanding these computing types helps you:
- Choose the right architecture for a problem
- Understand why IoT systems cannot rely on cloud alone
- See how modern data and IoT platforms fit together
Centralized Computing

Centralized Computing
Single computer or location handles all processing and storage. All resources and decisions are managed from one central point.
Characteristics
- Single point of control
- Centralized decision making
- Consistent data
- Simpler security
- Easier maintenance
Examples
- Traditional banking systems
- Library systems
- School management systems
Typical setup
- Central server or mainframe
- All branches connect to HQ
- Single database
- Centralized processing
- One place for updates
Major drawback
- Single point of failure
Distributed Computing

Multiple computers work together as one logical system. Processing, storage, and management are spread across multiple machines or locations.
Characteristics
- Shared resources
- Fault tolerance
- High availability
- Horizontal scalability
- Load balancing
Example
- Google Search
- Multiple data centers
- Distributed query processing
- Replication and redundancy
Monolithic

Single application where all functionality is packaged into one codebase.
Characteristics
- One deployment unit
- Shared database
- Tightly coupled components
- Single technology stack
- All-or-nothing scaling
Advantages
- Simple to build
- Easy to deploy
- Good performance
- Lower initial cost
Disadvantages
- Hard to scale selectively
- Technology lock-in
Examples
- WordPress
- Early-stage applications (many start monolithic)
Microservices

Application built as independent, small services that communicate via APIs.
Characteristics
- Independent services
- Separate databases (often)
- Loosely coupled
- Different tech stacks possible
- Individual scaling
Advantages
- Scale only what is needed
- Team autonomy
- Technology flexibility
Disadvantages
- Operational overhead
- Higher complexity
- Latency and distributed failures
- Tooling sprawl if unmanaged
Cloud Computing

Cloud computing provides compute resources (servers, storage, databases, networking, software) over the internet with pay-as-you-go pricing.
Benefits
- Cost savings
- No upfront infrastructure
- Pay for usage
- Reduced maintenance
- Scalability
- Scale up or down on demand
- Handle traffic spikes
- Accessibility
- Access from anywhere
- Global reach
- Reliability
- Backups and disaster recovery
- Multi-region options
- Automatic updates
- Security patches
- Managed services reduce ops work
Examples
- Cloud storage
- OTT streaming platforms
Service Models
- SaaS (Software as a Service)
- Ready-to-use apps
- Examples: Gmail, Dropbox, Slack
- PaaS (Platform as a Service)
- App runtime and developer platforms
- Examples: Heroku, Google App Engine
- IaaS (Infrastructure as a Service)
- Compute, network, storage building blocks
- Examples: AWS EC2, Azure VMs
Edge Computing

Edge computing moves computation and storage closer to where data is generated, near or on IoT devices.
Benefits
- Lower latency
- Works with limited internet
- Reduces bandwidth cost
- Better privacy (data stays local)
Simple examples
- Smart camera doing motion detection locally
- Smart thermostat adjusting temperature locally
- Factory robot making real-time decisions from sensors
Examples
- Smart Home Security
- Local video processing
- Only sends alerts or clips to cloud
- Tesla cars
- Local sensor fusion and obstacle detection
- Split-second decisions on device
Fog Computing

What it does
- Aggregates data from multiple edge devices
- Provides more compute than individual devices
- Filters and enriches data before sending to cloud
- Keeps latency lower than cloud-only systems
Examples
- Smart building local server processing many sensors
- Factory gateway analyzing multiple machines
- Farm gateway coordinating multiple sensors and controllers
Cloud vs Edge vs Fog
| Aspect | Cloud | Edge | Fog |
|---|---|---|---|
| Location | Central data centers | On/near device | Local network |
| Latency | High | Very low | Medium |
| Compute | Very high | Low | Medium |
| Storage | High | Very limited | Limited |
| Internet dependency | Required | Optional | Local network required |
| Data scope | Global | Single device | Multiple local devices |
| Typical use | Analytics, long-term storage | Real-time decisions | Aggregation, coordination |
| Example | AWS | Smart camera | Factory gateway |
Computing Evolution

Manual Computing
Calculations and decisions performed by humans.
Drawbacks
- Slow
- Error-prone
- Not scalable
Automated Computing
Computers execute workflows with minimal human involvement.
- Faster processing
- Higher accuracy
- Efficient resource use
Reactive Computing
System responds after events happen.
Examples
- Incident response
- Support tickets
- After-the-fact troubleshooting
Proactive Computing
System predicts and acts before failures happen.
Examples
- Predictive maintenance
- Capacity planning
- Anomaly detection
Idea
- Prevention is better than cure
Remember the saying “Prevention is better than cure”
[Avg. reading time: 10 minutes]
Evolution of IoT
IoT evolved from isolated device communication to distributed, event-driven systems where intelligence is shared across edge, fog, and cloud.
Early Phase (2000–2010): Machine-to-Machine Era
Characteristics
- Direct device-to-system communication
- Mostly industrial use cases
- Proprietary protocols
- Vendor-locked implementations
Limitations
- No standardization
- Poor interoperability
- High cost
- Difficult to scale
Example: OnStar Vehicle Communication
- Direct vehicle to control-center connection
- Proprietary cellular network
- Centralized command system
Capabilities
- Emergency alerts
- Vehicle tracking
- Remote diagnostics
Limitations
- Closed ecosystem
- Single-vendor dependency
- High operational cost
Implementation: General Motors’ OnStar system (2000s)

Initial IoT Phase (2010–2015): Three-Layer Architecture
Architecture Layers
Perception Layer
- Sensors and actuators
- Data collection from physical world
Network Layer
- Connectivity
- Data transmission
Application Layer
- Basic analytics
- Visualization
- User interfaces
Key Advances
- Cloud computing adoption
- Open protocols emerge
- Improved interoperability
Example 1: Nest Learning Thermostat (1st Generation)

- Temperature and motion sensors
- Wi-Fi connectivity
- Cloud-backed mobile application
Impact
- Mainstream smart home adoption
- Remote monitoring and automation
Intermediate Phase (2015-2018): Five-Layer Architecture
The five-layer model emerged because cloud-only processing could not meet latency, scale, and enterprise integration needs.
Additional Layers
- Transport Layer: reliable data movement
- Processing Layer: analytics and rule engines
- Business Layer: enterprise integration and monetization
Improvements
- Better security models
- Edge computing introduced
- Improved scalability
- Structured data management
Example: Smart City - Barcelona

Architecture
- City-wide sensor networks
- High-speed transport networks
- Central data platforms
- Multiple city applications
- Business and governance layer
Results
- Reduced water consumption
- Improved traffic flow
- Optimized waste management
Modern Phase (2018-Present): Service-Oriented Architecture
Core Characteristics
- Microservices-based systems
- Edge–Cloud continuum
- Event-driven architecture
- Zero-trust security
- AI and ML integration
Key Capabilities
Distributed Intelligence
- Edge processing
- Fog computing
- Autonomous decision-making
Advanced Integration
- API-first design
- Event mesh
- Digital twins
Security
- Identity-based access
- End-to-end encryption
- Continuous threat detection
Scalability
- Containers
- Serverless computing
- Auto-scaling
Example: Tesla Vehicle Platform
Architecture
- Edge computing inside vehicles
- Cloud-based OTA updates
- AI-driven autopilot
- Digital vehicle twins
Impact
- Continuous improvement
- Predictive maintenance
- Fleet-level intelligence
Example : Amazon Go Stores

Technologies
- Computer vision
- Sensor fusion
- Edge AI
- Deep learning
Results
- Cashierless retail
- Reduced operational cost
- Improved customer experience
Emerging Trends in IoT
Autonomous IoT
- Self-healing systems
- Self-optimizing networks
- Cognitive decision-making
Sustainable IoT
- Energy-efficient design
- Green computing
- Resource optimization
Resilient IoT
- Fault tolerance
- Disaster recovery
- Business continuity
Example: Smart Agriculture
- Autonomous machinery
- Drone integration
- Soil and weather sensors
- Precision farming
Example: Smart Grids
- Grid sensors
- Smart meters
- Edge intelligence
- Automated fault recovery
- Demand response
Key Architectural Shifts Over Time:
- From Centralized → Distributed
- From Monolithic → Microservices
- From Cloud-centric → Edge-centric
- From Static → Dynamic
- From Manual → Automated
- From Reactive → Proactive
Impact on Design Considerations
Scalability
- Vertical → Horizontal
- Static → Elastic
Security
- Perimeter-based → Zero trust
- Reactive → Preventive
Integration
- Point-to-point → Event-driven
- Tight coupling → Loose coupling
Operations
- Manual → Automated
- Centralized → Distributed
[Avg. reading time: 14 minutes]
Protocols
A protocol in the context of computing and communications refers to a set of rules and conventions that dictate how data is transmitted and received over a network. Protocols ensure that different devices and systems can communicate with each other reliably and effectively. They define the format, timing, sequencing, and error checking mechanisms used in data exchange.
Importance of Protocols
Interoperability: Allows different systems and devices from various manufacturers to work together.
Reliability: Ensures data is transmitted accurately and efficiently.
Standardization: Provides a common framework that developers can follow, leading to consistent implementations.
Commonly used Protocols
HTTP (HyperText Transfer Protocol): Used for transmitting web pages over the internet.
FTP (File Transfer Protocol): Used for transferring files between computers.
TCP/IP (Transmission Control Protocol/Internet Protocol): A suite of communication protocols used to interconnect network devices on the internet.
UDP (User Datagram Protocol): UDP, or User Datagram Protocol, is a communication protocol used across the Internet. It is part of the Internet Protocol Suite, which is used by networked devices to send short messages known as datagrams but with minimal protocol mechanisms. Used in VoIP & Live Streaming.
Key Characteristics of Protocols
Syntax:
Defines the structure or format of the data.
Example: How data packets are formatted or how headers are structured.
Semantics:
Describes the meaning of each section of bits in the data.
Example: What specific bits represent, such as addressing information or control flags.
Timing:
Controls the sequencing and speed of data exchange.
Example: When data should be sent, how fast it should be sent, and how to handle synchronization.
Popular IoT Protocols
1. Bluetooth
Description: A short-range wireless technology standard used for exchanging data between fixed and mobile devices. Its a Key protocol in the IoT ecosystem.
Use Cases:
- Wearable devices (e.g., fitness trackers, smartwatches)
- Wireless peripherals (e.g., keyboards, mice, headphones)
- Home automation (e.g., smart locks, lighting control)
- Health monitoring devices
2. Zigbee
Description: A low-power, low data rate wireless mesh network standard ideal for IoT applications. It can handle larger networks in 1000’s of nodes compared to Bluetooch with a limit of 5 to 30 devices. Lower Latency compared to Bluetooth. Needs a hub / controller to communicate. (Google Nest, Apple HomePod)
Use Cases:
- Smart home devices (e.g., smart bulbs, thermostats, security systems)
- Industrial automation
- Smart energy applications (e.g., smart meters)
- Wireless sensor networks
3. NFC (Near Field Communication)
Description: Direct Peer to Peer communication system. A set of communication protocols for communication between two electronic devices over a distance of 4 cm (1.6 in) or less. No pairing or controller is needed.
Use Cases:
- Contactless payments (e.g., Apple Pay, Google Wallet)
- Access control (e.g., NFC-enabled door locks, Yubi Keys)
- Data exchange (e.g., transferring contacts, photos)
- Smart posters and advertising
Payment Terminal
Phone → Terminal (direct) Terminal → Payment processor (separate connection)
Door Access
Card → Reader (direct) Reader → Access control system (separate connection)
4. LoRaWAN (Long Range Wide Area Network)
Description: A low-power, long-range wireless protocol designed for IoT applications.
Use Cases:
- Smart cities (e.g., parking sensors, street lighting)
- Agriculture (e.g., soil moisture sensors)
- Asset tracking
- Environmental monitoring
5. MQTT (Message Queuing Telemetry Transport)
Description: A lightweight messaging protocol for small sensors and mobile devices optimized for high-latency or unreliable networks.
- It’s a lightweight messaging protocol designed for devices with limited resources
- Works like a postal service for IoT devices
- Uses a publish/subscribe model instead of direct device-to-device communication
- Perfect for IoT because it’s:
- Low bandwidth
- Battery efficient
- Reliable even with poor connections
Use Cases:
- Home automation (e.g., smart home controllers)
- Industrial automation.
- Telemetry data collection.
- Remote monitoring.
6. CoAP (Constrained Application Protocol)
Description: A specialized web transfer protocol for use with constrained nodes and networks in the IoT.
Key Characteristics
- It’s a specialized web transfer protocol for resource-constrained IoT devices
- Works similarly to HTTP but optimized for IoT needs
- Uses UDP (User Datagram Protocol) instead of TCP, making it lighter and faster
- Built for machine-to-machine (M2M) applications
Use Cases:
- Smart energy and utility metering
- Building automation
- Environmental monitoring
- Resource-constrained devices
Main Features
- Built-in Resource Discovery
- Support for multicast and broadcast messages
- Simple proxy and caching capabilities
- Low overhead and parsing complexity
- Asynchronous message exchange
- URI support similar to HTTP (coap://endpoint/path)
Apart from this there are few more Z-Wave, LTE-M, RFID
[Avg. reading time: 4 minutes]
IoT Protocol Stack Overview
Many IoT protocols span multiple layers.
This stack is a conceptual view used to understand responsibilities, not a strict OSI mapping.
| Layer | Purpose | Examples |
|---|---|---|
| Physical Layer | Handles hardware-level transmission such as sensors, actuators, radios, and modulation. | LoRa, BLE (PHY), Zigbee (PHY), Wi-Fi, Cellular (NB-IoT, LTE-M) |
| Data Link Layer | Manages MAC addressing, framing, error detection, and local delivery. | IEEE 802.15.4, BLE Link Layer, LoRaWAN |
| Network Layer | Handles addressing and routing across networks (IP or adapted IP). | IPv6, 6LoWPAN, RPL |
| Transport Layer | Provides end-to-end data delivery and reliability where required. | UDP, TCP |
| Security Layer | Ensures encryption, authentication, and integrity. | DTLS, TLS |
| Application Layer | Defines messaging, device interaction, and application semantics. | MQTT, CoAP, HTTP, LwM2M, AMQP |
IoT Stack Preferred Languages
| Stack Layer | Preferred Languages | Why |
|---|---|---|
| Lower Stack (Firmware / Device) | C / C++ / Rust (emerging) | Direct hardware access, deterministic performance, low memory footprint, real-time constraints, zero-cost abstractions. |
| Middle Stack (Gateway / Edge) | Rust / Python | Protocol translation, buffering, edge analytics, balance of performance and developer productivity. |
| Upper Stack (Cloud / Data) | Rust / Python | Large-scale data processing, APIs, stream processing, ML orchestration, cloud-native services. |
[Avg. reading time: 3 minutes]
Layers of IoT - Lower Stack
IoT architecture typically consists of several layers, each serving a specific function in the overall system. These layers can be broadly divided into the lower stack and the upper stack.
The lower stack focuses on the physical and network aspects of IoT systems. It includes the following layers:
Physical Devices and Sensors:
Devices and sensors that collect data from the environment. Examples: Smart thermostats, industrial sensors, wearable health monitors.
Device Hardware and Firmware:
Microcontrollers, processors, and firmware that manage device operations. Ensures proper functioning and communication of IoT devices.
Connectivity and Network Layer:
Communication protocols (Wi-Fi, Bluetooth, Zigbee, LoRaWAN, etc.) that transmit data. Network hardware like routers and gateways that facilitate data transmission.
Edge Computing:
Edge devices that process data locally to reduce latency and bandwidth usage. Edge analytics for real-time decision-making without relying on cloud processing.
Power Management:
Battery technologies and energy harvesting methods to power IoT devices. Ensures prolonged operational life of remote and portable devices.
[Avg. reading time: 5 minutes]
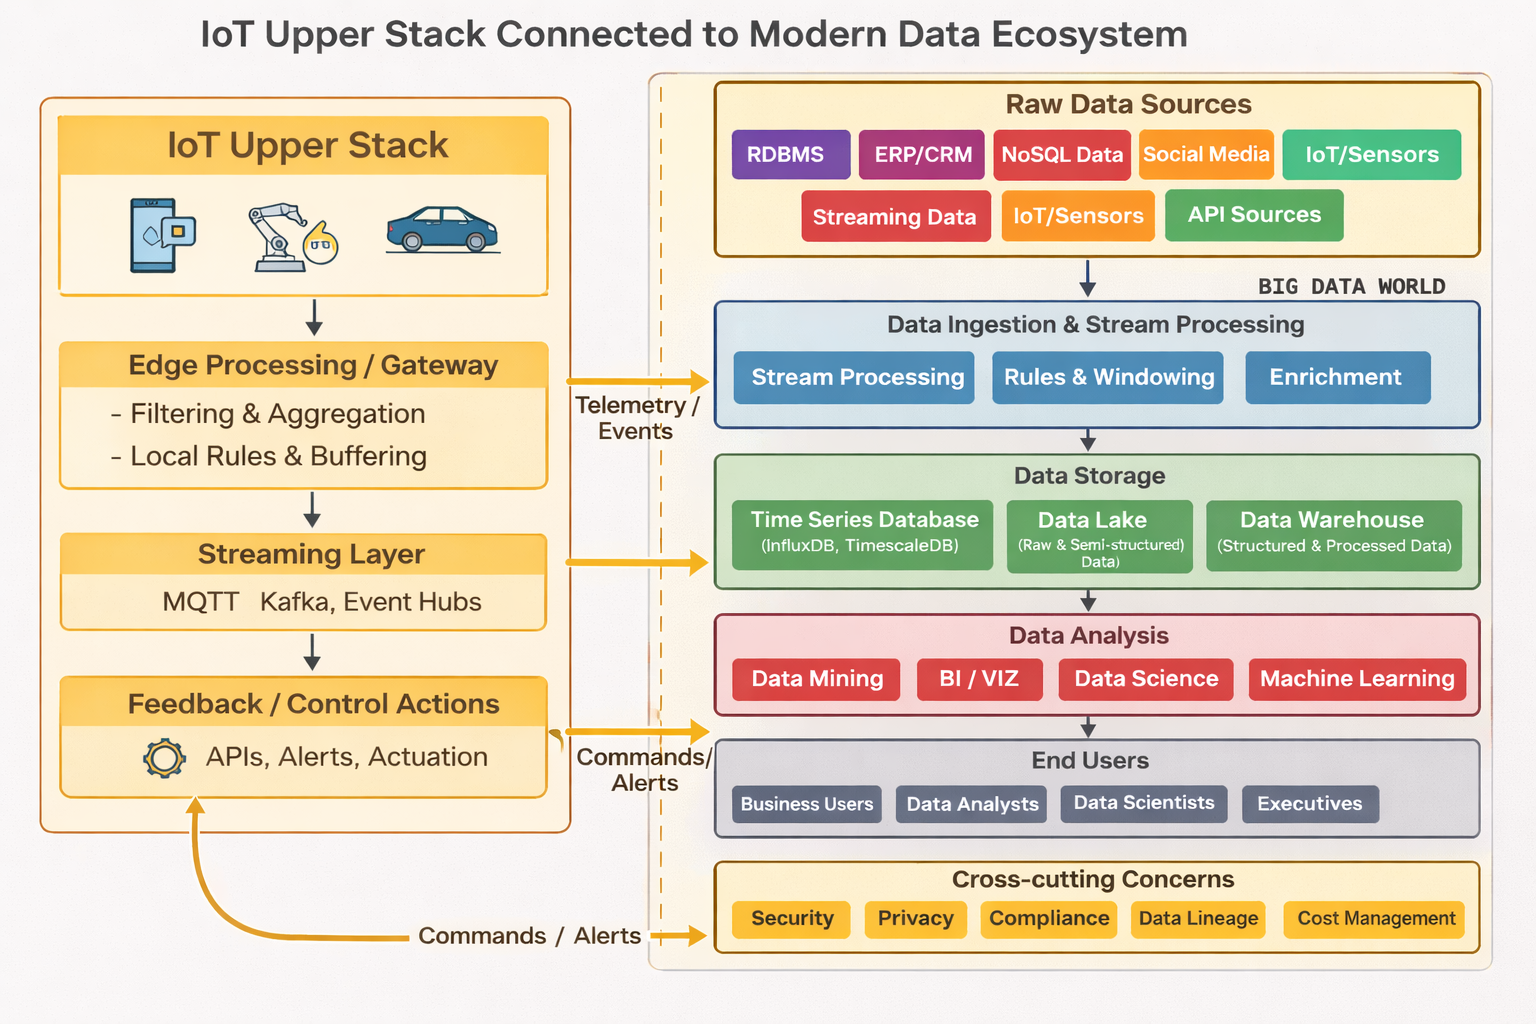
Layers of IoT - Upper Stack
IoT architecture typically consists of several layers, each serving a specific function in the overall system. These layers can be broadly divided into the lower stack and the upper stack.
The upper stack deals with application, data processing, and user interaction aspects of IoT systems. It includes the following layers:
Data Ingestion Layer
- Different Data formats (JSON, Binary)
- Message Brokers and queuing systems (RabbitMQ, Apache Kafka)
Data Processing & Storage
- Time Series Databases like InfluxDB / TimescaleDB.
- Hot vs Cold storage strategies.
- Data aggregation techniques.
- Edge vs Cloud processing decisions.
Analytical Layer
- Realtime analytics
- Vizualization frameworks and tools
- Anomaly detection systems
Application Interface / Enablement
- API (RESTful services)
- User authentication / authorization
Enterprise Integration
- Data transformation and mapping
- Integration with legacy systems
#upperstack #data #integrationlayer
[Avg. reading time: 3 minutes]
Puzzle
1. For each of the following IoT components, identify whether it belongs to the upper stack or the lower stack and explain why.
-
1.1. A mobile app that allows users to control their home lighting system.
-
1.2. A sensor that measures soil moisture levels in a farm.
-
1.3. A gateway that translates Zigbee protocol data to Wi-Fi for transmission to the cloud.
-
1.4. A cloud-based analytics platform that processes data from smart meters.
-
1.5. Firmware running on a smart thermostat that controls HVAC systems.
2. Determine whether the following statements are true or false.
-
2.1 Edge computing is part of the upper stack in IoT systems.
-
2.2 User authentication and data encryption are important aspects of the lower stack.
-
2.3 A smart refrigerator that sends notifications to your phone about expired food items involves both upper and lower stack components.
-
2.4 Zigbee and Bluetooth are commonly used for high-bandwidth IoT applications.
-
2.5 Predictive maintenance in industrial IoT primarily utilizes data from the upper stack.
[Avg. reading time: 3 minutes]
Data Processing
- Application Layer
- CPU Architecture
- Containers
- Python Environment
- Time Series Databases
- Data Visualization libraries
[Avg. reading time: 5 minutes]
Application Layer
Application Protocols
Lightweight protocols designed for IoT communication:
MQTT (Message Queuing Telemetry Transport):
Device → MQTT Broker → Server
Publish-subscribe model over TCP/IP.
Ideal for unreliable networks (e.g., remote sensors).
CoAP (Constrained Application Protocol):
RESTful, UDP-based protocol for low-power devices.
Features: Observe mode, resource discovery, DTLS security.
HTTP/HTTPS:
Used for cloud integration (less efficient than CoAP/MQTT).
LwM2M (Lightweight M2M):
Device management protocol built on CoAP.
Data Formats
JSON: Human-readable format for APIs and web services.
CBOR (Concise Binary Object Representation): Binary format for efficiency (used with CoAP).
XML: Less common due to larger payload size.
APIs and Services
RESTful APIs: Enable integration with cloud platforms (e.g., AWS IoT, Azure IoT).
WebSocket: Real-time bidirectional communication.
Device Management: Firmware updates, remote configuration (via LwM2M).
Security Mechanisms
DTLS (Datagram TLS): Secures CoAP communications.
TLS/SSL: Used for MQTT and HTTP.
Authentication: OAuth, API keys, X.509 certificates.
Why the Application Layer Matters
Efficiency: Protocols like CoAP minimize overhead for low-power devices.
Scalability: Supports thousands of devices in large-scale deployments.
Interoperability: Enables integration with existing web infrastructure (e.g., HTTP).
Security: Ensures data integrity and confidentiality in sensitive applications.
Challenges in IoT Application Layers
Fragmentation: Multiple protocols (CoAP, MQTT, HTTP) complicate interoperability.
Resource Constraints: Limited compute/memory on devices restricts protocol choices.
Latency: Real-time applications require optimized data formats and protocols.
#applicationlayer #protocols #formats #api #services
[Avg. reading time: 18 minutes]
MQTT - Message Queuing Telemetry Transport
MQTT is one of the most widely used messaging protocols in the Internet of Things (IoT).
It was originally developed by IBM in 1999 and later standardized by OASIS. MQTT became popular in IoT because it is simple, lightweight, and designed for unreliable networks.
MQTT works well on:
- Low bandwidth networks
- High latency connections
- Intermittent or unreliable connectivity
Unlike HTTP, MQTT uses a binary message format, making it far more efficient for constrained devices such as sensors and embedded systems.
Why MQTT Exists
Traditional request–response protocols like HTTP are inefficient for IoT devices.
MQTT was designed to:
- Minimize network usage
- Reduce device CPU and memory consumption
- Support asynchronous, event-driven communication
Work reliably even when devices disconnect frequently.
Core MQTT Concepts
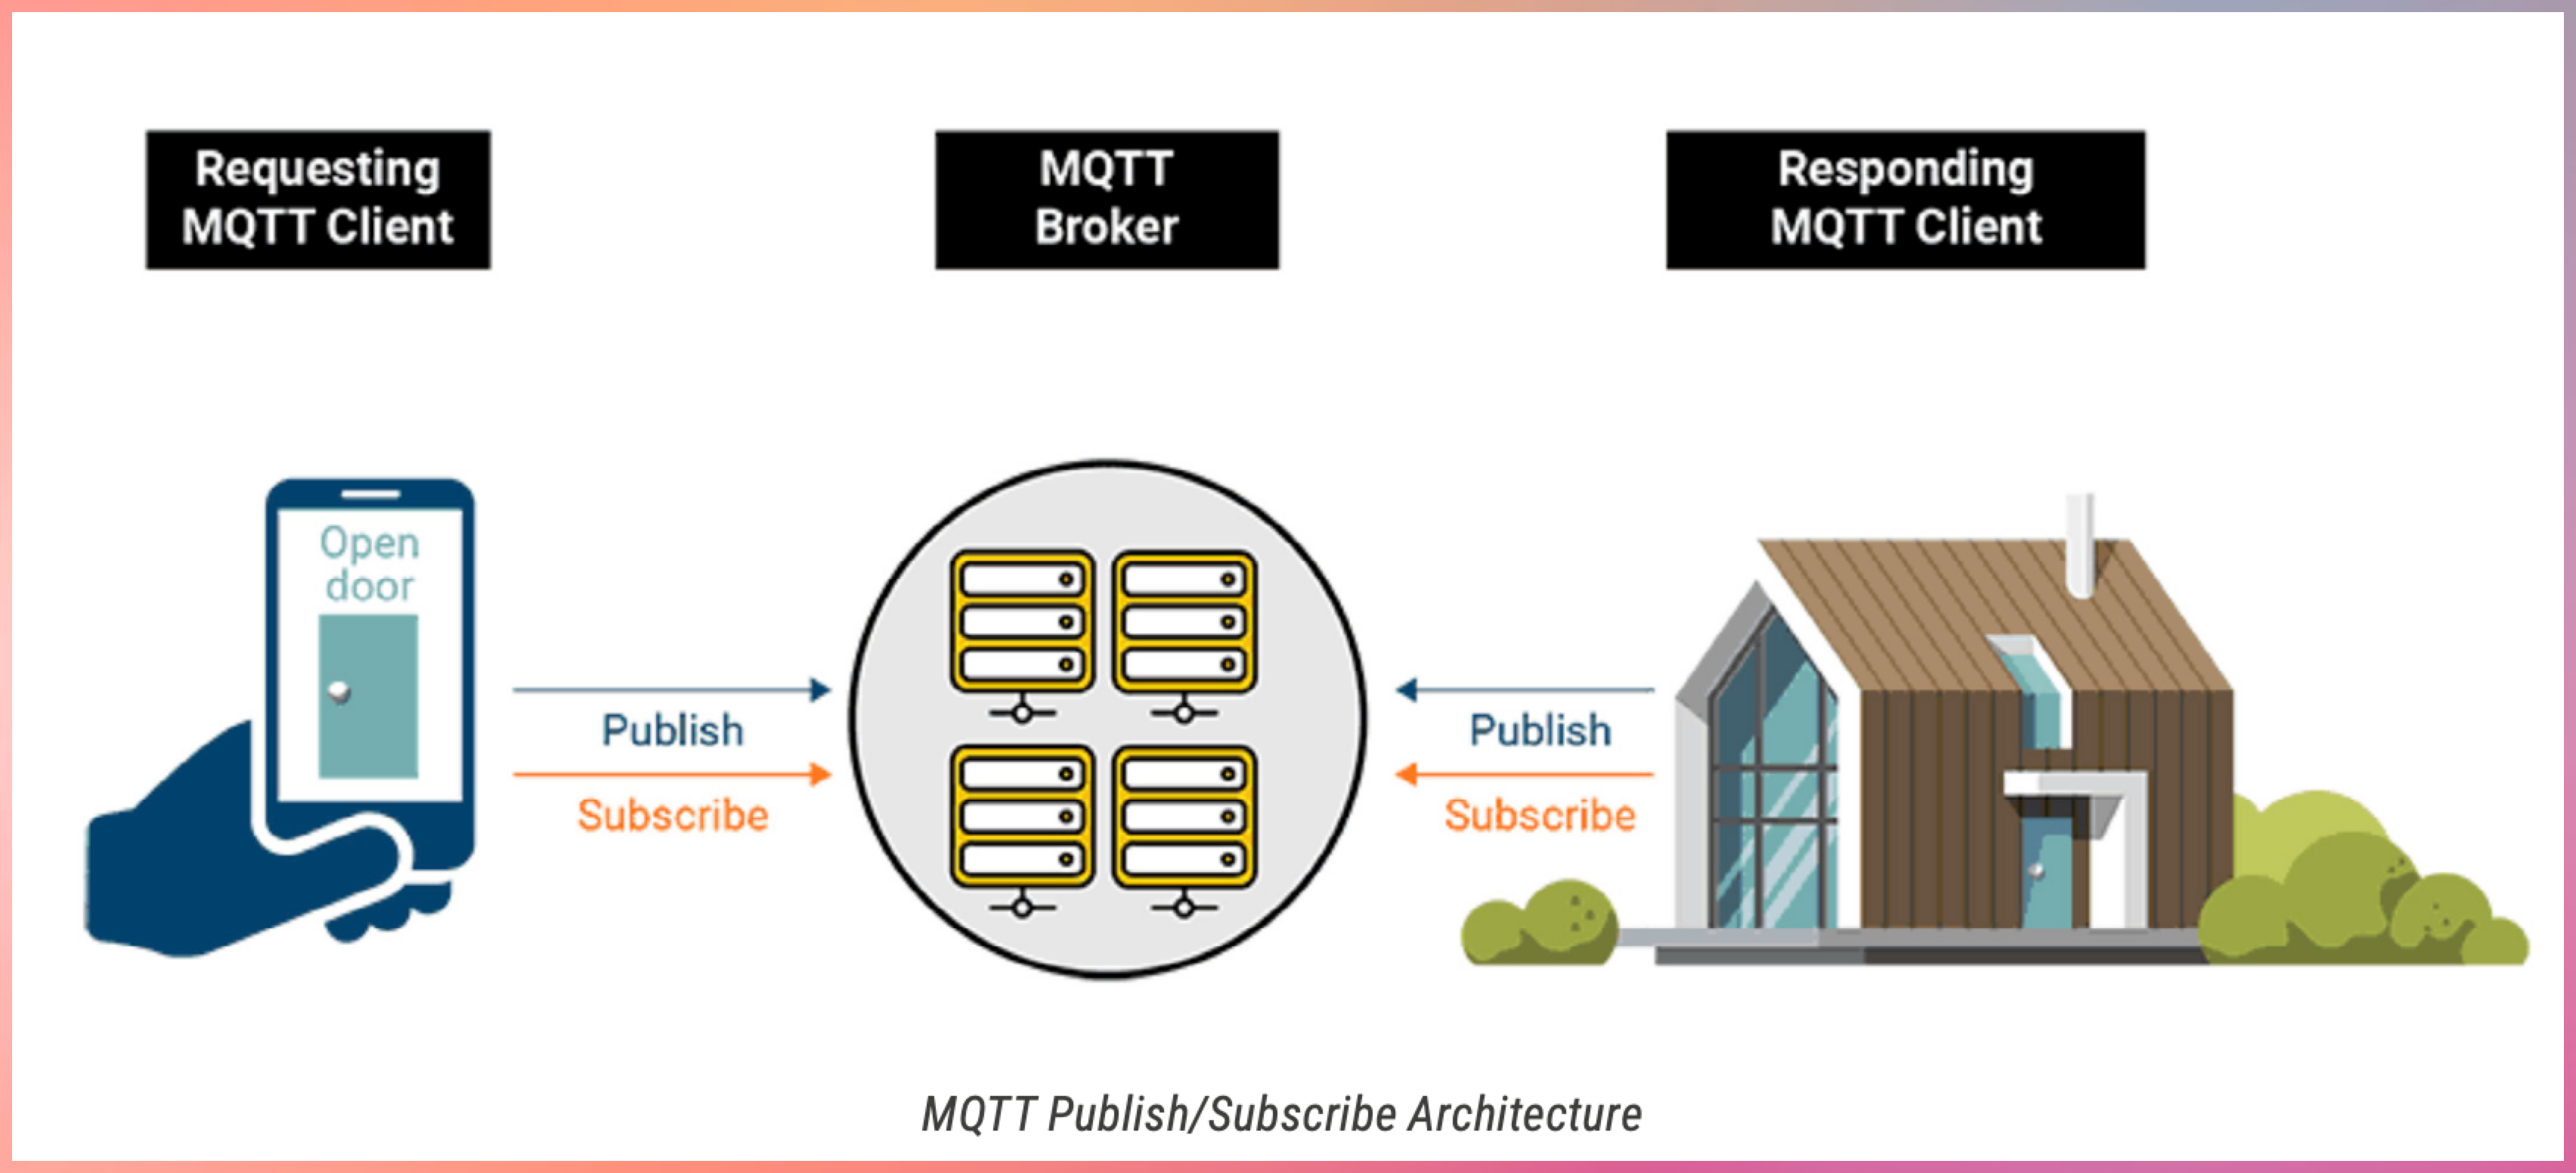
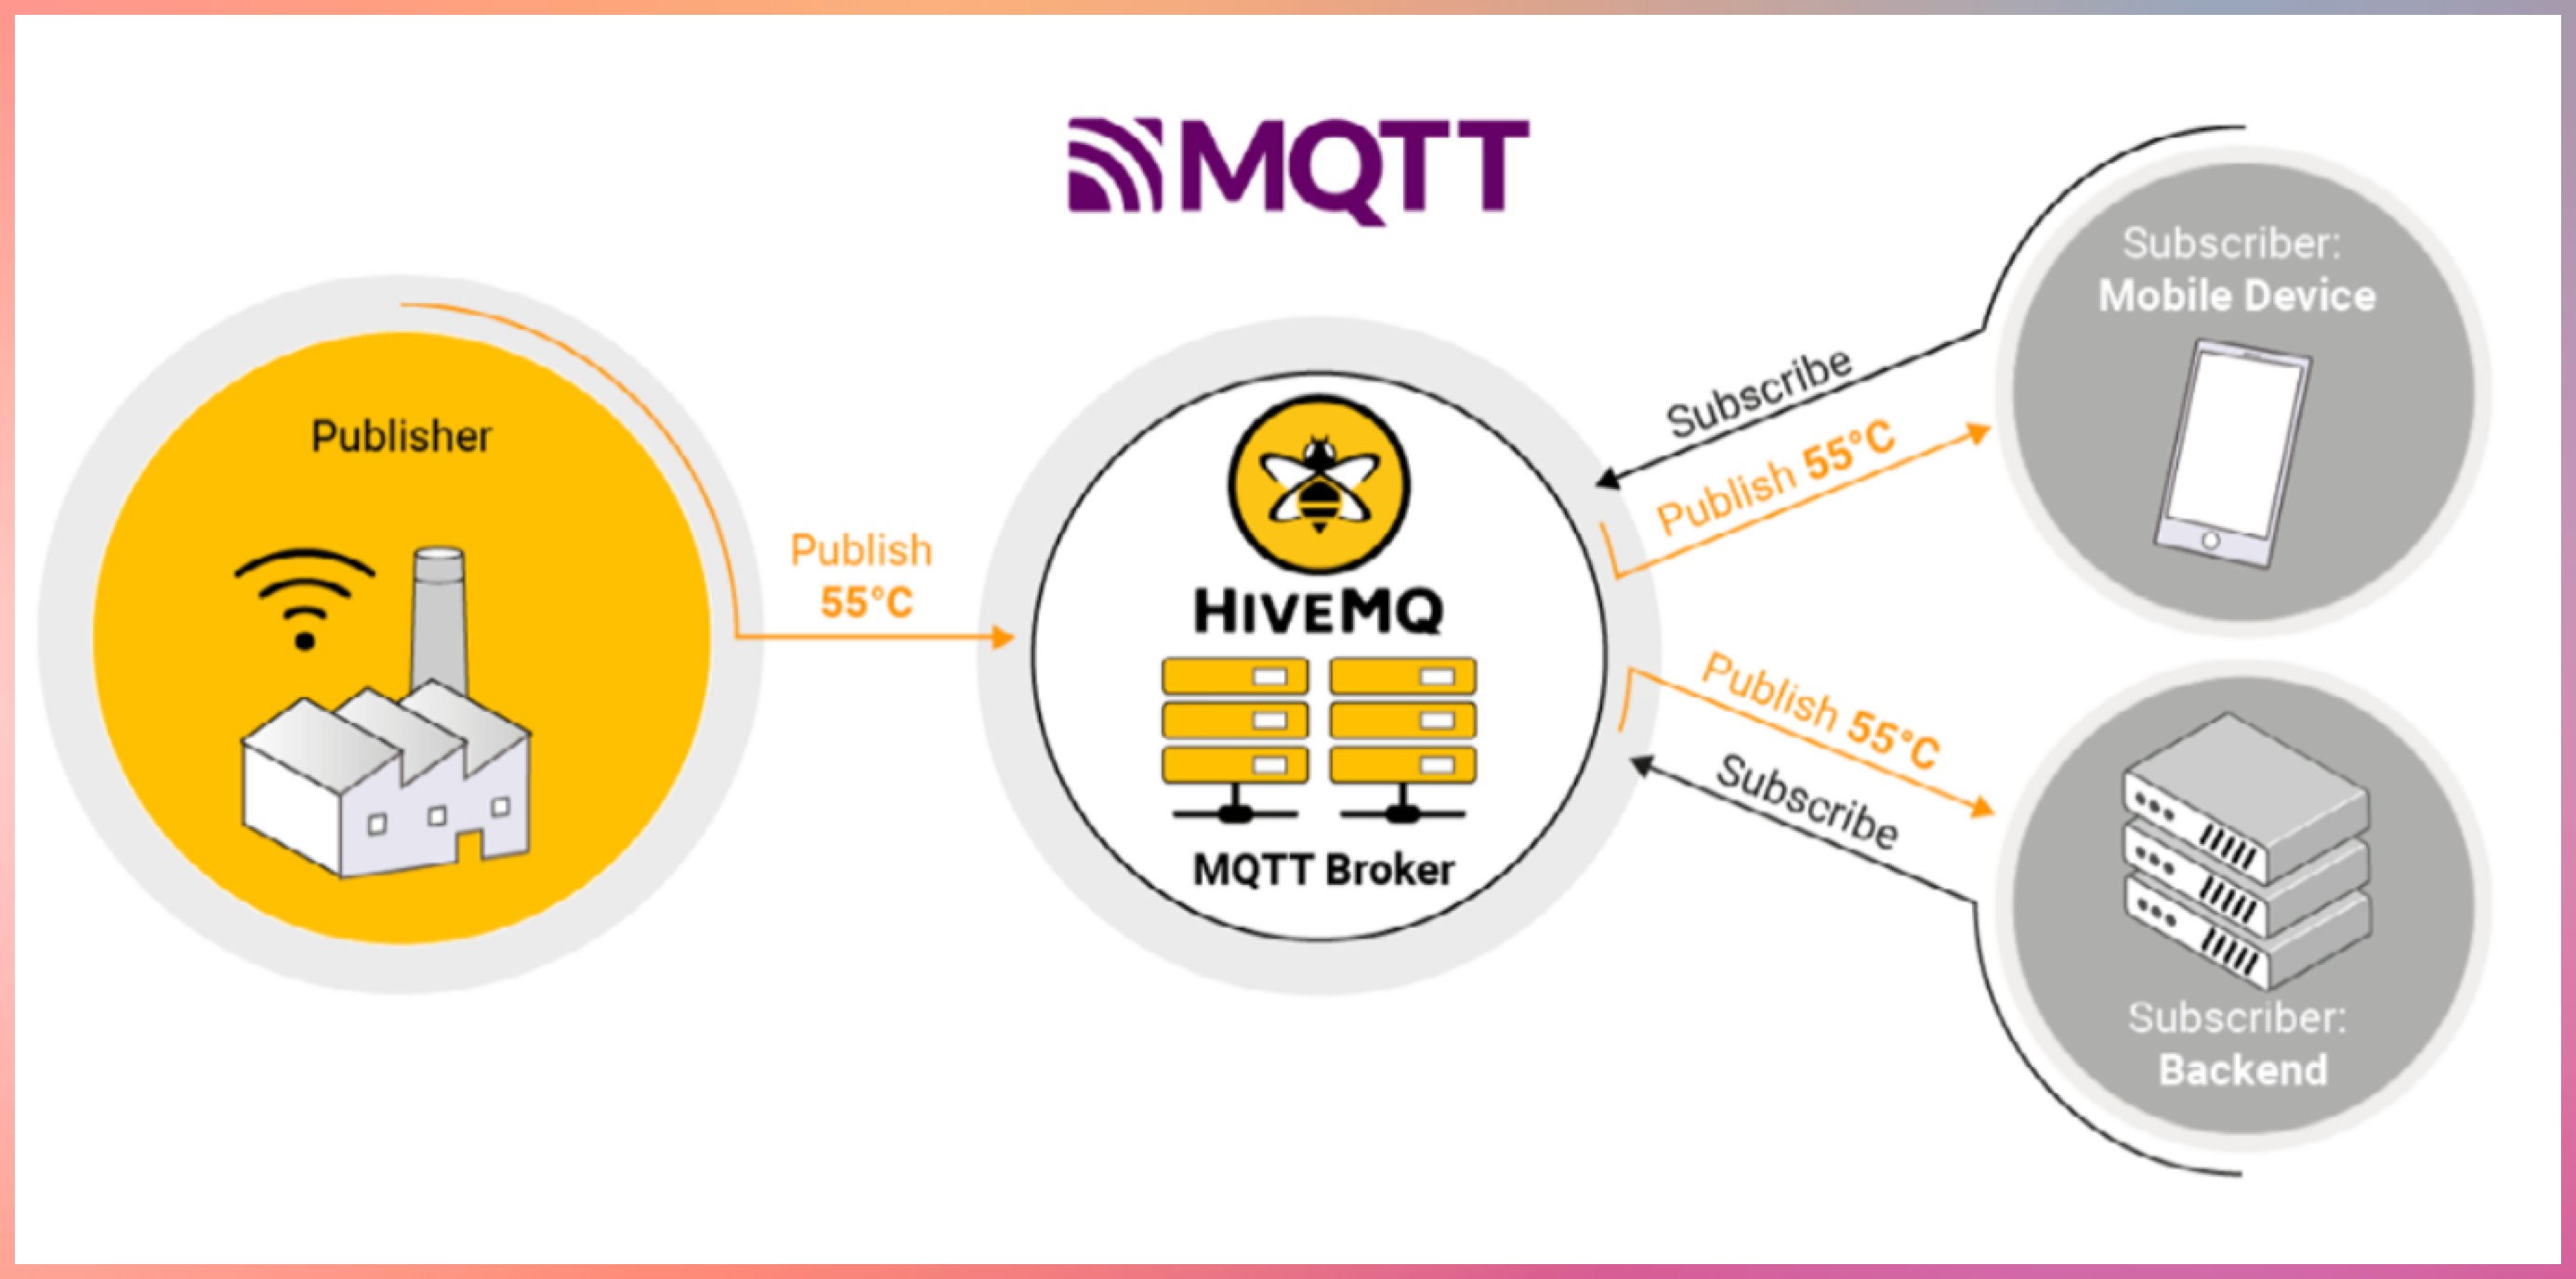
- Publish–Subscribe Model
- MQTT uses a publish–subscribe architecture.
- Devices publish messages to a broker
- Devices subscribe to topics they are interested in
- The broker routes messages to matching subscribers
- Devices never communicate directly with each other.
MQTT Components
MQTT Broker
- The broker is the central message hub.
- Think of it like a post office:
- Receives messages from publishers
- Filters messages by topic
- Delivers messages to subscribers
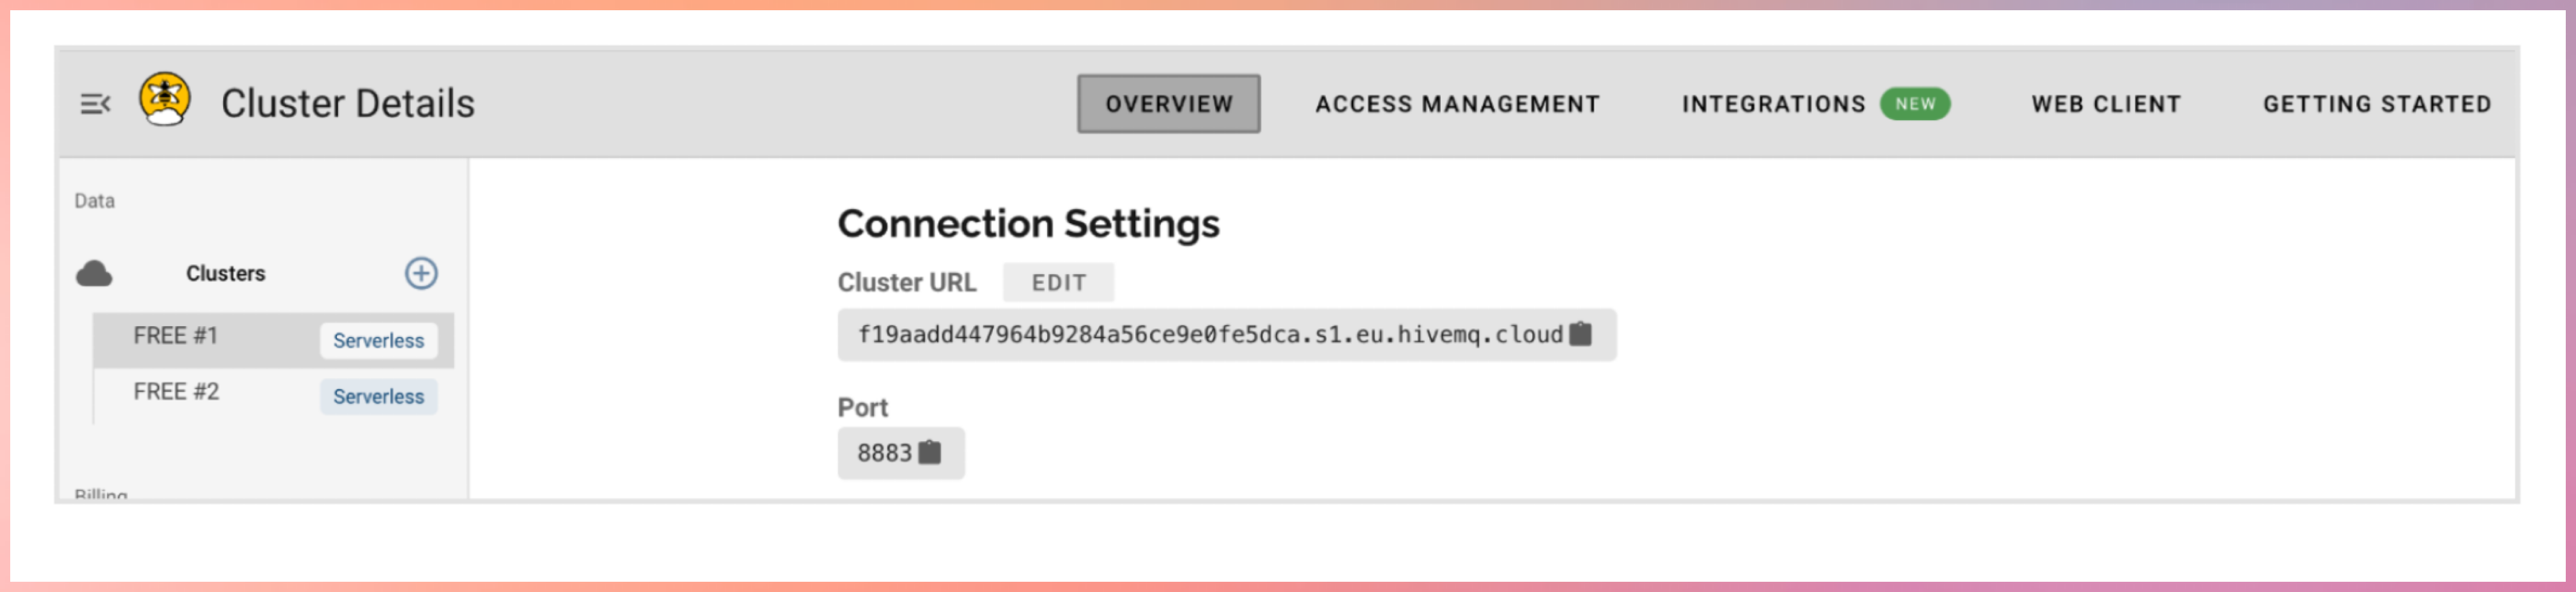
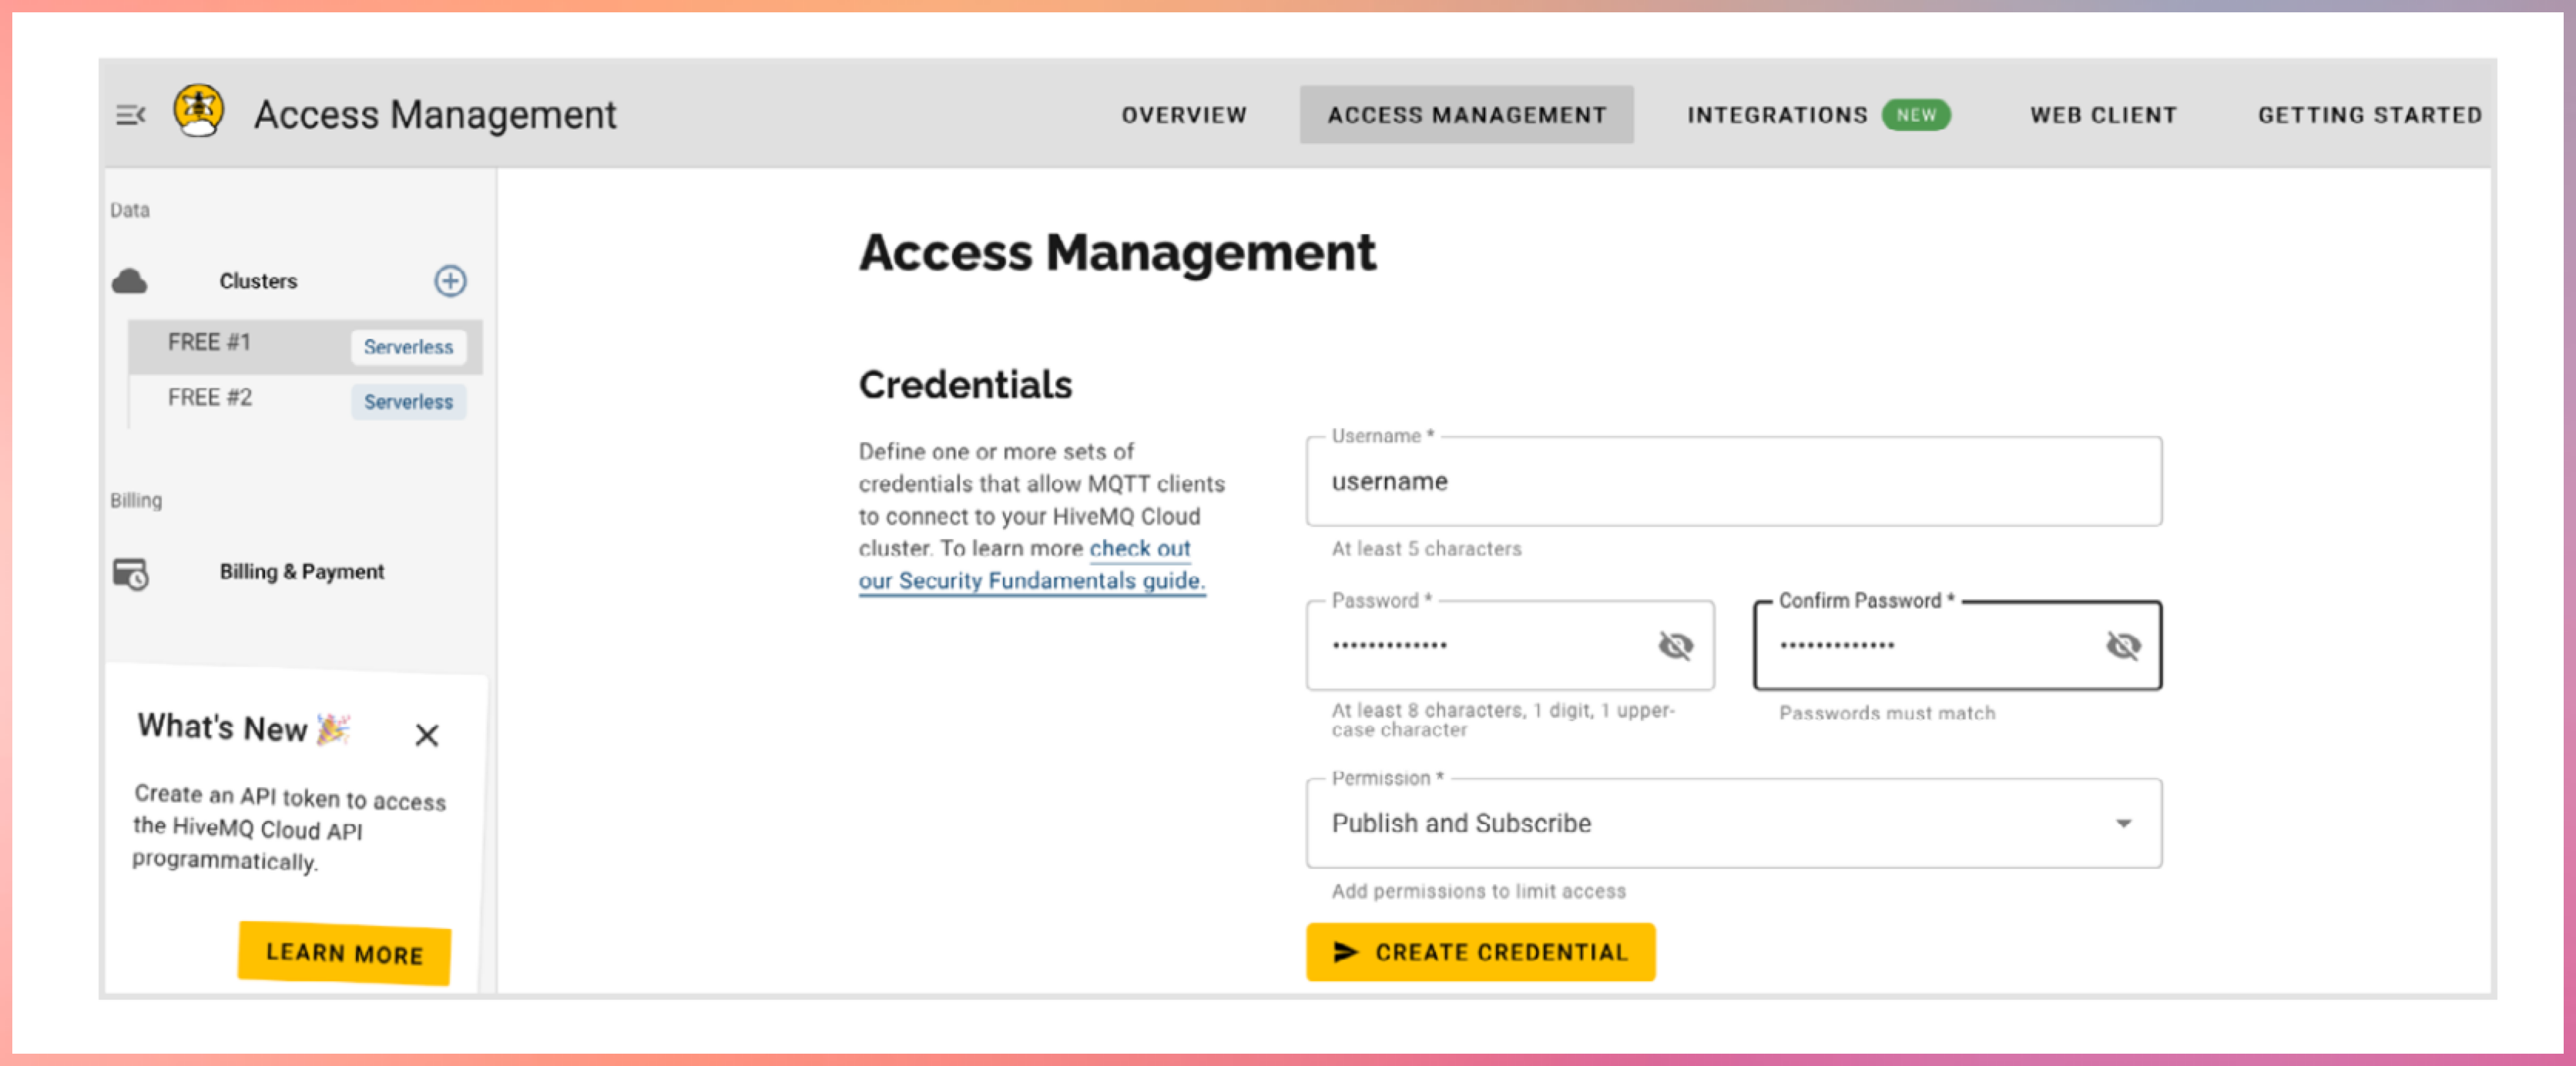
Common brokers:
- Open source: Mosquitto
- Commercial: HiveMQ
Register with hivemq cloud
Publishers
Devices that send data
Example:
- Temperature sensor publishing readings
- Garage door device publishing open or close status
Subscribers
Devices that receive data
Example:
- Mobile app receiving temperature updates
- Backend system monitoring device health
Topics
Topics are hierarchical strings used to route messages.
Example:
home/livingroom/temperature
- Publishers send messages to a topic
- Subscribers subscribe to topics of interest
- The broker matches topics and delivers messages
Topic Wildcards
MQTT supports topic wildcards for flexible subscriptions.
Single-level wildcard
- Matches exactly one level
Example:
home/+/temperature
Multi-level wildcard
Matches all remaining levels
Example:
home/#
Key Features of MQTT
- Lightweight and Efficient
- Small packet size
- Minimal protocol overhead
- Ideal for constrained devices
- Bidirectional Communication
- Devices can both publish and subscribe
- Enables real-time updates and control
- Highly Scalable
- Supports thousands to millions of devices
- Widely used in large IoT and IIoT deployments
- Configurable Reliability
- Supports different Quality of Service levels
- Lets you trade reliability for performance
- Session Persistence and Buffering
- Brokers can store messages when clients disconnect
- Messages are delivered when clients reconnect
- Security Support
- MQTT itself has no built-in security
- Security is added using:
- TLS encryption
- Client authentication
- Access control at the broker
graph LR
    B[MQTT Broker]
    CD1[Client Device]
    CD2[Client Device]
    CD3[Client Device]
    CD4[Client Device]
    CD5[Client Device]

    CD1 -->|Topic 2| B
    CD1 -->|Topic 1| B
    CD2 -->|Topic 2| B

    B -->|Topic 2| CD3
    B -->|Topic 1
    Topic 3| CD4
    B -->|Topic 3| CD5
Quality of Service (QoS)
MQTT defines three QoS levels for message delivery. QoS is coordinated by the broker.
QoS 0 – At most once
- No acknowledgment
- Messages may be lost
- Lowest latency
- Use when message loss is acceptable
- Example: Temperature sensor every 2 seconds. High volume of data.
QoS 1 – At least once
- Message delivery is acknowledged
- Messages may be duplicated
- Commonly used in IoT
- Use when Message loss is unacceptable and duplicate messages can be handled
- Deduplication handled by message id.
- Example: Smart meter readings. Door open/close.
QoS 2 – Exactly once
- Guarantees single delivery
- Highest overhead
- Increased latency
- Use only when message loss and duplication are both unacceptable.
- Example: control commands, critical alerts, factory machine shutdown.
Higher QoS levels consume more network and compute resources.
Pub QoS 1, Sub QoS 0 → delivered as QoS 0
Pub QoS 2, Sub QoS 1 → delivered as QoS 1
Pub QoS 0, Sub QoS 2 → delivered as QoS 0
Message Persistence
Message persistence ensures messages are not lost when clients disconnect.
Non-persistent (Default)
- Messages are not stored
- Lost if subscriber is offline
- Suitable for non-critical data
Queued Persistent
- Broker stores messages for offline clients
- Messages delivered when client reconnects
Similar to: Emails waiting on a server until you connect
Persistent with Acknowledgment
- Messages stored until acknowledged
- Messages resent until confirmation
Used when: Guaranteed processing is required
Persistent Session Stores
When persistence is enabled, brokers may store:
- Client ID
- Subscription list
- Unacknowledged QoS messages
- Queued messages
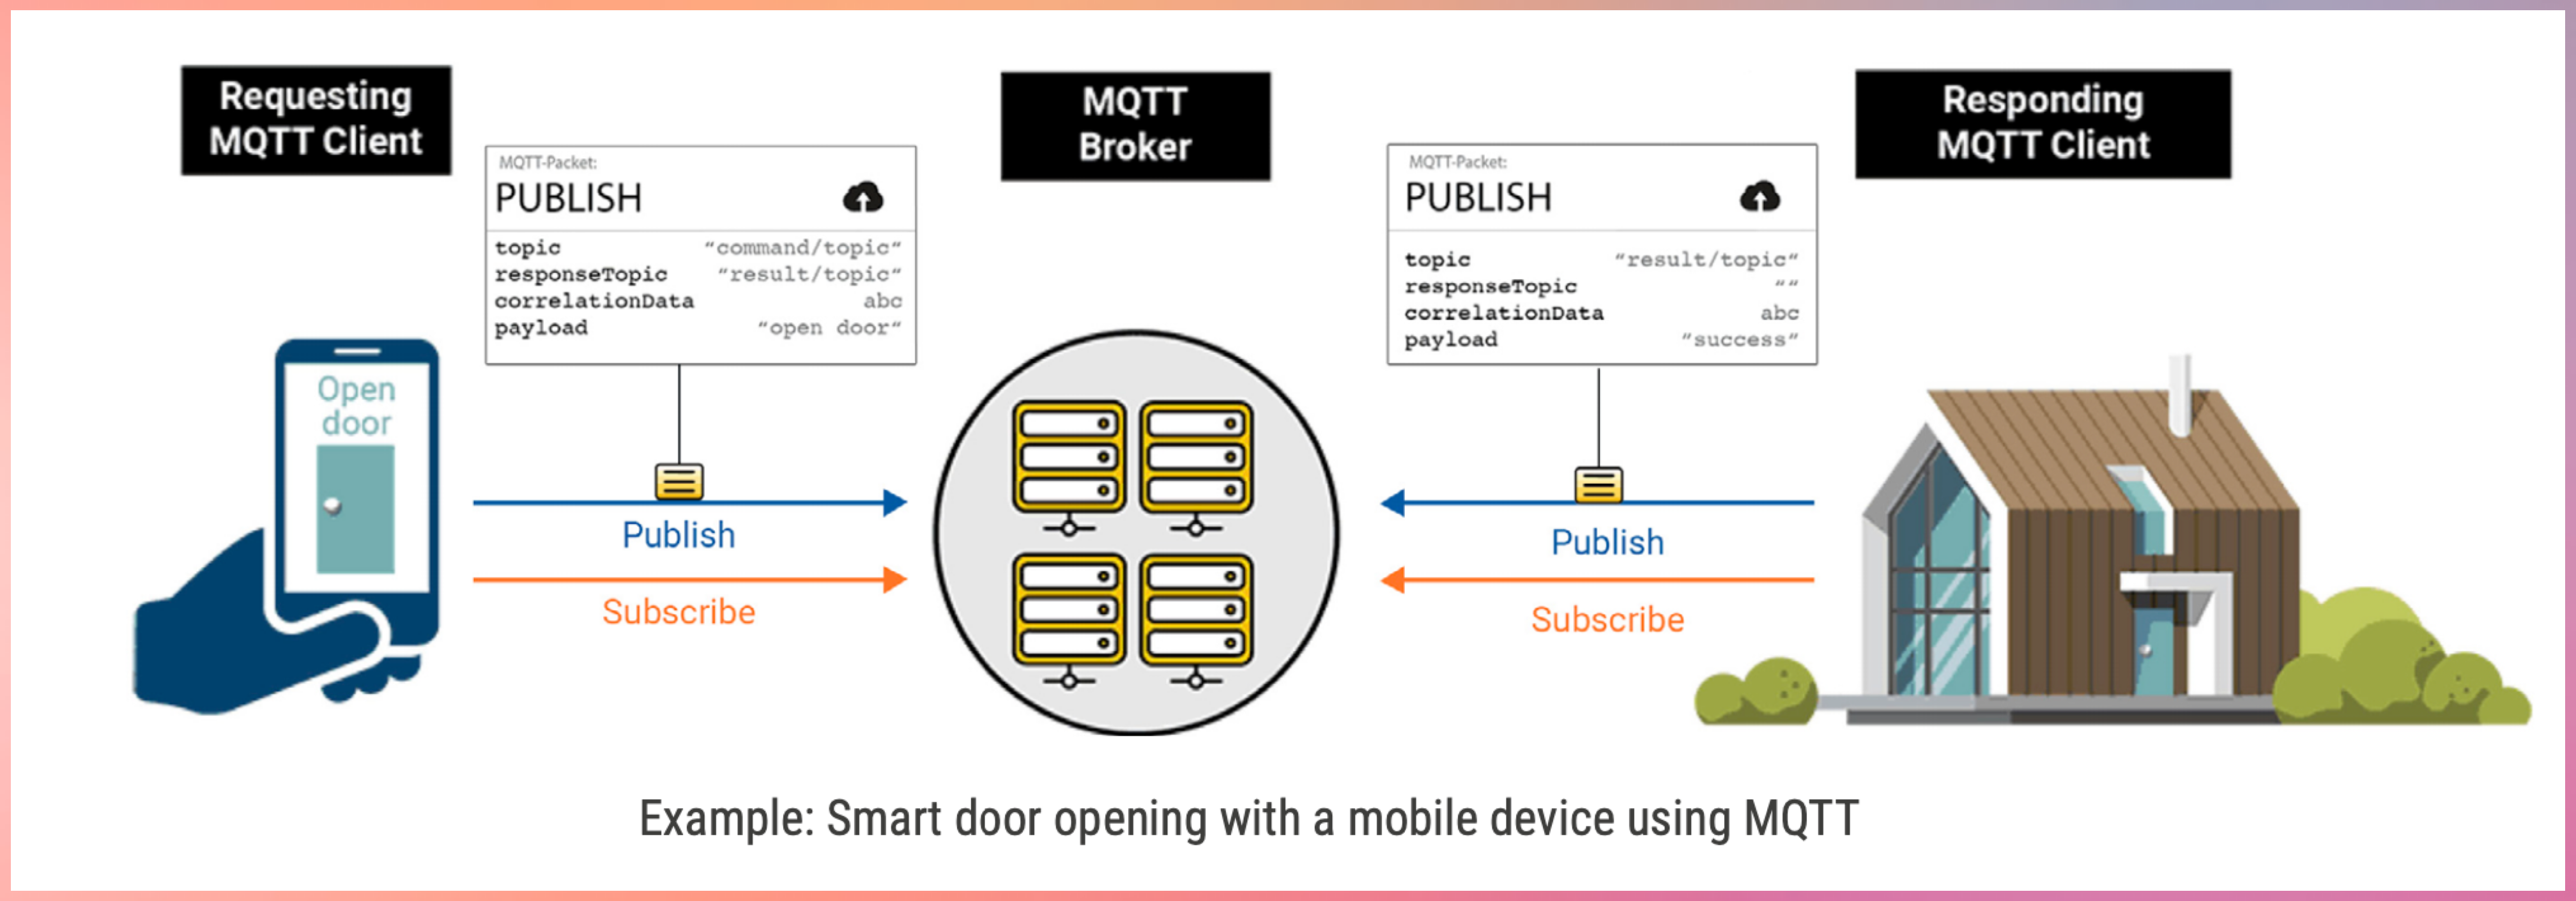
CONN Car Company
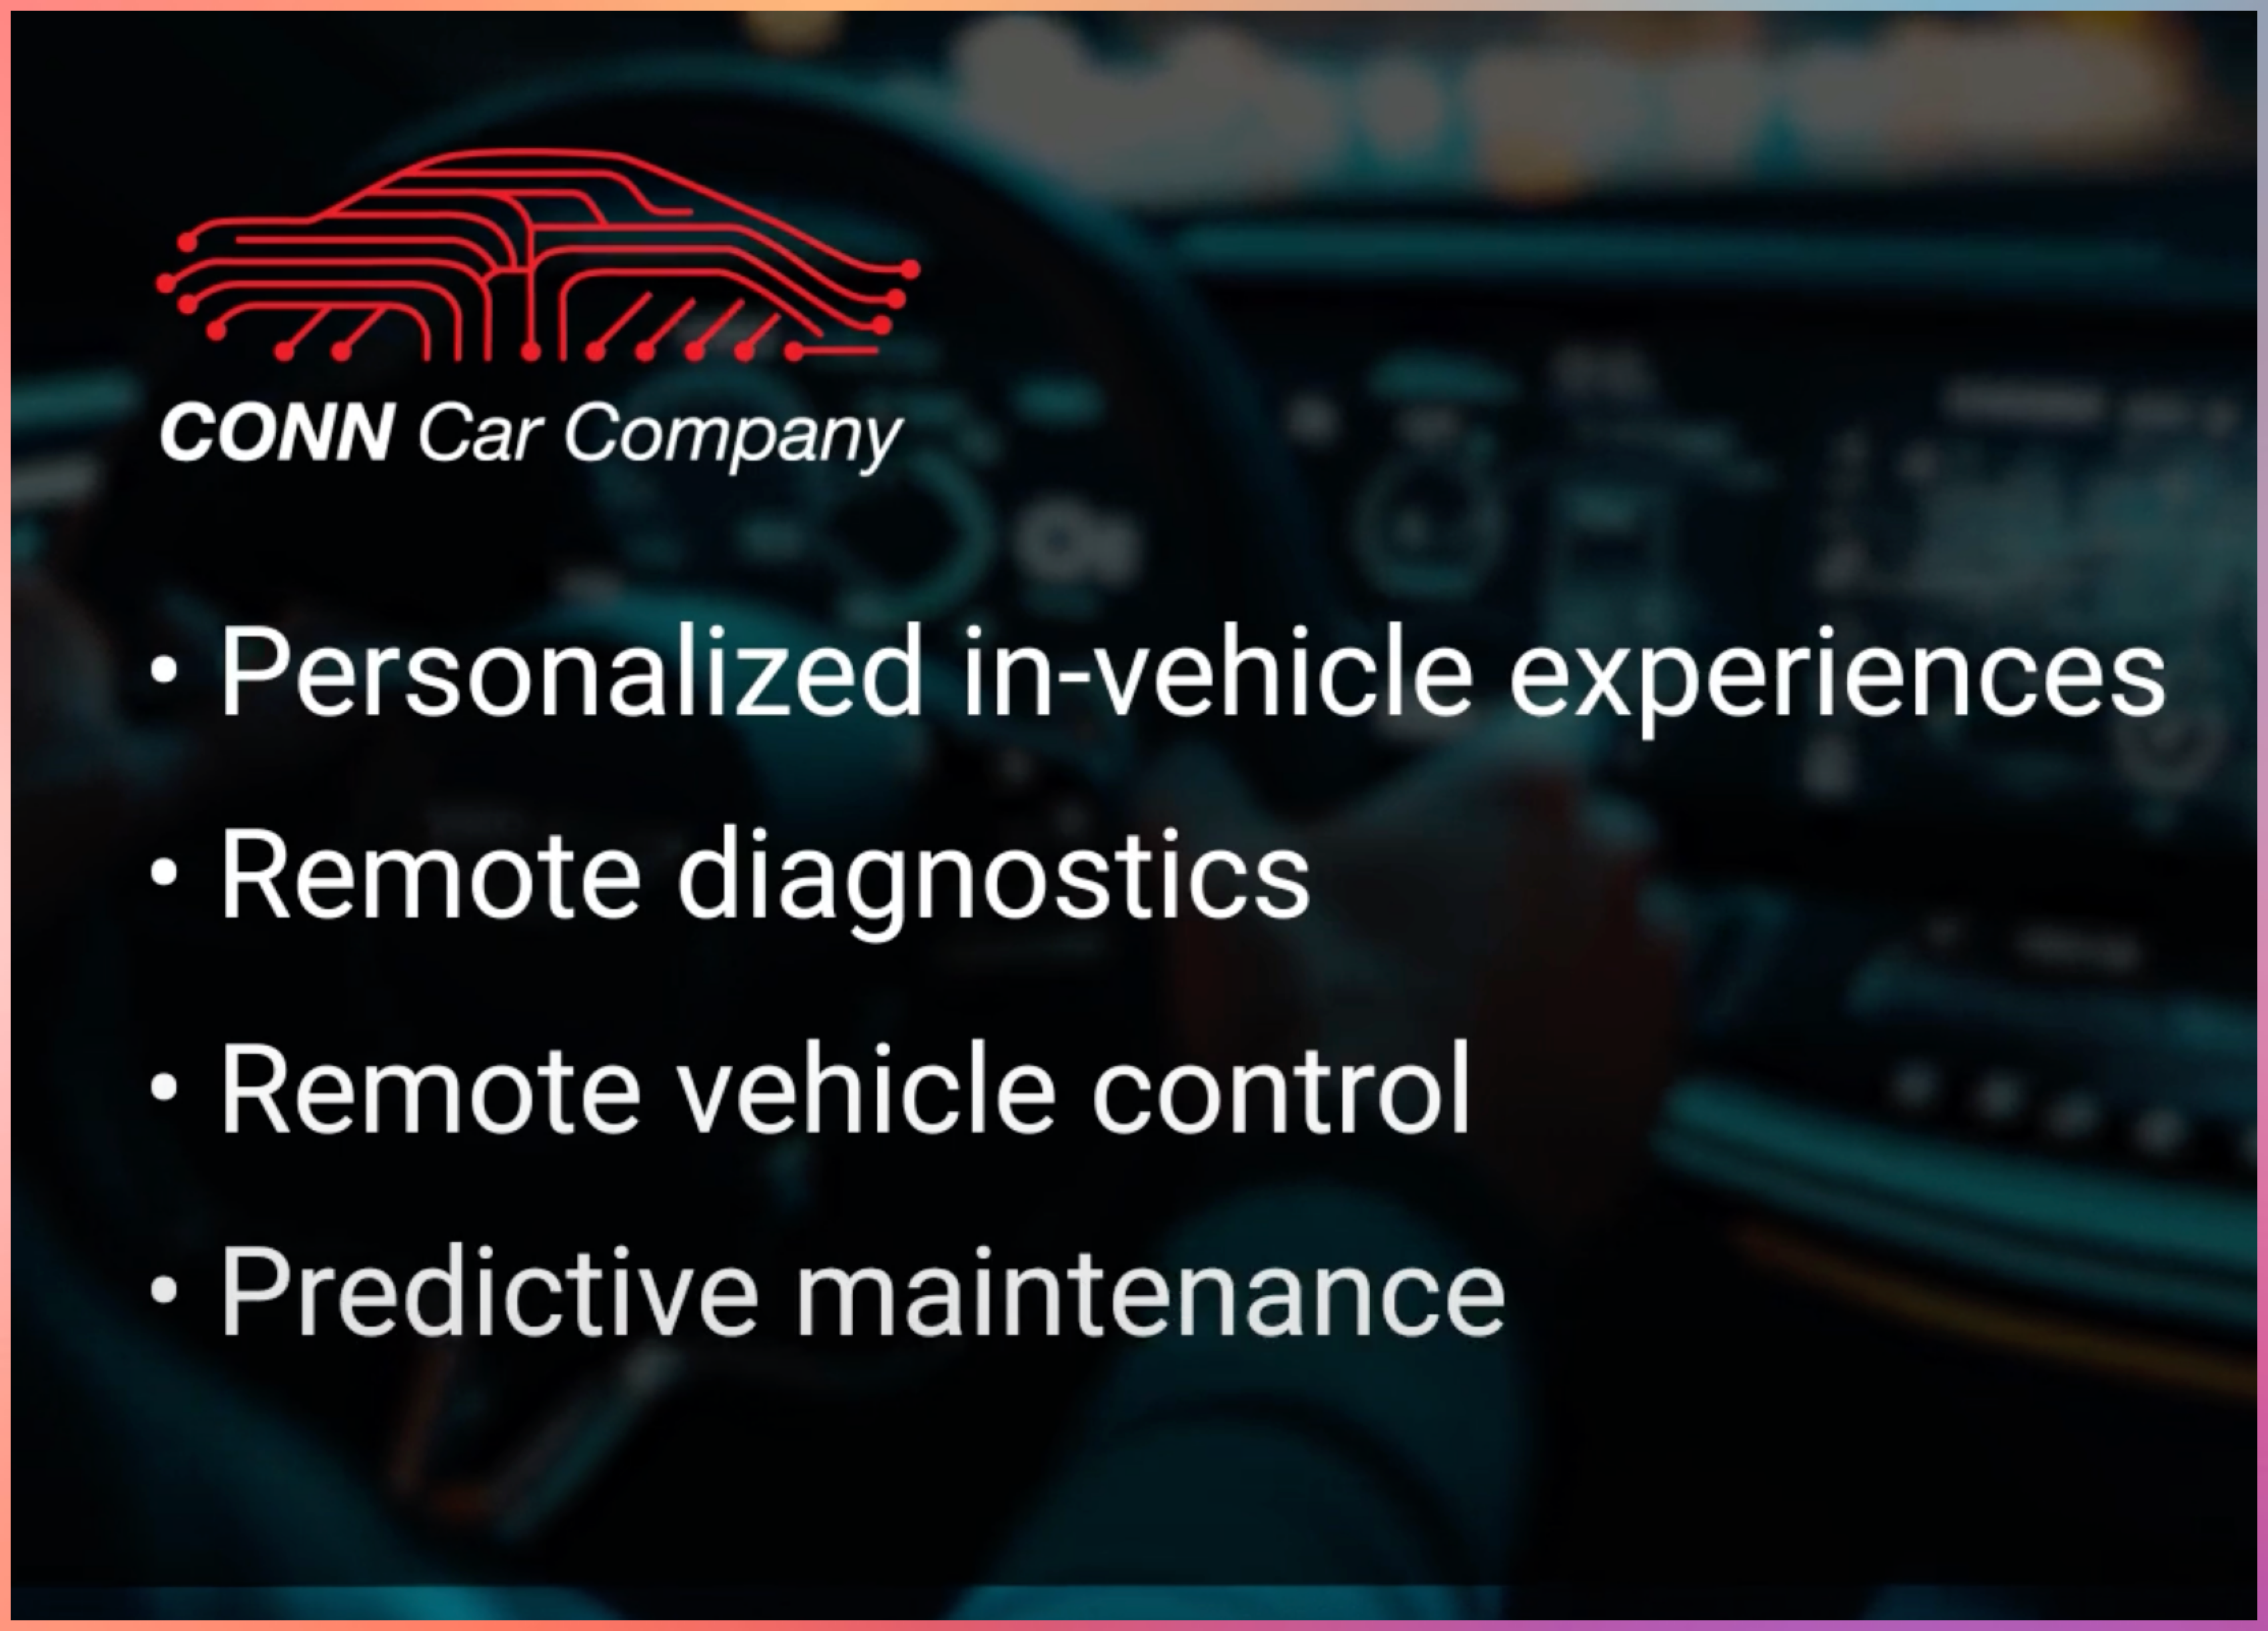
Vehicles are shifting from hardware to Software Defined Vehicles. (EVs like Tesla)
MQTT is used for:
- Telemetry streaming
- Remote diagnostics
- Over-the-air updates
- Feature enablement
EV companies use MQTT to connect vehicles, cloud systems, and mobile apps reliably.
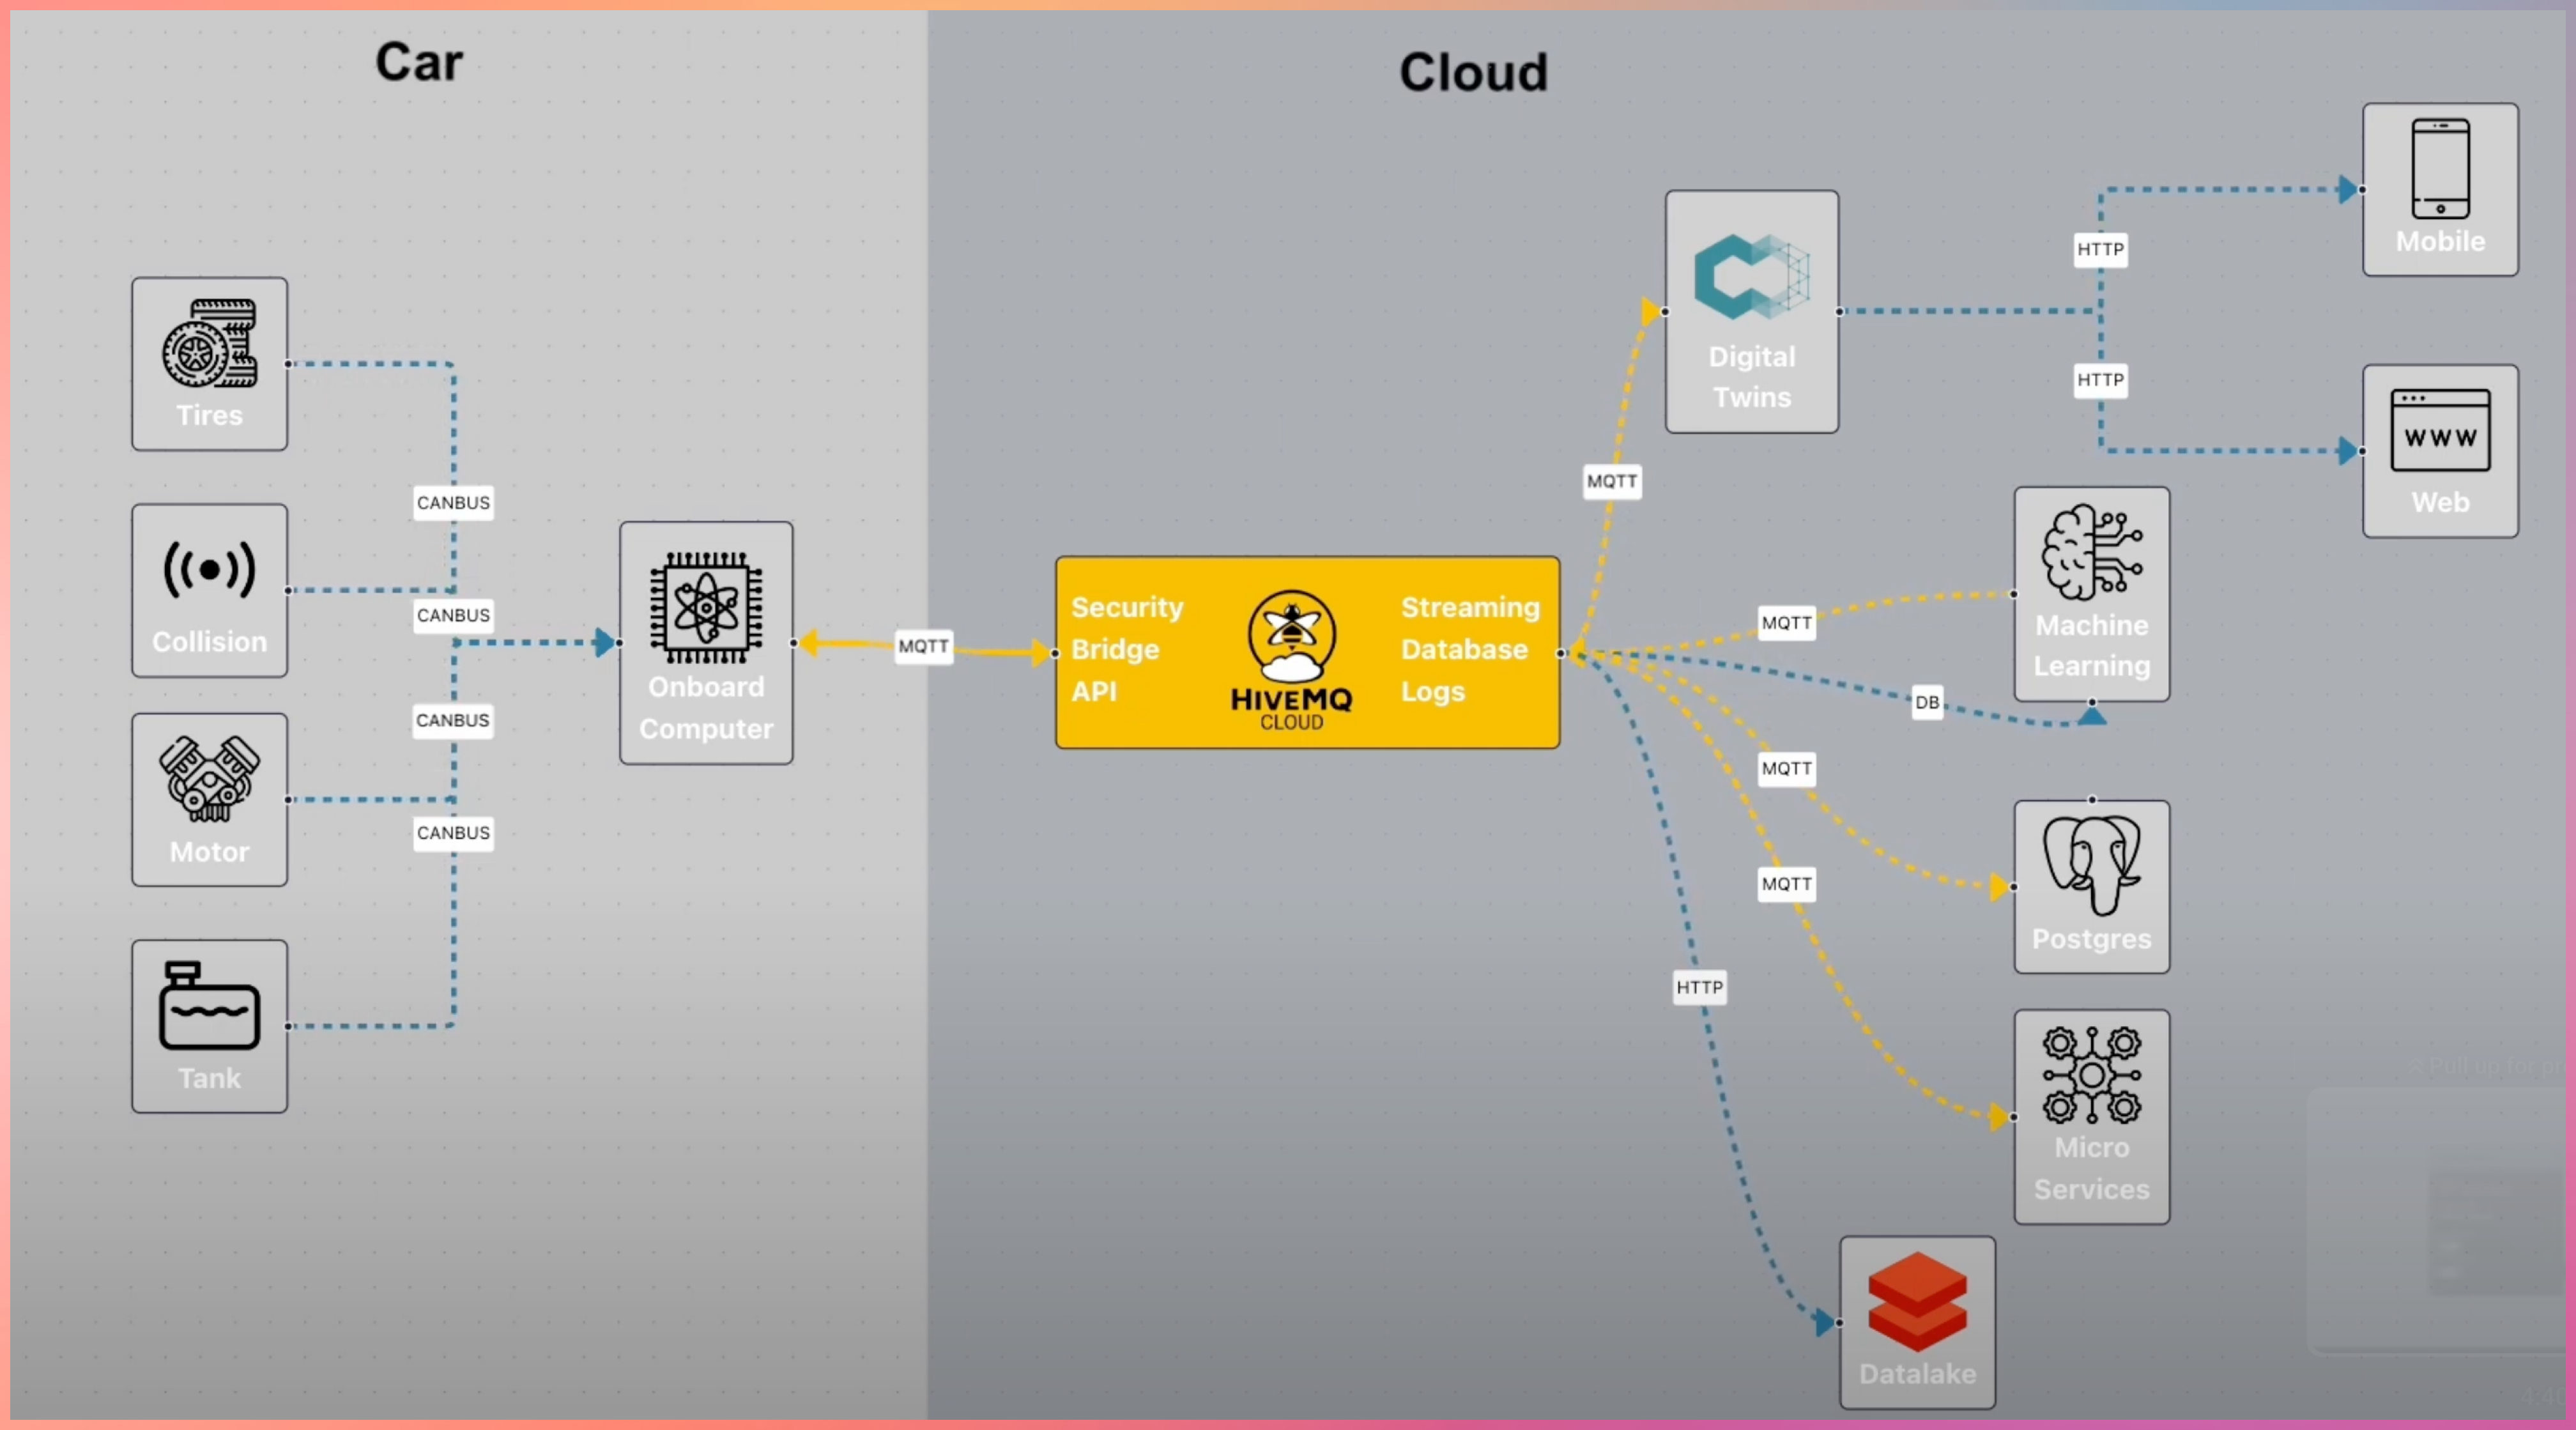

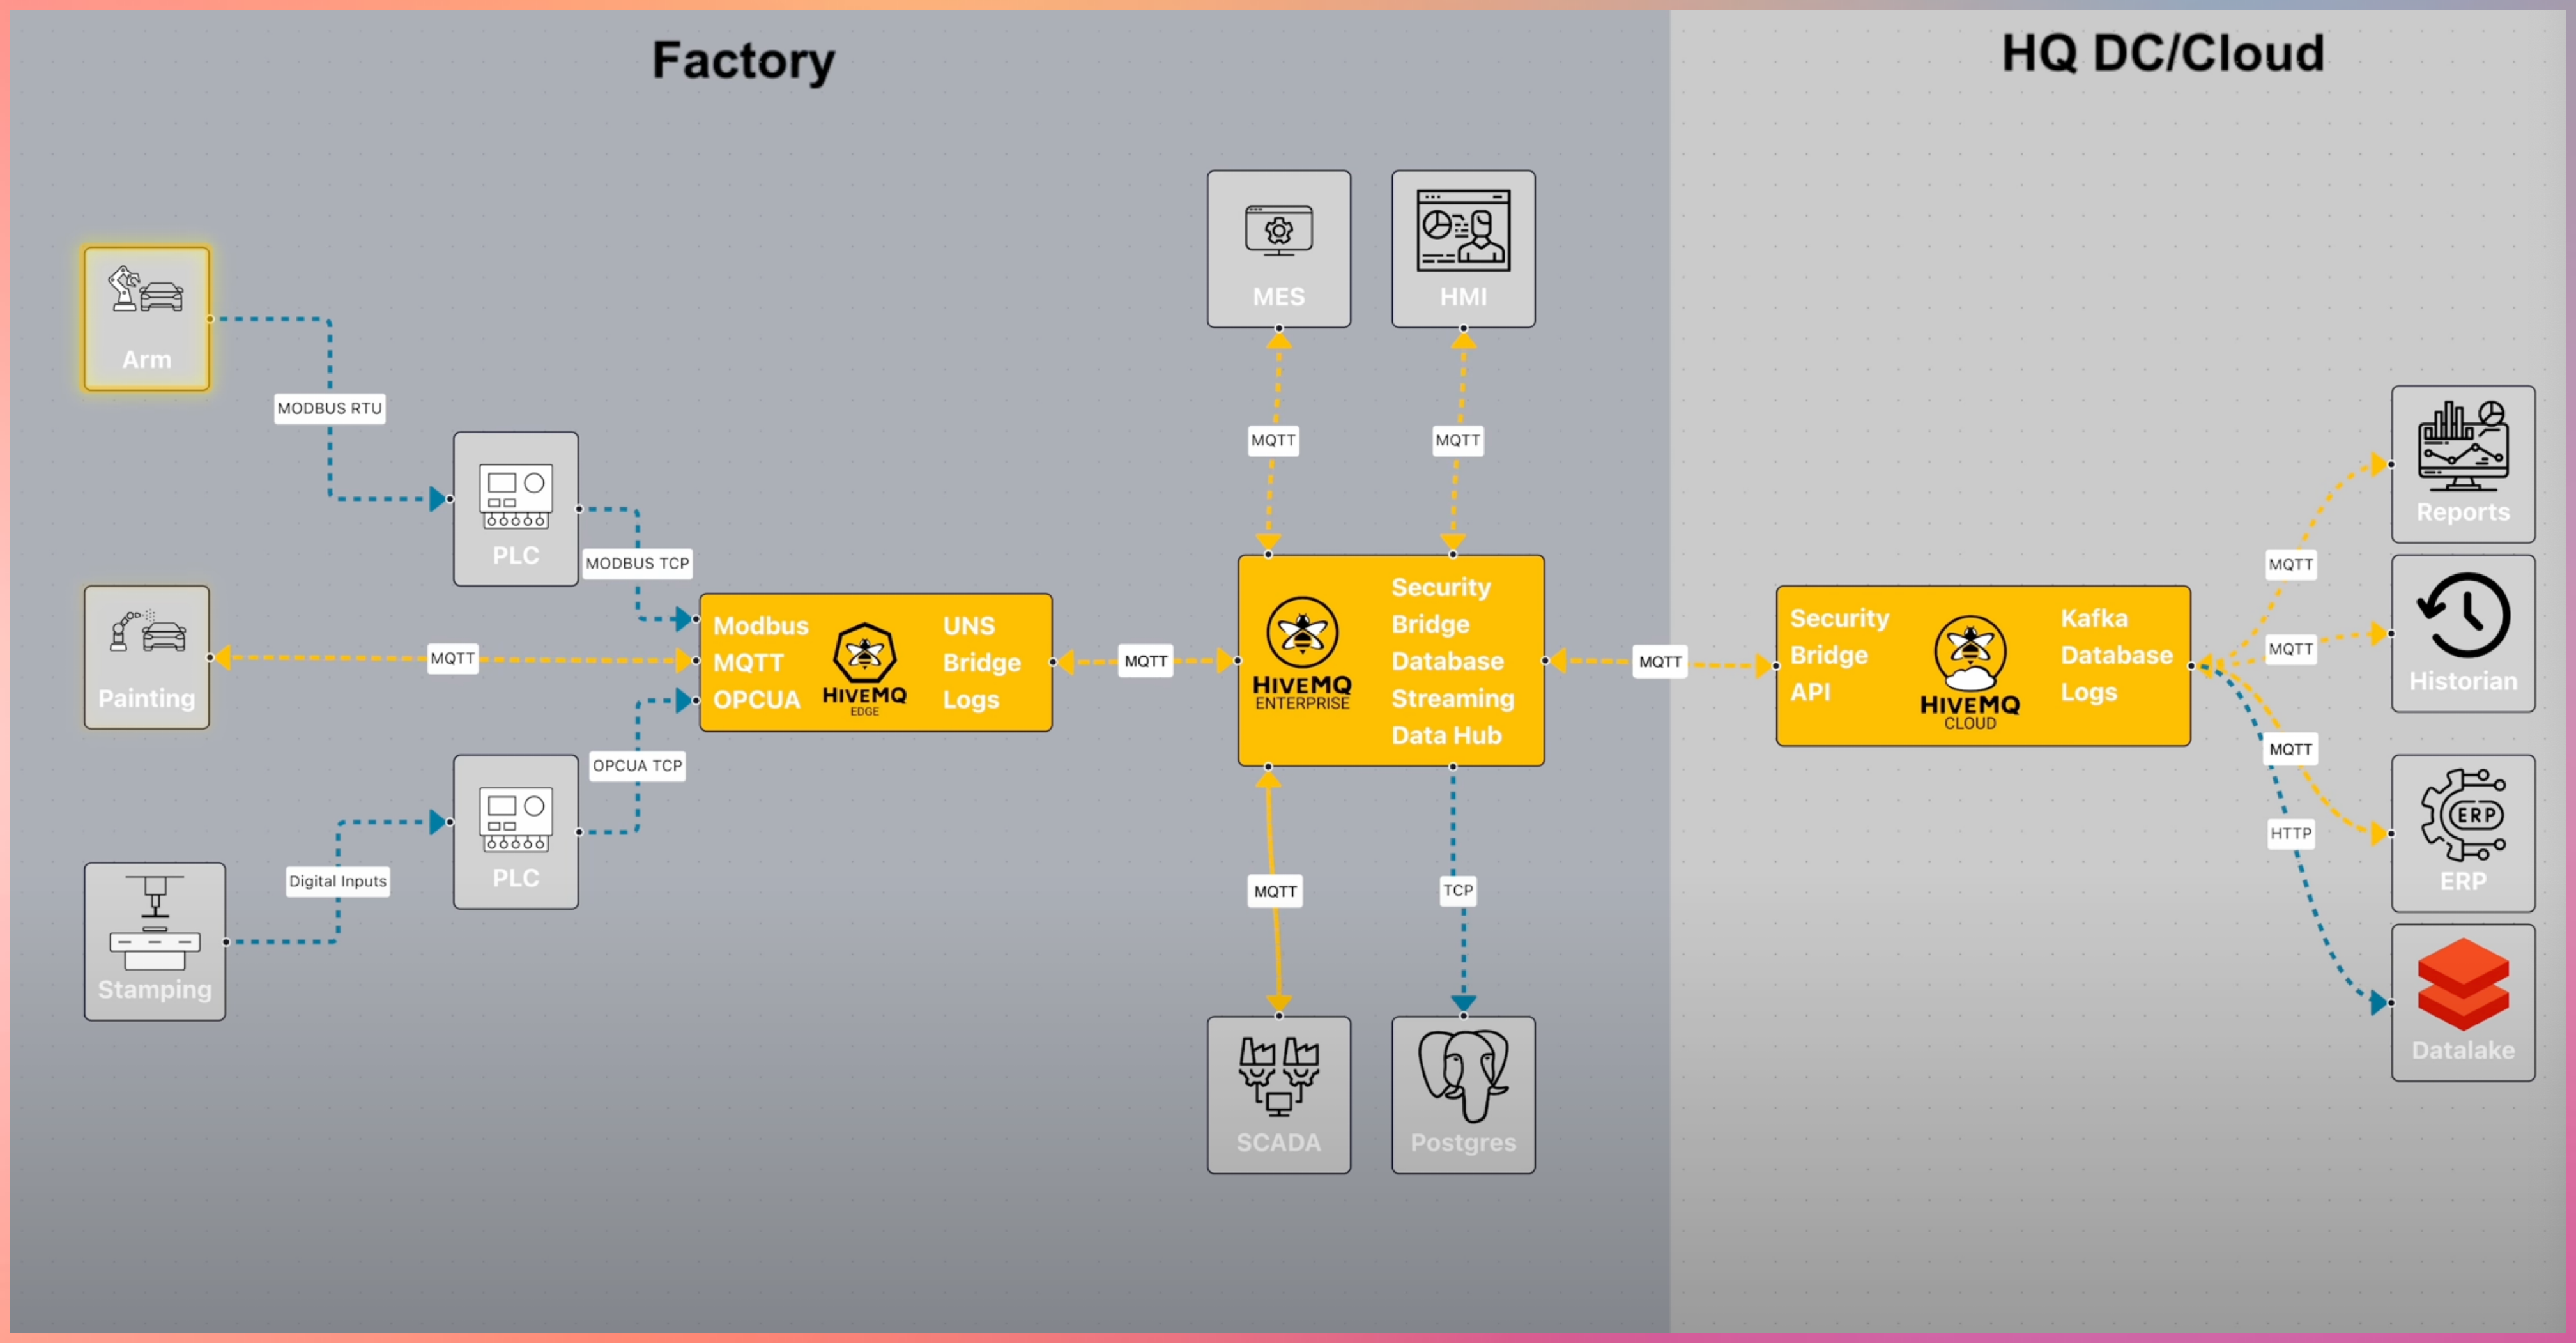
MQTT doesn’t stop here
MQTT integrates with:
- Cloud platforms
- Data pipelines
- Streaming systems
- Analytics and monitoring tools
Source YouTube Links
(https://www.youtube.com/watch?v=brUsw_H9Gq8)
(https://www.youtube.com/watch?v=k103_LhF05w)
Advanced Learning about Brokers
https://www.hivemq.com/blog/mqtt-brokers-beginners-guide/
Download the Open Source Broker to learn more https://mosquitto.org/
#mqtt #http #broker #publisher #subscriber
1: http://hivemq.com
[Avg. reading time: 8 minutes]
JSON
JSON (JavaScript Object Notation) is a lightweight, text-based data format that’s easy to read for both humans and machines. It was derived from JavaScript but is now language-independent, making it one of the most popular formats for data exchange between applications. Key Concepts:
What is JSON Used For?
- Storing configuration settings
- Exchanging data between web servers and browsers
- APIs (Application Programming Interfaces)
- Storing structured data in files or databases
- Mobile app data storage
JSON Data Types:
Strings: Text wrapped in double quotes
{"name": "Rachel Green"}
Numbers: Integer or floating-point
{"age": 27, "height": 5.5}
Booleans: true or false
{"isStudent": true}
null: Represents no value
{"middleName": null}
Arrays: Ordered lists of values
{
  "hobbies": ["shopping", "singing", "swimming"]
}
Objects: Collections of key-value pairs
{
  "address": {
    "street": "123 Main St",
    "city": "NYC",
    "zipCode": "10001"
  }
}
Important Rules:
- All property names must be in double quotes
- Values can be strings, numbers, objects, arrays, booleans, or null
- Commas separate elements in arrays and properties in objects
- No trailing commas allowed
- No comments allowed in JSON
- Must use UTF-8 encoding
Example
{
  "studentInfo": {
    "firstName": "Monica",
    "lastName": "Geller",
    "age": 22,
    "isEnrolled": true,
    "courses": [
      {
        "name": "Web Development",
        "code": "CS101",
        "grade": 95.5
      },
      {
        "name": "Database Design",
        "code": "CS102",
        "grade": 88.0
      }
    ],
    "contact": {
      "email": "monica.g@friends.com",
      "phone": null,
      "address": {
        "street": "456 College Ave",
        "city": "Columbia",
        "state": "NY",
        "zipCode": "13357"
      }
    }
  }
}
Dont’s with JSON
- Using single quotes instead of double quotes
- Not enclosing property names in quotes
- Adding trailing commas
- Missing closing brackets or braces
- Using undefined or functions (not allowed in JSON)
- Adding comments (not supported in JSON)
Best Practices
- Always validate JSON using a JSON validator tool
- Pay attention to proper nesting of objects and arrays
- Ensure all opening brackets/braces have matching closing ones
- Check for proper use of commas
camelCase (e.g., firstName):
- Most popular in JavaScript/JSON
- Easy to read and type
- Matches JavaScript convention
Example:
{
  "firstName": "John",
  "lastLoginDate": "2024-12-20",
  "phoneNumber": "555-0123"
}
snake_case (underscores, e.g., first_name):
- Popular in Python and SQL
- Very readable
- Clear word separation
Example:
{
  "first_name": "John",
  "last_login_date": "2024-12-20",
  "phone_number": "555-0123"
}
kebab-case (hyphens, e.g., first-name):
- Common in URLs and HTML attributes
- NOT recommended for JSON
- Can cause issues because hyphen is also the subtraction operator
- Requires bracket notation to access in JavaScript
Example of why it’s problematic:
// This won't work
data.first-name  // JavaScript interprets as data.first minus name

// Must use bracket notation
data["first-name"]  // Works but less convenient
[Avg. reading time: 9 minutes]
CBOR (Concise Binary Object Representation)
CBOR is a compact binary data format designed for efficiency, speed, and low overhead. It keeps JSON’s simplicity while delivering 30–50% smaller payloads and faster serialization, making it ideal for IoT, embedded systems, and high-throughput APIs.
https://cbor.dev
Why CBOR
JSON is human-friendly but wasteful for machines.
CBOR is Binary
- Binary encoding instead of text
- Smaller payloads
- Faster parsing
- Native binary support
- Better fit for constrained environments
Use CBOR when:
- Bandwidth is expensive
- Latency matters
- Devices are constrained
- Message rates are high
Key Features
Binary Format
- Compact payloads
- Lower bandwidth usage
- Faster transmission
Self-Describing
- Encodes type information directly
- No external schema required to decode
Schema-Less (Schema Optional)
- Works like JSON
- Supports validation using CDDL (Consise Data Definition Language)
Fast Serialization & Parsing
- No expensive string parsing
- Lower CPU overhead
Extensible
- Supports semantic tags for:
- Date / Time
- URIs
- Application-specific meanings
Data Types & Structure
CBOR natively supports JSON-like data structures:
Primitive Types:
- Integers (positive, negative)
- Byte strings (bstr)
- text strings (tstr)
- Floating-point numbers (16,32,64 bit)
- Booleans (true, false)
- null, and undefined values.
Composite Types:
- Arrays (ordered lists)
- Maps (key-value pairs, similar to JSON objects)
Semantic Tags:
- Optional tags to add meaning (e.g., Tag 0 for date/time strings, Tag 32 for URIs).
Example: CBOR vs. JSON
JSON Object
{
  "id": 123,
  "name": "Temperature Sensor",
  "value": 25.5,
  "active": true
}
CBOR to/from JSON
CBOR Playground
CBOR Encoding (Hex Representation)
B9 0004                                 # map(4)
   62                                   # text(2)
   6964                                 # "id"
   18 7B                                # unsigned(123)
   64                                   # text(4)
   6E616D65                             # "name"
   72                                   # text(18)
   54656D70657261747572652053656E736F72 # "Temperature Sensor"
   65                                   # text(5)
   76616C7565                           # "value"
   FB 4039800000000000                  # primitive(4627870829588250624)
   66                                   # text(6)
   616374697665                         # "active"
   F5                                   # primitive(21)
Size Comparison:
- JSON: ~70 bytes.
- CBOR: ~45 bytes (35% smaller)
| Feature | CBOR | JSON/XML |
|---|---|---|
| Payload Size | Compact binary encoding (~30-50% smaller). | Verbose text-based encoding |
| Parsing Speed | Faster (no string parsing). | Slower (text parsing required). |
| Data Types | Rich (supports bytes, floats, tags). | Limited (no native byte strings). |
| Schema Flexibility | Optional schemas (CDDL). | Often requires external schemas. |
| Human Readability | Requires tools to decode. | Easily readable. |
Limitations
Human-Unreadable: Requires tools (e.g., CBOR Playground) to decode.
Schema Validation: While optional, validation requires external tools like CDDL (Concise Data Definition Language).
When to Use CBOR
-
Low-bandwidth networks (e.g., IoT over LoRaWAN or NB-IoT).
-
High-performance systems needing fast serialization.
-
Interoperability between devices and web services.
Demo Code
git clone https://github.com/gchandra10/python_cbor_examples
CBOR + MQTT = Perfect Match
CBOR is ideal for MQTT payloads
Demonstrate how cbor can be used with mqtt.
[Avg. reading time: 4 minutes]
XML
XML (eXtensible Markup Language) is moderately popular in IoT.
With JSON gaining popularity, XML is still used in Legacy systems and regulated environments such as Govt/Military systems.
It uses XSD (Extended Schema Definition) to enforce strict data validation, ensuring integrity in critical applications like healthcare.
Legacy systesm use SOAP-based web services (newer ones use REST API) often use XML, rquiring IoT devices to adopt XML for compatibility.
<sensorData>
    <deviceId>TEMP_SENSOR_01</deviceId>
    <location>living_room</location>
    <reading>
        <temperature>23.5</temperature>
        <unit>Celsius</unit>
        <timestamp>2025-01-29T14:30:00</timestamp>
    </reading>
</sensorData>
Limitations of XML in IoT
- Verbosity: Larger payloads increase bandwidth and storage costs.
- Processing Overhead: Parsing XML can strain low-power IoT devices.
- Modern Alternatives: JSON and binary formats (e.g., Protocol Buffers) are more efficient for most IoT use cases.
Here’s the XML vs. JSON Trade-offs comparison formatted as a markdown table:
| Factor | XML | JSON |
|---|---|---|
| Payload Size | Verbose (larger files) | Compact (better for low-bandwidth IoT) |
| Parsing Speed | Slower (complex structure) | Faster (lightweight parsing) |
| Validation | Mature (XSD) | Growing (JSON Schema) |
| Adoption in New Projects | Rare (outside legacy/regulated use cases) | Dominant (preferred for new IoT systems) |
[Avg. reading time: 6 minutes]
TCP & UDP
- Transmission Control Protocol
- User Datagram Protocol
TCP and UDP are transport protocols. Their only job is to decide how data moves across the network.
Common IoT problems
- Sensors generate data continuously
- Networks are unreliable
- Devices are constrained
- Some data losses are acceptable and some are not.
UDP
- Sends data without confirmation
- No retries
- No ordering
- No connection
- Very low overhead
UDP Usecases in IOT
- Battery powered devices
- High frequency telemetry
- Small payloads
- Occasional loss is acceptable
- Speed matters more than accuracy
Typical IoT usage
- CoAP
- Device discovery
- Heartbeats
- Periodic measurements of Environmental sampling
Example
Smart street lighting
- Each lamp sends a heartbeat every 5 to 10 seconds
- Payload: device_id, status, battery, signal strength
- If ‘n’ heartbeats are missed, mark lamp as offline
- Losing one packet changes nothing.
Vehicle Telematics
- Fleet vehicles send location and health pings
- One ping every few seconds
- Next ping overrides the previous
TCP
- Confirms delivery
- Retries lost data
- Preserves order
- Maintains a connection
- Higher overhead
TCP use cases in IoT
- Data must not be lost
- Order matters
- Sessions last minutes or hours
Typical IoT usage
- MQTT
- HTTP
- HTTPS
- TLS secured pipelines
With MQTT
- Ordered messages
- Delivery guarantees using QoS
- Persistent sessions
- Broker side buffering
- Fan out to many subscribers
UDP vs TCP
| Question | UDP | TCP |
|---|---|---|
| Is delivery guaranteed | No | Yes |
| Is ordering preserved | No | Yes |
| Is it lightweight | Yes | No |
| Does MQTT use it | No | Yes |
| Does CoAP use it | Yes | No |
| Best for battery devices | Yes | Sometimes |
| Best for critical data | No | Yes |
          SENSOR
            |
            |
     -----------------
     |               |
   UDP Path         TCP Path
     |               |
 No confirmation   Confirmed delivery
 No retry          Retry on failure
 Possible loss     Ordered messages
     |               |
   CoAP           MQTT Broker
                     |
               Persistent sessions
                     |
                 Cloud Applications
````<span id='footer-class'>Ver 6.0.23</span>
<footer id="last-change">Last change: 2026-04-16</footer>````
[Avg. reading time: 8 minutes]
MessagePack
A compact binary data interchange format
What is MessagePack
MessagePack is an efficient binary serialization format designed for fast and compact data exchange between systems.
Core properties
- Compact compared to text formats like JSON
- Fast serialization and deserialization
- Cross-language support across many ecosystems
- Flexible data model with optional extensions
Why MessagePack
MessagePack solves a very specific problem:
- JSON is easy to read but inefficient on the wire
- IoT and distributed systems care about bytes, latency, and CPU
- MessagePack keeps JSON-like simplicity but removes text overhead
In short, JSON Data model with Binary efficiency.
Key Use Cases
- IoT telemetry and device data
- Edge gateways aggregating high-frequency events
- Microservice-to-microservice communication
- Caching layers like Redis and Memcached
- Distributed systems logging and checkpoints
MessagePack vs JSON
- Binary and compact
- Faster to parse
- Smaller payloads for most data
- Not human-readable
- Debugging requires tooling
MessagePack vs CBOR
- MessagePack is simpler and lighter
- CBOR supports semantic tags like datetime and URI
- CBOR supports deterministic encoding for hashing and signatures
- Size differences are workload-dependent, not guaranteed
Comparison with Similar Formats
| Feature | MessagePack | JSON | CBOR |
|---|---|---|---|
| Encoding | Binary | Text | Binary |
| Human-readable | No | Yes | No |
| Data Size | Small (varies) | Large | Small (varies) |
| Schema Required | No | No | No |
| Standardization | Community | RFC 8259 | RFC 8949 |
| Binary Data Support | Native | Base64 | Native |
| Semantic Tags | No | No | Yes |
| Deterministic Encoding | No | No | Yes |
Key Differences:
- vs JSON: 20-30% smaller payloads, faster parsing, but not human-readable
- vs CBOR: More compact for simple types, CBOR has better semantic tagging
Basic Operations
packb()converts Python objects to MessagePack bytesunpackb()converts MessagePack bytes back to Python objects
Python Example
git clone https://github.com/gchandra10/python_messagepack_examples.git
MessagePack in IoT and Edge Systems
- Commonly used in edge gateways and ingestion pipelines
- Efficient for short, frequent telemetry messages
- Suitable for MQTT payloads where the broker is payload-agnostic
- Rarely used directly in regulated firmware layers
Important:
- MQTT does not care about payload format
- MessagePack is an application-layer choice, not a protocol requirement
Summary
When to Choose MessagePack
- Bandwidth or memory is constrained
- JSON is too verbose
- Binary data is common
- Speed matters more than readability
- Schema flexibility is acceptable
What MessagePack Does Not Do
- No schema enforcement
- No backward compatibility guarantees
- No semantic meaning for fields
- No built-in validation
- No deterministic encoding
Devices like AppleWatch, Fitbit use Protocol Buffers for strict schema FDA regulated enforcement.
[Avg. reading time: 12 minutes]
Protocol Buffers
What are Protocol Buffers
- A method to serialize structured data into binary format
- Created by Google
- Its like JSON, but smaller and faster.
- Protocol Buffers are more commonly used in industrial IoT scenarios.
Why Protobuf is great for IoT
- Smaller size: Uses binary format instead of text, saving bandwidth
- Faster processing: Binary format means less CPU usage on IoT devices
- Strict schema: Helps catch errors early
- Language neutral: Works across different programming languages
- Great for limited devices: Uses less memory and battery power
- Extensibility: Add new fields to your message definitions without breaking existing code.
Industrial Use Cases
- Bridge structural sensors (vibration, stress)
- Factory equipment monitors
- Power grid sensors
- Oil/gas pipeline monitors
- Wind turbine telemetry
- Industrial HVAC systems
Why Industries prefer Protobuf:
- High data volume (thousands of readings per second)
- Need for efficient bandwidth usage
- Complex data structures
- Multiple systems need to understand the data
- Long-term storage requirements
- Cross-platform compatibility needs
graph LR
    subgraph Bridge["Bridge Infrastructure"]
        S1[Vibration Sensor] --> GW
        S2[Strain Gauge] --> GW
        S3[Temperature Sensor] --> GW
        subgraph Gateway["Linux Gateway (Solar)"]
            GW[Edge Gateway]
            DB[(Local Storage)]
            GW --> DB
        end
    end

    subgraph Communication["Communication Methods"]
        GW --> |4G/LTE| Cloud
        GW --> |LoRaWAN| Cloud
        GW --> |Satellite| Cloud
    end

    Cloud[Cloud Server] --> DA[Data Analysis]

    style Bridge fill:#87CEEB,stroke:#333,stroke-width:2px,color:black
    style Gateway fill:#90EE90,stroke:#333,stroke-width:2px,color:red
    style Communication fill:#FFA500,stroke:#333,stroke-width:2px,color:black
    style Cloud fill:#4169E1,stroke:#333,stroke-width:2px,color:white
    style DA fill:#4169E1,stroke:#333,stroke-width:2px,color:white
    style GW fill:#000000,stroke:#333,stroke-width:2px,color:white
    style DB fill:#800020,stroke:#333,stroke-width:2px,color:white

    classDef sensor fill:#00CED1,stroke:#333,stroke-width:1px,color:black
    class S1,S2,S3 sensor
Consumer IoT devices (in general)
- Use simpler formats (JSON, proprietary)
- Have lower data volumes
- Work within closed ecosystems (Google Home, Apple HomeKit)
- Don’t need the optimization Protobuf provides
Data Types in Protobufs
Scalar Types:
int32, int64, uint32, uint64, sint32, sint64, fixed32, fixed64, sfixed32, sfixed64 float, double, bool, string, bytes
Composite Types:
- message: Defines a structured collection of other fields.
- enum: Defines a set of named integer constants.
Collections:
- repeated: Allows you to define a list of values of the same type. Like Array.
Steps involved in creating a Proto Buf data file.
Step 1: Define the Data Structure of your data file as .proto text file.
Ex: my_data.proto
syntax = "proto3";

message MyData {
  int32 id = 1;
  string name = 2;
  float value = 3;
}
Step 2: Compile the .proto file to Python Class (.pb) or Java Class (.java) using protoc library.
protoc --python_out=. my_data.proto
Generates my_data_pb2.py
Step 3: Use the Generated Python Class file and use it to store data.
Note: Remember protoc –version should be same or closer as protobuf minor version number from pypi library.
In my setup protoc –version = 29.3, pypi protobuf = 5.29.2 Minor version of protobuf is 29.2 which is closer to 29.3
See example.
Demo Script
git clone https://github.com/gchandra10/python_protobuf_demo
flowchart LR
    subgraph Sensor["Temperature/Humidity Sensor"]
        S1[DHT22/BME280]
    end

    subgraph MCU["Microcontroller"]
        M1[ESP32/Arduino]
    end

    subgraph Gateway["Gateway/Edge Device"]
        G1[Raspberry Pi/\nIntel NUC]
    end

    subgraph Cloud["Cloud Server"]
        C1[AWS/Azure/GCP]
    end

    S1 -->|Raw Data 23.5°C, 45%| M1
    M1 -->|"JSON over MQTT {temp: 23.5,humidity: 45}"| G1
    G1 -->|Protocol Buffers\nover HTTPS| C1
[Avg. reading time: 2 minutes]
HTTP Basics
HTTP (HyperText Transfer Protocol) is the foundation of data communication on the web, used to transfer data (such as HTML files and images).
GET - Navigate to a URL or click a link in real life.
POST - Submit a form on a website, like a username and password.
Popular HTTP Status Codes
200 Series (Success): 200 OK, 201 Created.
300 Series (Redirection): 301 Moved Permanently, 302 Found.
400 Series (Client Error): 400 Bad Request, 401 Unauthorized, 404 Not Found.
500 Series (Server Error): 500 Internal Server Error, 503 Service Unavailable.
We already learnt about Monolithic and Microservices.
#http #status #monolithic #microservices
[Avg. reading time: 9 minutes]
Statefulness
The server stores information about the client’s current session in a stateful system. This is common in traditional web applications. Here’s what characterizes a stateful system:
Session Memory: The server remembers past interactions and may store session data like user authentication, preferences, and other activities.
Server Dependency: Since the server holds session data, the same server usually handles subsequent requests from the same client. This is important for consistency.
Resource Intensive: Maintaining state can be resource-intensive, as the server needs to manage and store session data for each client.
Example: A web application where a user logs in, and the server keeps track of their authentication status and interactions until they log out.
sequenceDiagram
    participant C as Client
    participant LB as Load Balancer
    participant S1 as Server 1
    participant S2 as Server 2

    Note over C,S2: Initial Session Establishment
    C->>LB: Initial Request
    LB->>S1: Forward Request
    S1-->>LB: Response (Session ID)
    LB-->>C: Response (Session ID)

    rect rgb(255, 255, 200)
        Note over C,S2: Sticky Session Established
    end

    Note over C,S2: Session Continuation
    C->>LB: Subsequent Request (with Session ID)
    LB->>S1: Forward Request (based on Session ID)
    S1-->>LB: Response (Data)
    LB-->>C: Response (Data)

    rect rgb(255, 255, 200)
        Note over C,S2: Session Continues on Server 1
    end

    Note over C,S2: Session Termination
    C->>LB: Logout Request
    LB->>S1: Forward Logout Request
    S1-->>LB: Confirmation
    LB-->>C: Confirmation

    rect rgb(255, 255, 200)
        Note over C,S2: Session Ended
    end

    rect rgb(255, 255, 200)
        Note right of S2: Server 2 remains unused due to stickiness
    end
Stickiness (Sticky Sessions)
Stickiness or sticky sessions are used in stateful systems, particularly in load-balanced environments. It ensures that requests from a particular client are directed to the same server instance. This is important when:
Session Data: The server needs to maintain session data (like login status), and it’s stored locally on a specific server instance.
Load Balancers: In a load-balanced environment, without stickiness, a client’s requests could be routed to different servers, which might not have the client’s session data.
Trade-off: While it helps maintain session continuity, it can reduce the load balancing efficiency and might lead to uneven server load.
Methods of Implementing Stickiness
Cookie-Based Stickiness: The most common method, where the load balancer uses a special cookie to track the server assigned to a client.
IP-Based Stickiness: The load balancer routes requests based on the client’s IP address, sending requests from the same IP to the same server.
Custom Header or Parameter: Some load balancers can use custom headers or URL parameters to track and maintain session stickiness.
[Avg. reading time: 7 minutes]
Statelessness
In a stateless system, each request from the client must contain all the information the server needs to fulfill that request. The server does not store any state of the client’s session. This is a crucial principle of RESTful APIs. Characteristics include:
No Session Memory: The server remembers nothing about the user once the transaction ends. Each request is independent.
Scalability: Stateless systems are generally more scalable because the server doesn’t need to maintain session information. Any server can handle any request.
Simplicity and Reliability: The stateless nature makes the system simpler and more reliable, as there’s less information to manage and synchronize across systems.
Example: An API where each request contains an authentication token and all necessary data, allowing any server instance to handle any request.
sequenceDiagram
    participant C as Client
    participant LB as Load Balancer
    participant S1 as Server 1
    participant S2 as Server 2

    C->>LB: Request 1
    LB->>S1: Forward Request 1
    S1-->>LB: Response 1
    LB-->>C: Response 1

    C->>LB: Request 2
    LB->>S2: Forward Request 2
    S2-->>LB: Response 2
    LB-->>C: Response 2

    rect rgb(255, 255, 200)
        Note over C,S2: Each request is independent
    end
In this diagram:
Request 1: The client sends a request to the load balancer.
Load Balancer to Server 1: The load balancer forwards Request 1 to Server 1.
Response from Server 1: Server 1 processes the request and sends a response back to the client.
Request 2: The client sends another request to the load balancer.
Load Balancer to Server 2: This time, the load balancer forwards Request 2 to Server 2.
Response from Server 2: Server 2 processes the request and responds to the client.
Statelessness: Each request is independent and does not rely on previous interactions. Different servers can handle other requests without needing a shared session state.
Token-Based Authentication
Common in stateless architectures, this method involves passing a token for authentication with each request instead of relying on server-stored session data. JWT (JSON Web Tokens) is a popular example.
[Avg. reading time: 9 minutes]
REST API
REpresentational State Transfer is a software architectural style developers apply to web APIs.
REST APIs provide simple, uniform interfaces because they can be used to make data, content, algorithms, media, and other digital resources available through web URLs. Essentially, REST APIs are the most common APIs used across the web today.
Use of a uniform interface (UI)
HTTP Methods
GET: This method allows the server to find the data you requested and send it back to you.
POST: This method permits the server to create a new entry in the database.
PUT: If you perform the ‘PUT’ request, the server will update an entry in the database.
DELETE: This method allows the server to delete an entry in the database.
Sample REST API
https://api.zippopotam.us/us/08028

http://api.tvmaze.com/search/shows?q=friends

https://jsonplaceholder.typicode.com/posts

https://jsonplaceholder.typicode.com/posts/1

https://jsonplaceholder.typicode.com/posts/1/comments

https://reqres.in/api/users?page=2

https://reqres.in/api/users/2
More examples
http://universities.hipolabs.com/search?country=United+States

https://itunes.apple.com/search?term=pop&limit=1000

https://www.boredapi.com/api/activity

https://techcrunch.com/wp-json/wp/v2/posts?per_page=100&context=embed
CURL
Install curl (Client URL)
curl is a CLI application available for all OS.
brew install curl
Usage
curl https://api.zippopotam.us/us/08028
curl https://api.zippopotam.us/us/08028 -o zipdata.json
Browser based
VS Code based
Using Python
git clone https://github.com/gchandra10/python_read_restapi
Summary
Definition: REST (Representational State Transfer) API is a set of guidelines for building web services. A RESTful API is an API that adheres to these guidelines and allows for interaction with RESTful web services.
How It Works: REST uses standard HTTP methods like GET, POST, PUT, DELETE, etc. It is stateless, meaning each request from a client to a server must contain all the information needed to understand and complete the request.
Data Format: REST APIs typically exchange data in JSON or XML format.
Purpose: REST APIs are designed to be a simple and standardized way for systems to communicate over the web. They enable the backend services to communicate with front-end applications (like SPAs) or other services.
Use Cases: REST APIs are used in web services, mobile applications, and IoT (Internet of Things) applications for various purposes like fetching data, sending commands, and more.
[Avg. reading time: 8 minutes]
CPU Architecture Fundamentals
Introduction
CPU architecture defines:
- The instruction set a processor understands
- Register structure
- Memory addressing model
- Binary format
It determines what machine code can run on a processor.
If software is compiled for one architecture, it cannot run on another without translation.
Major CPU Architectures
In todays world.
1. amd64 (x86_64)
- Designed by AMD, adopted by Intel
- Dominates desktops and traditional servers
- Common in enterprise data centers
- Most Windows laptops
- Intel-based Macs
Characteristics:
- High performance
- Higher power consumption
2. arm64 (aarch64)
- Designed for power efficiency
- Common in embedded systems and mobile devices
- Raspberry Pi
- Apple Silicon (M*)
- Many IoT gateways
Characteristics:
- Energy efficient
- Dominant in IoT and edge computing
Mac/Linux
uname -m
Windows
echo %PROCESSOR_ARCHITECTURE%%
systeminfo | findstr /B /C:"System Type"
In IoT environments:
Edge devices : usually arm64
Cloud : often amd64 (ARM growing fast)
How Programming Languages Relate to Architecture
                +----------------------+
                |     Source Code      |
                |  (C, Rust, Python)   |
                +----------+-----------+
                           |
                           v
                +----------------------+
                |     Compiler /       |
                |     Interpreter      |
                +----------+-----------+
                           |
         +-----------------+-----------------+
         |                                   |
         v                                   v
+---------------------+          +----------------------+
|  amd64 Binary       |          |  arm64 Binary       |
|  (x86_64 machine    |          |  (ARM machine       |
|   instructions)     |          |   instructions)     |
+----------+----------+          +----------+-----------+
           |                                |
           v                                v
+---------------------+          +----------------------+
|  Intel / AMD CPU    |          |  ARM CPU            |
|  (Laptop, Server)   |          |  (Raspberry Pi,     |
|                     |          |   IoT Gateway)      |
+---------------------+          +----------------------+
Compiled Languages
Examples: C, C++, Rust, Go
When compiled, they produce native machine code.
Compile on Windows - produces an amd64 binary.
Compile on Raspberry Pi or new Mac - produces an arm64 binary.
That binary cannot run on a different architecture.
Interpreted Languages
Examples: Python, Node.js
Source code is architecture-neutral. Interpreter handles it.
The interpreter (Python, Node) is architecture-specific
Native extensions are architecture-specific.
Java and Bytecode
            +------------------+
            |   Java Source    |
            +--------+---------+
                     |
                     v
            +------------------+
            |    Bytecode      |
            |   (.class file)  |
            +--------+---------+
                     |
         +-----------+-----------+
         |                       |
         v                       v
+------------------+     +------------------+
| JVM (amd64)      |     | JVM (arm64)      |
+--------+---------+     +--------+---------+
         |                        |
         v                        v
   Intel CPU                ARM CPU
Java uses a different model.
Compile: javac MyApp.java
Produces: MyApp.class
This is bytecode, not native machine code.
Bytecode runs on the JVM (Java Virtual Machine).
The JVM is architecture-specific.
Same bytecode runs on amd64 JVM
Same bytecode runs on arm64 JVM
Java achieves portability through a virtual machine layer.
Cross Compilation
It is possible to cross compile for a different architecture than your current architecture.
Developer Laptop (amd64)
        |
        | build
        v
   amd64 binary
        |
        | deploy
        v
Raspberry Pi (arm64)
        |
        X  Fails (architecture mismatch)
Developer Laptop
        |
        | cross-build for arm64
        v
   arm64 binary
        |
        v
Raspberry Pi (runs successfully)
Architecture in IoT Upper Stack
| Layer | Typical Architecture |
|---|---|
| Microcontroller | ARM (32-bit or 64-bit) |
| Edge Gateway | arm64 |
| Cloud VM | amd64 or arm64 |
| Personal Machines | amd64 or arm64 |
[Avg. reading time: 7 minutes]
Containers
World before containers
Physical Machines

- 1 Physical Server
- 1 Host Machine (say some Linux)
- 3 Applications installed
Limitation:
- Need of physical server.
- Version dependency (Host and related apps)
- Patches ”hopefully” not affecting applications.
- All apps should work with the same Host OS.

- 3 physical server
- 3 Host Machine (diff OS)
- 3 Applications installed
Limitation:
- Need of physical server(s).
- Version dependency (Host and related apps)
- Patches ”hopefully” not affecting applications.
- Maintenance of 3 machines.
- Network all three so they work together.
Virtual Machines

-
Virtual Machines emulate a real computer by virtualizing it to execute applications,running on top of a real computer.
-
To emulate a real computer, virtual machines use a Hypervisor to create a virtual computer.
-
On top of the Hypervisor, we have a Guest OS that is a Virtualized Operating System where we can run isolated applications, called Guest Operating System.
-
Applications that run in Virtual Machines have access to Binaries and Libraries on top of the operating system.
( + ) Full Isolation, Full virtualization ( - ) Too many layers, Heavy-duty servers.
Key Benefits
- Better resource utilization than separate physical servers
- Strong isolation between applications
- Ability to run different OS environments
- Easier backup and snapshot capabilities
- Better than single OS but still has overhead
- Each VM requires its own OS resources
- Slower startup times compared to containers
- Higher memory usage due to multiple OS instances
Containers

Containers are lightweight, portable environments that package an application with everything it needs to run—like code, runtime, libraries, and system tools—ensuring consistency across different environments. They run on the same operating system kernel and isolate applications from each other, which improves security and makes deployments easier.
-
Containers are isolated processes that share resources with their host and, unlike VMs, don’t virtualize the hardware and don’t need a Guest OS.
-
Containers share resources with other Containers in the same host.
-
This gives more performance than VMs (no separate guest OS).
-
Container Engine in place of Hypervisor.
Pros
- Isolated Process
- Mounted Files
- Lightweight Process
Cons
- Same Host OS
- Security
[Avg. reading time: 3 minutes]
VMs or Containers
VMs are great for running multiple, isolated OS environments on a single hardware platform. They offer strong security isolation and are useful when applications need different OS versions or configurations.
Containers are lightweight and share the host OS kernel, making them faster to start and less resource-intensive. They’re perfect for microservices, CI/CD pipelines, and scalable applications.
Smart engineers focus on the right tool for the job rather than getting caught up in “better or worse” debates.
Use them in combination to make life better.
Popular container technologies
Docker: The most widely used container platform, known for its simplicity, portability, and extensive ecosystem.
Podman: A daemonless container engine that’s compatible with Docker but emphasizes security, running containers as non-root users.
We will be using Docker for this course.
[Avg. reading time: 1 minute]
What container does
It brings to us the ability to create applications without worrying about their environment.

- Docker turns “my machine” into the machine
- Docker is not a magic want.
- It only guarantees the environment is identical
- Correctness still depends on what you build and how you run it.
#worksforme #container #docker
[Avg. reading time: 6 minutes]
Docker Basics
At a conceptual level, Docker is built around two core abstractions:
- Images – what you build
- Containers – what you run
Everything else in Docker exists to build, store, distribute, and execute these two artifacts.
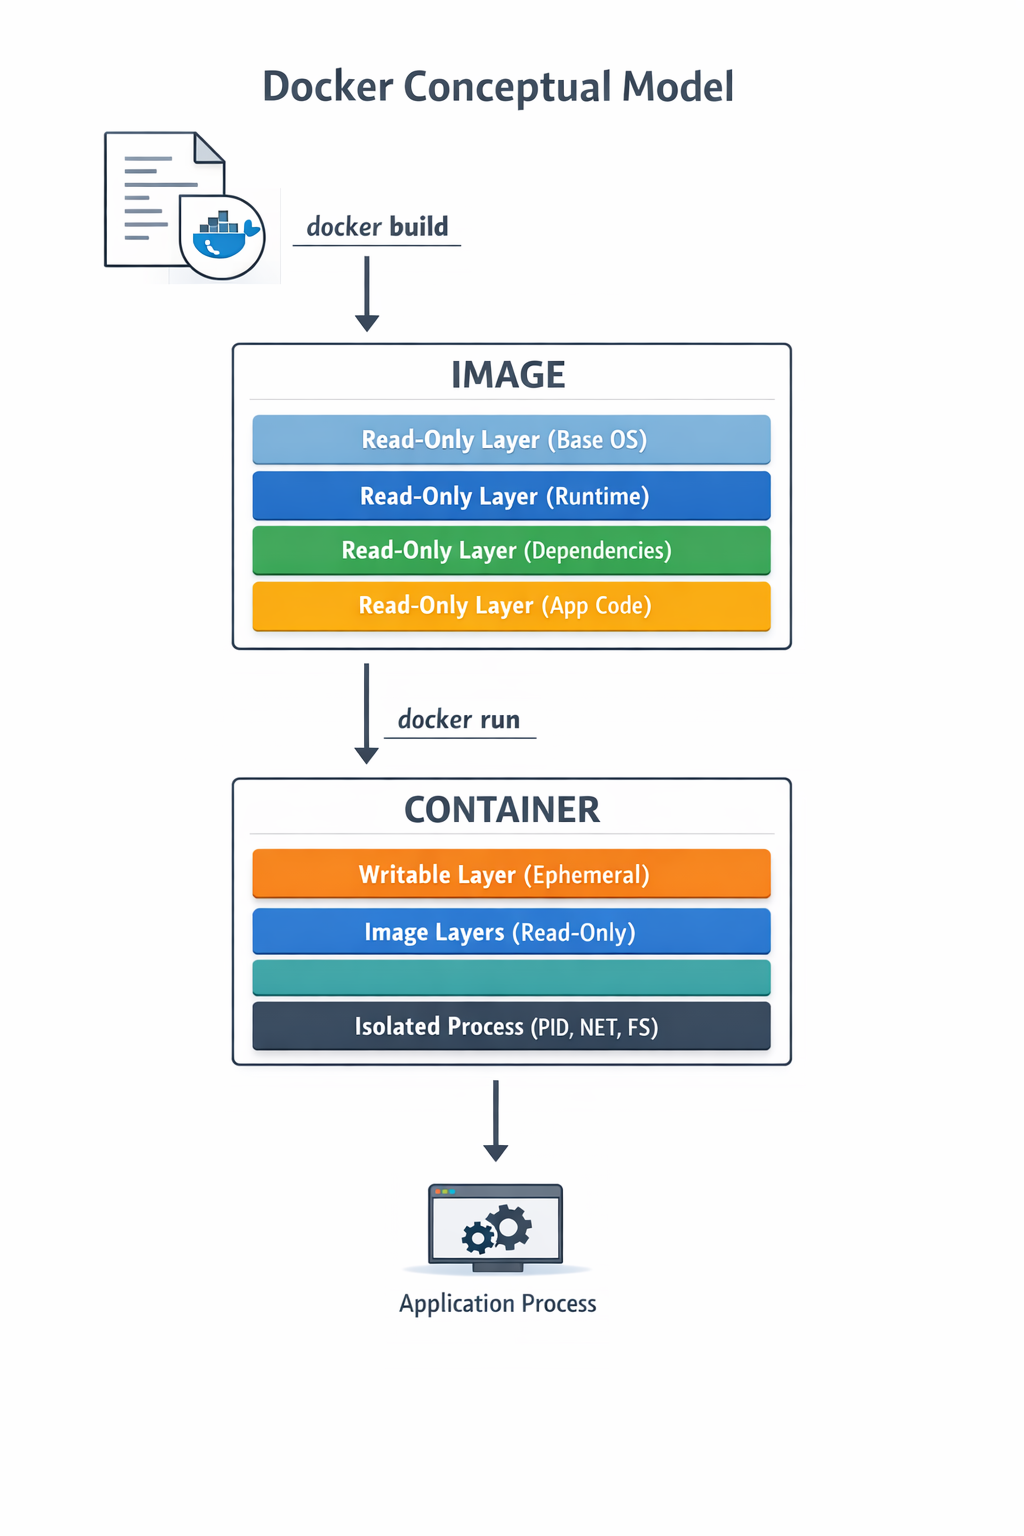
Images
- An image is an immutable, layered filesystem snapshot
- Built from a Dockerfile
- Each instruction creates a new read-only layer
- Images are content-addressed via SHA256 digests
Image is a versioned, layered blueprint
Key properties:
- Immutable
- Reusable
- Cached aggressively
- Portable across environments
Container
A container is a running instance of an image
- A writable layer on top of image layers
- Namespaces for isolation (PID, USER)
- Containers are processes, not virtual machines
- When the main process exits, the container stops
Image vs Container
| Aspect | Image | Container |
|---|---|---|
| Nature | Static | Dynamic |
| Mutability | Immutable | Mutable |
| Lifecycle | Build-time | Runtime |
| Role | Artifact | Instance |
Where Do Images Come From?
Docker Hub
- Default public container registry
- Hosts official and community images
- Supports tags, digests, vulnerability scans
- Docker Hub is default, not mandatory
Apart from Docker Hub, there are few other common registries
Private / On-Prem Registries
Enterprises widely use on-prem or private registries. JFrog Artifactory is extremely common in regulated environments.
#docker #container #repositories #hub
[Avg. reading time: 16 minutes]
Docker Examples
- Lists images available on the local machine
docker image ls
- To get a specific image
docker image pull <imagename>
docker image pull python:3.12-slim
- To inspect the downloaded image
docker image inspect python:3.12-slim
Check the architecture, ports open etc..
- Create a container
docker create \
    --name edge-http \
    -p 8000:8000 \
    python:3.12-slim \
    python -m http.server
List the Image and container again
- Start the container
docker start edge-http
Open browser and check http://localhost:8000 shows the docker internal file structure.
docker inspect edge-http
- Shows all running containers
docker container ls
- Shows all containers
docker container ls -a
- Disk usage by images, containers, volumes
docker system df
- Logs Inspection
docker logs edge-http
docker inspect edge-http
- Stop and remove
docker stop edge-http
docker rm edge-http
docker run is a wrapper for docker pull, docker create, docker start
Run an MQTT Broker
MQTT broker typically runs at edge or cloud.
- Create a new container
docker run -d \
  --name mqtt-broker \
  -p 1883:1883 \
  eclipse-mosquitto:2.0
- Verify
docker container ls
docker logs mqtt-broker
- Stop and Delete
docker stop mqtt-broker
docker rm mqtt-broker
Deploy MySQL Database using Containers
Create the following folder
Linux / Mac
mkdir -p container/mysql
cd container/mysql
Windows
md container
cd container
md mysql
cd mysql
mkdir data
Note: If you already have MySQL Server installed in your machine then please change the port to 3307 as given below.
-p 3307:3306 \
Run the container
docker run --name mysql -d \
    -p 3306:3306 \
    -e MYSQL_ROOT_PASSWORD=root-pwd \
    -e MYSQL_ROOT_HOST="%" \
    -e MYSQL_DATABASE=mydb \
    -e MYSQL_USER=remote_user \
    -e MYSQL_PASSWORD=remote_user-pwd \
    -v ./data:/var/lib/mysql \
    docker.io/library/mysql:8.4.4
-d : detached (background mode) -p : 3306:3306 maps mysql default port 3306 to host machines port 3306 3307:3306 maps mysql default port 3306 to host machines port 3307
-e MYSQL_ROOT_HOST=“%” Allows to login to MySQL using MySQL Workbench
Login to MySQL Container
docker exec -it mysql bash
CREATE DATABASE IF NOT EXISTS iot_telemetry;
USE iot_telemetry;

CREATE TABLE telemetry (
  id BIGINT AUTO_INCREMENT PRIMARY KEY,
  device_id VARCHAR(64),
  temperature_c FLOAT,
  humidity_pct FLOAT,
  event_ts TIMESTAMP DEFAULT CURRENT_TIMESTAMP
);

INSERT INTO telemetry (device_id, temperature_c, humidity_pct)
VALUES
('esp32-001', 24.1, 51.2),
('esp32-002', 23.4, 49.8);

SELECT * FROM telemetry;
List all the Containers
docker container ls -a
Stop MySQL Container
docker stop mysql
Delete the container**
docker rm mysql
Build your own Image
mkdir -p container
cd container
Calculator Example
Follow the README.md
Fork & Clone
git clone https://github.com/gchandra10/docker_mycalc_demo.git
Docker Compose
Docker Compose is a tool that lets you define and run multi-container Docker applications using a single YAML file.
Instead of manually running multiple docker run commands, you describe:
- Services (containers)
- Networks
- Volumes
- Environment variables
- Dependencies between services
…all inside a docker-compose.yml file.
Sample docker-compose.yaml
version: "3.9"

services:
  app:
    build: .
    ports:
      - "5000:5000"
    depends_on:
      - db

  db:
    image: postgres:15
    environment:
      POSTGRES_PASSWORD: example
docker compose up -d
docker compose down
Usecases
- Reproducible environments
- Clean dev setups
- Ideal for microservices
- Great for IoT stacks like broker + processor + DB
MQTT Python Docker Compose Example
https://github.com/gchandra10/docker-compose-mqtt-demo
Web App Demo
Fork & Clone
git clone https://github.com/gchandra10/docker_webapp_demo.git
Publish Image to Docker Hub
Login to Docker Hub
- Create a Repository “my_faker_calc”
- Under Account Settings
- Personal Access Token
- Create a PAT token with Read/Write access for 1 day
Replace gchandra10 with yours.
docker login

enter userid
enter PAT token
Then build the Image with your userid
docker build -t gchandra10/my_faker_calc:1.0 .
docker image ls
Copy the ImageID of gchandra10/my_fake_calc:1.0
Tag the ImageID with necessary version and latest
docker image tag <image_id> gchandra10/my_faker_calc:latest
Push the Images to Docker Hub (version and latest)
docker push gchandra10/my_faker_calc:1.0
docker push gchandra10/my_faker_calc:latest
Image Security
Trivy
Open Source Scanner.
https://trivy.dev/latest/getting-started/installation/
trivy image python:3.12-slim

# Focus on high risk only

trivy image --severity HIGH,CRITICAL python:3.12-slim

# Show only fixes available
trivy image --ignore-unfixed false python:3.12-slim

trivy image gchandra10/my_faker_calc

trivy image gchandra10/my_faker_calc --severity CRITICAL,HIGH --format table

trivy image gchandra10/my_faker_calc --severity CRITICAL,HIGH  --output result.txt
Grype
Open Source Scanner
grype python:3.12-slim
Common Mitigation Rules
- Upgrade the base
- move to newer version of python if 3.12 has issues
- Minimize OS packages
- check our how many layers of packages are installed
- Pin versions on libraries
- requirements.txt make sure Library versions are pinned for easy detection
- Run as non-root
- Create local user instead of running as root
- Don’t share Secrets
- dont copy .env or any secrets in your script or application.
[Avg. reading time: 5 minutes]
Containers in IoT Architecture
Where Containers Exist
Runtime Layers
-
Microcontrollers (ESP32, STM32)
- Bare metal / RTOS / MicroPython
- No Docker
-
Edge Gateway (Raspberry Pi, Industrial PC)
- Linux-based
- Docker runs here
- Hosts broker + processing services
-
Cloud Infrastructure
- Scalable ingestion, storage, APIs
Containers live above firmware.
What Runs in Containers at the Edge
Typical IoT gateway stack:
Edge Gateway
 ├── MQTT Broker (mosquitto)
 ├── Data Processor (Python service)
 ├── Local Buffer (SQLite / lightweight DB)
 └── Forwarder to Cloud
Each service:
- Built as an image
- Run as an isolated container
- Independently restartable
Why Containers Matter at Edge
- Service isolation
- Independent restart
- Controlled upgrades
- Version pinning
- Reduced “works on my machine” problems
IoT systems must be deterministic.
Never use
mosquitto:latest
Always Pin versions
mosquitto:2.0.18
Resource Constraints at Edge
IoT is not cloud.
Resource Limits
Edge gateways have:
- Limited RAM
- Limited CPU
- Limited storage
docker run \
  --memory=256m \
  --cpus=1 \
  --restart=always \
  eclipse-mosquitto:2.0
Containers consume real hardware resources.
Persistence Matters
Edge devices lose power. Without volumes, state is lost.
- Use volumes to preserve:
- Logs
- Broker sessions
- Buffered sensor data
docker run \
  -v mosq_data:/mosquitto/data \
  eclipse-mosquitto:2.0
Networking and Security
- Use internal Docker networks
- Expose only required ports
- Avoid running containers as root
- Use minimal base images
- Scan for vulnerabilities
- Compromised gateway equals compromised fleet.
Deployment Flow in IoT
- Build image
- Push to private registry
- Gateway pulls image
- Run container with restart policy
- Monitor and update safely
Containers are how software moves from developer laptop to physical infrastructure.
Summary
- Firmware generates signals.
- Containers turn signals into systems.
Containers are the operational layer of the IoT upper stack.
[Avg. reading time: 24 minutes]
Python Environment
PEP
PEP, or Python Enhancement Proposal, is the official style guide for Python code. It provides conventions and recommendations for writing readable, consistent, and maintainable Python code.
- PEP 8 : Style guide for Python code (most famous).
- PEP 20 : “The Zen of Python” (guiding principles).
- PEP 484 : Type hints (basis for MyPy).
- PEP 517/518 : Build system interfaces (basis for pyproject.toml, used by Poetry/UV).
- PEP 572 : Assignment expressions (the := walrus operator).
- PEP 440 : Mention versions in Libraries
PEP 8 (Popular one)
Indentation
- Use 4 spaces per indentation level
- Continuation lines should align with opening delimiter or be indented by 4 spaces.
Line Length
- Limit lines to a maximum of 79 characters.
- For docstrings and comments, limit lines to 72 characters.
Blank Lines
- Use 2 blank lines before top-level functions and class definitions.
- Use 1 blank line between methods inside a class.
Imports
- Imports should be on separate lines.
- Group imports into three sections: standard library, third-party libraries, and local application imports.
- Use absolute imports whenever possible.
# Correct
    import os
    import sys

# Wrong
    import sys, os
Naming Conventions
- Use
snake_casefor function and variable names. - Use
CamelCasefor class names. - Use
UPPER_SNAKE_CASEfor constants. - Avoid single-character variable names except for counters or indices.
Whitespace
- Don’t pad inside parentheses/brackets/braces.
- Use one space around operators and after commas, but not before commas.
- No extra spaces when aligning assignments.
Comments
- Write comments that are clear, concise, and helpful.
- Use complete sentences and capitalize the first word.
- Use # for inline comments, but avoid them where the code is self-explanatory.
Docstrings
- Use triple quotes (“”“) for multiline docstrings.
- Describe the purpose, arguments, and return values of functions and methods.
Code Layout
- Keep function definitions and calls readable.
- Avoid writing too many nested blocks.
Consistency
- Consistency within a project outweighs strict adherence.
- If you must diverge, be internally consistent.
PEP 20 - The Zen of Python
https://peps.python.org/pep-0020/
Simple is better than complex
Complex
result = (lambda x: (x*x + 2*x + 1))(5)
Simple
x = 5
result = (x + 1) ** 2
Readability counts
No Good
a=10;b=20;c=a+b;print(c)
Good
first_value = 10
second_value = 20
sum_of_values = first_value + second_value
print(sum_of_values)
Errors should never pass silently
No Good
try:
    x = int("abc")
except:
    pass
Good
try:
    x = int("abc")
except ValueError as e:
    print("Conversion failed:", e)
PEP 572
Walrus Operator :=
Assignment within Expression Operator
Old Way
inputs = []
current = input("Write something ('quit' to stop): ")
while current != "quit":
    inputs.append(current)
    current = input("Write something ('quit' to stop): ")
Using Walrus
inputs = []
while (current := input("Write something ('quit' to stop): ")) != "quit":
    inputs.append(current)
Another Example
Old Way
import re

m = re.search(r"\d+", text)
if m:
    print(m.group())
New Way
import re

if (m := re.search(r"\d+", text)):
    print(m.group())
Linting
Linting is the process of automatically checking your Python code for:
-
Syntax errors
-
Stylistic issues (PEP 8 violations)
-
Potential bugs or bad practices
-
Keeps your code consistent and readable.
-
Helps catch errors early before runtime.
-
Encourages team-wide coding standards.
# Incorrect
import sys, os

# Correct
import os
import sys
# Bad spacing
x= 5+3

# Good spacing
x = 5 + 3
Ruff : Linter and Code Formatter
Ruff is a fast, modern tool written in Rust that helps keep your Python code:
- Consistent (follows PEP 8)
- Clean (removes unused imports, fixes spacing, etc.)
- Correct (catches potential errors)
Install
uv add ruff
Verify
ruff --version
ruff --help
example.py
import os, sys

def greet(name):
  print(f"Hello, {name}")

def message(name): print(f"Hi, {name}")

def calc_sum(a, b): return a+b

greet('World')
greet('Ruff')
message('Ruff')
uv run ruff check example.py
uv run ruff check example.py --fix
uv run ruff format example.py --check
uv run ruff check example.py
PEP 484 - MyPy : Type Checking Tool
Python is a Dynamically typed programming language. Meaning
x=26 x= “hello”
both are valid.
MyPy is introduced to make it statically typed.
mypy is a static type checker for Python. It checks your code against the type hints you provide, ensuring that the types are consistent throughout the codebase.
It primarily focuses on type correctness—verifying that variables, function arguments, return types, and expressions match the expected types.
What mypy checks:
- Variable reassignment types
- Function arguments
- Return types
- Expressions and operations
- Control flow narrowing
What mypy does not do:
- Runtime validation
- Performance checks
- Logical correctness
Install
    uv add mypy

    or

    pip install mypy
Example 1 : sample.py
x = 1
x = 1.0
x = True
x = "test"
x = b"test"

print(x)
uv run mypy sample.py

or

mypy sample.py
Example 2: Type Safety
def add(a: int, b: int) -> int:
    return a + b

print(add(100, 123))
print(add("hello", "world"))
Example 3: Return Type Violation
def divide(a: int, b: int) -> int:
    if b == 0:
        return "invalid"
    return a // b
Example 4: Optional Types
from typing import Optional

def get_username(user_id: int) -> Optional[str]:
    if user_id == 0:
        return None
    return "admin"

name = get_username(0)
print(name.upper())
What is wrong in this? name can also be None and there is no upper for None
[Avg. reading time: 15 minutes]
Code Quality & Safety
Type Hinting/Annotation
Type Hint
A type hint is a notation that suggests what type a variable, function parameter, or return value should be. It provides hints to developers and tools about the expected type but does not enforce them at runtime. Type hints can help catch type-related errors earlier through static analysis tools like mypy, and they enhance code readability and IDE support.
Type Annotation
Type annotation refers to the actual syntax used to provide these hints. It involves adding type information to variables, function parameters, and return types. Type annotations do not change how the code executes; they are purely for informational and tooling purposes.
Benefits
-
Improved Readability: Code with type annotations is easier to understand.
-
Tooling Support: IDEs can provide better autocompletion and error checking.
-
Static Analysis: Tools like mypy can check for type consistency, catching errors before runtime.
Basic Type Hints
age: int = 25
name: str = "Rachel"
is_active: bool = True
price: float = 19.99
Here, age is annotated as an int, and name is annotated as a str.
Collections
from typing import List, Set, Dict, Tuple

# List type hints
numbers: List[int] = [1, 2, 3]
names: List[str] = ["Alice", "Bob"]

# Set type hints
unique_ids: Set[int] = {1, 2, 3}

# Dictionary type hints
user_scores: Dict[str, int] = {"Alice": 95, "Bob": 87}

# Tuple type hints
point: Tuple[float, float] = (2.5, 3.0)
Function Annotations
def calculate_discount(price: float, discount_percent: float) -> float:
    """Calculate the final price after applying a discount."""
    return price * (1 - discount_percent / 100)

def get_user_names(user_ids: List[int]) -> Dict[int, str]:
    """Return a mapping of user IDs to their names."""
    return {uid: f"User {uid}" for uid in user_ids}
Advanced Type Hints
from typing import Optional, Union

def process_data(data: Optional[str] = None) -> str:
    """Process data with an optional input."""
    if data is None:
        return "No data provided"
    return data.upper()

def format_value(value: Union[int, float, str]) -> str:
    """Format a value that could be integer, float, or string."""
    return str(value)
Best Practices
- Consistency: Apply type hints consistently across your codebase.
- Documentation: Type hints complement but don’t replace docstrings.
- Type Checking: Use static type checkers like mypy.
# Run mypy on your code
mypy your_module.py
Secret Management
Proper secret management is crucial for application security. Secrets include API keys, database credentials, tokens, and other sensitive information that should never be hardcoded in your source code or committed to version control.
Either create them in Shell or .env
Shell
export SECRET_KEY='your_secret_value'
Windows Users
Goto Environment Variables via GUI and create one.
pip install python-dotenv
Create a empty file .env
.env
SECRET_KEY=your_secret_key
DATABASE_URL=your_database_url
main.py
from dotenv import load_dotenv
import os

# Load environment variables from .env file
load_dotenv()

# Access the environment variables
secret_key = os.getenv("SECRET_KEY")
database_url = os.getenv("DATABASE_URL")

print(f"Secret Key: {secret_key}")
print(f"Database URL: {database_url}")
Best Practices
Never commit secrets to version control
- Use .gitignore to exclude .env files
- Regularly audit git history for accidental commits
Sample .gitignore
# .gitignore
.env
.env.*
!.env.example
*.pem
*.key
secrets/
Create a .env.example file with dummy values:
# .env.example
SECRET_KEY=your_secret_key_here
DATABASE_URL=postgresql://user:password@localhost:5432/dbname
API_KEY=your_api_key_here
DEBUG=False
Access Control
- Restrict environment variable access to necessary processes
- Use separate environment files for different environments (dev/staging/prod)
Secret Rotation
- Implement procedures for regular secret rotation
- Use separate secrets for different environments
Production Environments
Consider using cloud-native secret management services:
- AWS Secrets Manager
- Google Cloud Secret Manager
- Azure Key Vault
- HashiCorp Vault
PDOC
Python Documentation
pdoc is an automatic documentation generator for Python libraries. It builds on top of Python’s built-in doc attributes and type hints to create comprehensive API documentation. pdoc automatically extracts documentation from docstrings and generates HTML or Markdown output.
Docstring (Triple-quoted string)
def add(a: float, b: float) -> float:
    """
    Add two numbers.

    Args:
        a (float): The first number to add.
        b (float): The second number to add.

    Returns:
        float: The sum of the two numbers.

    Example:
        >>> add(2.5, 3.5)
        6.0
    """
    return a + b


def divide(a: float, b: float) -> float:
    """
    Divide one number by another.

    Args:
        a (float): The dividend.
        b (float): The divisor, must not be zero.

    Returns:
        float: The quotient of the division.

    Raises:
        ValueError: If the divisor (`b`) is zero.

    Example:
        >>> divide(10, 2)
        5.0
    """
    if b == 0:
        raise ValueError("The divisor (b) must not be zero.")
    return a / b
uv add pdoc
uv run pdoc filename.py -o ./docs
- pdoc.config.json allows customization
{
    "docformat": "google",
    "include": ["your_module"],
    "exclude": ["tests", "docs"],
    "template_dir": "custom_templates",
    "output_dir": "api_docs"
}
[Avg. reading time: 8 minutes]
Error Handling
Python uses try/except blocks for error handling.
The basic structure is:
try:
    # Code that may raise an exception
except ExceptionType:
    # Code to handle the exception
finally:
    # Code executes all the time
Uses
Improved User Experience: Instead of the program crashing, you can provide a user-friendly error message.
Debugging: Capturing exceptions can help you log errors and understand what went wrong.
Program Continuity: Allows the program to continue running or perform cleanup operations before terminating.
Guaranteed Cleanup: Ensures that certain operations, like closing files or releasing resources, are always performed.
Some key points
-
You can catch specific exception types or use a bare except to catch any exception.
-
Multiple except blocks can be used to handle different exceptions.
-
An else clause can be added to run if no exception occurs.
-
A finally clause will always execute, whether an exception occurred or not.
Without Try/Except
x = 10 / 0
Basic Try/Except
try:
    x = 10 / 0
except ZeroDivisionError:
    print("Error: Division by zero!")
Generic Exception
try:
    file = open("nonexistent_file.txt", "r")
except:
    print("An error occurred!")
Find the exact error
try:
    file = open("nonexistent_file.txt", "r")
except Exception as e:
    print(str(e))
Raise - Else and Finally
try:
    x = -10
    if x <= 0:
        raise ValueError("Number must be positive")
except ValueError as ve:
    print(f"Error: {ve}")
else:
    print(f"You entered: {x}")
finally:
    print("This will always execute")
try:
    x = 10
    if x <= 0:
        raise ValueError("Number must be positive")
except ValueError as ve:
    print(f"Error: {ve}")
else:
    print(f"You entered: {x}")
finally:
    print("This will always execute")
Nested Functions
def divide(a, b):
    try:
        result = a / b
        return result
    except ZeroDivisionError:
        print("Error in divide(): Cannot divide by zero!")
        raise  # Re-raise the exception

def calculate_and_print(x, y):
    try:
        result = divide(x, y)
        print(f"The result of {x} divided by {y} is: {result}")
    except ZeroDivisionError as e:
        print(str(e))
    except TypeError as e:
        print(str(e))

# Test the nested error handling
print("Example 1: Valid division")
calculate_and_print(10, 2)

print("\nExample 2: Division by zero")
calculate_and_print(10, 0)

print("\nExample 3: Invalid type")
calculate_and_print("10", 2)
[Avg. reading time: 22 minutes]
Faker
Faker: A Python Library for Generating Fake Data
Faker is a powerful Python library that generates realistic fake data for various purposes. It’s particularly useful for:
-
Testing: Populating databases, testing APIs, and stress-testing applications with realistic-looking data.
-
Development: Creating sample data for prototyping and demonstrations.
-
Data Science: Generating synthetic datasets for training and testing machine learning models.
-
Privacy: Anonymizing real data for sharing or testing while preserving data structures and distributions.
Key Features:
-
Wide Range of Data Types: Generates names, addresses, emails, phone numbers, credit card details, dates, companies, jobs, texts, and much more.
-
Customization: Allows you to customize the data generated using various parameters and providers.
-
Locale Support: Supports multiple locales, allowing you to generate data in different languages and regions.
-
Easy to Use: Simple and intuitive API with clear documentation.
from faker import Faker

fake = Faker()

print(fake.name())  # Output: A randomly generated name
print(fake.email())  # Output: A randomly generated email address
print(fake.address())  # Output: A randomly generated address
print(fake.date_of_birth())  # Output: A randomly generated date of birth
Using Faker in Data World
Data Exploration and Analysis: Generate synthetic datasets with controlled characteristics to explore data analysis techniques and algorithms.
Data Visualization: Create sample data to visualize different data distributions and patterns.
Data Cleaning and Transformation: Test data cleaning and transformation pipelines with realistic-looking dirty data.
Data Modeling: Build and test data models using synthetic data before applying them to real-world data.
Using Faker in IoT World
IoT Device Simulation: Simulate sensor data from various IoT devices, such as temperature, humidity, and location data.
IoT System Testing: Test IoT systems and applications with realistic-looking sensor data streams.
IoT Data Analysis: Generate synthetic IoT data for training and testing machine learning models for tasks like anomaly detection and predictive maintenance.
IoT Data Visualization: Create visualizations of simulated IoT data to gain insights into system behavior.
Luhn Algorithm (pronounced as Loon)
Used to detect accidental errors in data entry or transmission, particularly single-digit errors and transposition of adjacent digits.
The Luhn algorithm, also known as the modulus 10 or mod 10 algorithm, is a simple checksum formula used to validate a variety of identification numbers, such as credit card numbers, IMEI numbers and so on.
- Step 1: Starting from the rightmost digit, double the value of every second digit.
- Step 2: If doubling of a number results in a two digit number, then add the digts to get a single digit number.
- Step 3: Now sum all the final digits.
- Step 4: If the sum is divisible by 10 then its a valid number.
Example: 4532015112830366

Key Features
- Can detect 100% of single-digit errors
- Can detect around 98% of transposition errors
- Simple mathematical operations (addition and multiplication)
- Low computational overhead
Limitations
- Not cryptographically secure
- Cannot detect all possible errors
- Some error types (like multiple transpositions) might go undetected
Common Use Cases
- Device Authentication: Validating device identifiers
- Asset Tracking: Verifying equipment serial numbers
- Smart Meter Reading Validation: Ensuring meter readings are transmitted correctly
- Sensor Data Integrity: Basic error detection in sensor data transmission
git clone https://github.com/gchandra10/python_faker_demo.git
Damm Algorithm
The Damm Algorithm is a check digit algorithm created by H. Michael Damm in 2004. It uses a checksum technique intended to identify mistakes in data entry or transmission, especially when it comes to number sequences.
Perfect Error Detection:
- Detects all single-digit errors
- Detects all adjacent transposition errors
- No false positives or false negatives
To check where 234 is valid number
Start: interim = 0

First digit (2):
- Row = 0 (current interim)
- Column = 2 (current digit)
- table[0][2] = 1
- New interim = 1

Second digit (3):
- Row = 1 (current interim)
- Column = 3 (current digit)
- table[1][3] = 2
- New interim = 2

Third digit (4):
- Row = 2 (current interim)
- Column = 4 (current digit)
- table[2][4] = 8
- Final interim = 8 (this becomes check digit)
As the final interim is not Zero this is not a valid number as per Damm Algorithm.
    [0, 3, 1, 7, 5, 9, 8, 6, 4, 2],
    [7, 0, 9, 2, 1, 5, 4, 8, 6, 3],
    [4, 2, 0, 6, 8, 7, 1, 3, 5, 9],
    [1, 7, 5, 0, 9, 8, 3, 4, 2, 6],
    [6, 1, 2, 3, 0, 4, 5, 9, 7, 8],
    [3, 6, 7, 4, 2, 0, 9, 5, 8, 1],
    [5, 8, 6, 9, 7, 2, 0, 1, 3, 4],
    [8, 9, 4, 5, 3, 6, 2, 0, 1, 7],
    [9, 4, 3, 8, 6, 1, 7, 2, 0, 5],
    [2, 5, 8, 1, 4, 3, 6, 7, 9, 0]
Lets try 57240 and someone entered 57340.
Luhn is like a spell checker and Damm is Grammar checker.
IOT Uses Cases with Algorithms
| Use Case | Algorithm Used | Description |
|---|---|---|
| Smart Metering (Electricity, Water, Gas) | Luhn | Consumer account numbers and meter IDs can use the Luhn algorithm to validate input during billing and monitoring. |
| IoT-based Credit Card Transactions | Luhn | When smart vending machines or POS terminals process card payments, Luhn ensures credit card numbers are valid. |
| IMEI Validation in Smart Devices | Luhn | IoT-enabled mobile and tracking devices use Luhn to validate IMEI numbers for device authentication. |
| Smart Parking Ticketing Systems | Luhn | Parking meters with IoT sensors can validate vehicle plate numbers or digital parking tickets using the Luhn algorithm. |
| Industrial IoT (IIoT) Sensor IDs | Damm | Factory sensors and devices generate unique IDs with the Damm algorithm to prevent ID entry errors and misconfigurations. |
| IoT-based Asset Tracking | Damm | Logistics and supply chain IoT devices use Damm to ensure tracking codes are error-free and resistant to transposition mistakes. |
| Connected Health Devices (Wearables, ECG Monitors) | Damm | Unique patient monitoring device IDs use Damm for error-free identification in hospital IoT systems. |
| IoT-enabled Vehicle Identification | Damm | Vehicle chassis numbers and VINs in IoT-based fleet management use Damm for better error detection. |
| Feature | Luhn Algorithm | Damm Algorithm |
|---|---|---|
| Type | Modulus-10 checksum | Noncommutative quasigroup checksum |
| Use Case | Credit card numbers, IMEI, etc. | Error detection in numeric sequences |
| Mathematical Basis | Weighted sum with modulus 10 | Quasigroup operations |
| Error Detection | Detects single-digit errors and most transpositions | Detects all single-digit and adjacent transposition errors |
| Processing Complexity | Simple addition and modulus operation | More complex due to quasigroup operations |
| Strengths | Simple and widely adopted | Stronger error detection capabilities |
| Weaknesses | Cannot detect all double transpositions | Less widely used and understood |
| Performance | Efficient for real-time validation | Slightly more computationally intensive |
For Firmware updates we can use SHA-256 or SHA-512 (Hashing Algorithms)
[Avg. reading time: 7 minutes]
Logging
Python’s logging module provides a flexible framework for tracking events in your applications. It’s used to log messages to various outputs (console, files, etc.) with different severity levels like DEBUG, INFO, WARNING, ERROR, and CRITICAL.
Use Cases of Logging
Debugging: Identify issues during development. Monitoring: Track events in production to monitor behavior. Audit Trails: Capture what has been executed for security or compliance. Error Tracking: Store errors for post-mortem analysis. Rotating Log Files: Prevent logs from growing indefinitely using size or time-based rotation.
Python Logging Levels
| Level | Usage | Numeric Value | Description |
|---|---|---|---|
DEBUG | Detailed information for diagnosing problems. | 10 | Useful during development and debugging stages. |
INFO | General information about program execution. | 20 | Highlights normal, expected behavior (e.g., program start, process completion). |
WARNING | Indicates something unexpected but not critical. | 30 | Warns of potential problems or events to monitor (e.g., deprecated functions, nearing limits). |
ERROR | An error occurred that prevented some part of the program from working. | 40 | Represents recoverable errors that might still allow the program to continue running. |
CRITICAL | Severe errors indicating a major failure. | 50 | Marks critical issues requiring immediate attention (e.g., system crash, data corruption). |
INFO
import logging

logging.basicConfig(level=logging.INFO)  # Set the logging level to INFO

logging.debug("This is a debug message.")
logging.info("This is an info message.")
logging.warning("This is a warning message.")
logging.error("This is an error message.")
logging.critical("This is a critical message.")
Error
import logging

logging.basicConfig(level=logging.ERROR)  # Set the logging level to ERROR

logging.debug("This is a debug message.")
logging.info("This is an info message.")
logging.warning("This is a warning message.")
logging.error("This is an error message.")
logging.critical("This is a critical message.")
import logging

logging.basicConfig(
    level=logging.DEBUG,
    format = '%(asctime)s - %(name)s - %(levelname)s - %(message)s'
)

logging.debug("This is a debug message.")
logging.info("This is an info message.")
logging.warning("This is a warning message.")
More Examples
git clone https://github.com/gchandra10/python_logging_examples.git
[Avg. reading time: 11 minutes]
Time Series Database (TSDB)
A Time Series Database (TSDB) is a type of database designed specifically to store and query time-stamped data.
In many modern systems, data is continuously generated with a timestamp attached to every event. Examples include sensor readings from IoT devices, system metrics from servers, financial price movements, or application performance metrics. Traditional databases can store this data, but they are not optimized for the access patterns that time-based data requires.
A TSDB is built to efficiently handle large volumes of sequential, time-ordered data and make it easy to analyze trends, patterns, and changes over time.
Key Characteristics
Time-centric design
Data is stored with time as the primary dimension.
Queries typically ask questions like:
- What happened in the last 5 minutes?
- What is the average CPU usage per minute today?
- How did temperature change over the last 24 hours?
Because of this, TSDBs are optimized for time-range queries and chronological data access.
High ingestion rates
Many time-series systems generate data very frequently.
Examples:
- IoT sensors publishing readings every few seconds
- Servers emitting metrics every few milliseconds
- Stock markets generating price ticks continuously
TSDBs are optimized to ingest large volumes of data points efficiently without slowing down.
Efficient storage
Time-series data often contains repeating patterns or slowly changing values.
To optimize storage, TSDBs commonly use:
- Compression techniques
- Column-oriented storage
- Time-based partitioning
These techniques reduce storage costs while maintaining fast query performance.
Optimized time-series queries
TSDBs support operations commonly used when analyzing time-based data.
Filtering
Selecting data within a time range or based on tags/labels.
Aggregation
Calculating metrics such as average, sum, min, or max over time intervals.
Downsampling
Reducing high-resolution data into summarized intervals.
For example converting per-second data into hourly averages.
These capabilities allow efficient analysis of both recent high-resolution data and long-term trends.
Common Use Cases
IoT Systems
Devices such as sensors, wearables, smart meters, and industrial machines continuously generate timestamped measurements.
Examples:
- Temperature readings
- Pressure measurements
- Energy consumption data
System Monitoring
Monitoring platforms collect metrics from infrastructure and applications.
Examples:
- CPU usage
- Memory utilization
- Network throughput
- Request latency
Financial Markets
Market data is inherently time-based.
Examples:
- Stock prices
- Trading volume
- Tick-level market events
Scientific and Research Data
Many experiments produce sequential measurements over time.
Examples:
- Climate data
- Astronomy observations
- Simulation outputs
Popular Time Series Databases
InfluxDB
A widely used open-source TSDB designed specifically for high-throughput time-series workloads.
TimescaleDB
A PostgreSQL extension that adds efficient time-series capabilities while retaining the SQL ecosystem.
Prometheus
An open-source monitoring system that includes its own time-series database for collecting and querying metrics.
Apache Cassandra
Although not a dedicated TSDB, Cassandra is often used for time-series workloads due to its distributed architecture and scalability.
Summary
Time-series data is everywhere in modern systems. IoT platforms, monitoring systems, financial markets, and scientific experiments all generate large volumes of timestamped data.
A Time Series Database provides a specialized architecture to:
- efficiently ingest high-frequency data
- store time-ordered events compactly
- query trends and patterns quickly
Because of these optimizations, TSDBs have become an important component in observability platforms, IoT pipelines, and real-time analytics systems.
[Avg. reading time: 17 minutes]
InfluxDB
InfluxDB is a high-performance Time Series Database (TSDB) designed to store and analyze large volumes of timestamped data. It is commonly used in systems where data arrives continuously, such as IoT devices, monitoring platforms, telemetry pipelines, and financial market feeds.
InfluxDB is optimized for workloads where the primary queries involve time ranges, trends, aggregations, and real-time metrics.
With the release of InfluxDB 3, the platform has evolved significantly. Earlier versions relied on custom storage engines and specialized query languages, but InfluxDB 3 adopts a modern analytics architecture built on open standards.
The latest version uses:
- Apache Arrow for in-memory analytics
- Parquet for columnar storage
- DataFusion as the SQL query engine
- Object storage as the persistent storage layer
This architecture improves performance, scalability, and interoperability with modern data platforms.
Key Features
High Ingestion Performance
InfluxDB is designed to ingest millions of time-series data points per second, making it suitable for systems that generate high-frequency telemetry data.
Examples include:
- IoT sensor streams
- application monitoring metrics
- infrastructure telemetry
- financial tick data
Time-Series Optimized Storage
Data is stored using columnar formats (Parquet) which allow efficient compression and fast scanning of time-based data.
This significantly improves performance for queries such as:
- time-range filtering
- aggregations over time intervals
- trend analysis
SQL Querying
InfluxDB 3 introduces standard SQL as the primary query language.
This change allows developers and analysts to query time-series data using familiar SQL tools rather than learning a specialized query language.
Example:
SELECT
  date_bin(INTERVAL '5 minutes', time) AS bucket,
  AVG(temperature)
FROM sensor_data
WHERE time > now() - INTERVAL '1 hour'
GROUP BY bucket
ORDER BY bucket;
Scalability with Object Storage
InfluxDB 3 separates compute from storage and stores data in object storage systems such as cloud storage.
Benefits include:
- virtually unlimited storage
- lower storage costs
- improved scalability for large datasets
Built-in Visualization and Management
InfluxDB provides tools for:
- data exploration
- dashboards
- monitoring metrics
- administrative tasks
These tools help users quickly analyze real-time data streams.
Data Model
InfluxDB uses a simple time-series data model consisting of four main components.
Measurement
A measurement represents a logical category of data, similar to a table in relational databases.
Examples:
- temperature
- cpu_usage
- network_latency
Tags
Tags are indexed key-value pairs used to describe metadata and enable fast filtering.
Examples:
- location = kitchen
- host = server01
- device = sensor12
Because tags are indexed, queries that filter by tags perform efficiently.
Fields
Fields contain the actual measured values.
Examples:
- temperature = 22.5
- cpu_usage = 65
- humidity = 40
Fields are not indexed to allow faster write performance.
Timestamp
Every data point includes a timestamp, which records when the event occurred.
Time is the primary dimension for storing and querying data in InfluxDB.
Common Use Cases
- IoT Sensor Data
- Infrastructure Monitoring (CPU,Memory, Network, Disk IO)
- Observability & DevOPS
- Financial TS Data (Stock, Trading, Market Indicators)
| Feature | InfluxDB 1.x | InfluxDB 2.x | InfluxDB 3.x |
|---|---|---|---|
| Query Language | InfluxQL | Flux | SQL |
| Storage Engine | Custom TSDB engine | Custom TSDB engine | Arrow + Parquet |
| Data Container | Database + Retention Policy | Bucket | Database |
| Storage Backend | Local storage | Local storage | Object storage |
| Query Engine | InfluxQL engine | Flux engine | DataFusion |
| Architecture | Single node / cluster | Improved platform with UI | Modern analytics architecture |
| Ecosystem Integration | Limited | Moderate | Strong integration with modern data stack |
InfluxDB3 uses DataFusion
SQL
  │
DataFusion Query Engine
  │
Apache Arrow
  │
Parquet files
  │
Object Storage
InfluxDB 3 UI
In InfluxDB 3, the user interface is separated from the core database engine. Unlike earlier versions where the UI was bundled with the database, the new architecture treats the UI as a separate service.
This change aligns with the overall design philosophy of InfluxDB 3, where storage, compute, and management tools are decoupled.
Why the UI is separated
Independent scaling
The database engine focuses purely on data ingestion, storage, and query execution, while the UI handles visualization and user interaction.
Separating them allows each component to scale independently.
Cleaner architecture
By separating the UI from the database engine, the system becomes more modular. The core database can remain lightweight and optimized for high-performance time-series workloads, while the UI evolves independently.
Flexible deployment
Users are not required to run the UI if they do not need it. Many production deployments interact with InfluxDB through:
- APIs
- SQL clients
- monitoring tools
- custom applications
The UI becomes an optional management layer rather than a required component.
Faster development
Because the UI is no longer tightly coupled with the database engine, improvements to dashboards, visualization, and management features can be released independently without impacting the database core.
What the UI provides
The InfluxDB UI helps users:
- explore and query time-series data
- build dashboards and visualizations
- monitor metrics
- manage databases and ingestion
It acts as a convenient interface for interacting with InfluxDB, while the core database focuses on performance and scalability.
Influxdb with IOT

Time Format
Epoch time represents the number of time units elapsed since:
1970-01-01 00:00:00 UTC
#influxdb #tsdb #telegraf #sql
[Avg. reading time: 25 minutes]
InfluxDB Demo
Software
Cloud
Via Docker
mkdir influxdb
cd influxdb
docker-compose.yml
docker-compose.yml
name: influxdb3
services:
  influxdb3-core:
    container_name: influxdb3-core
    image: influxdb:3-core
    ports:
      - 8181:8181
    command:
      - influxdb3
      - serve
      - --node-id=node0
      - --object-store=file
      - --data-dir=/var/lib/influxdb3/data
      - --plugin-dir=/var/lib/influxdb3/plugins
    volumes:
      - ./.influxdb3/core/data:/var/lib/influxdb3/data
      - ./.influxdb3/core/plugins:/var/lib/influxdb3/plugins
    restart: unless-stopped

  influxdb3-explorer:
    image: influxdata/influxdb3-ui:latest
    container_name: influxdb3-explorer
    ports:
      - "8888:80"
    volumes:
      - ./.influxdb3-ui/db:/db:rw
      - ./.influxdb3-ui/config:/app-root/config:ro
    environment:
      SESSION_SECRET_KEY: "${SESSION_SECRET_KEY:-$(openssl rand -hex 32)}"
    restart: unless-stopped
    command: ["--mode=admin"]
Launch the containers
docker compose up -d
Create Token
docker exec influxdb3-core influxdb3 create token --admin
create a file at
./.influxdb3-ui/config/config.json
Add the following contents
  "DEFAULT_INFLUX_SERVER": "http://influxdb3-core:8181",
  "DEFAULT_API_TOKEN": "",
  "DEFAULT_SERVER_NAME": "InfluxDB3 - Docker""
Restart Docker
docker compose restart
Load Data
Login via UI
http://localhost:8888
- Create a Database, if prompted set retention period.
- Load data via Line Protocol or CSV or JSON or Programatically
Line Protocol
Line protocol, is InfluxDB’s text-based format for writing time series data into the database. It’s designed to be both human-readable and efficient for machine parsing.
Format of Sample Data
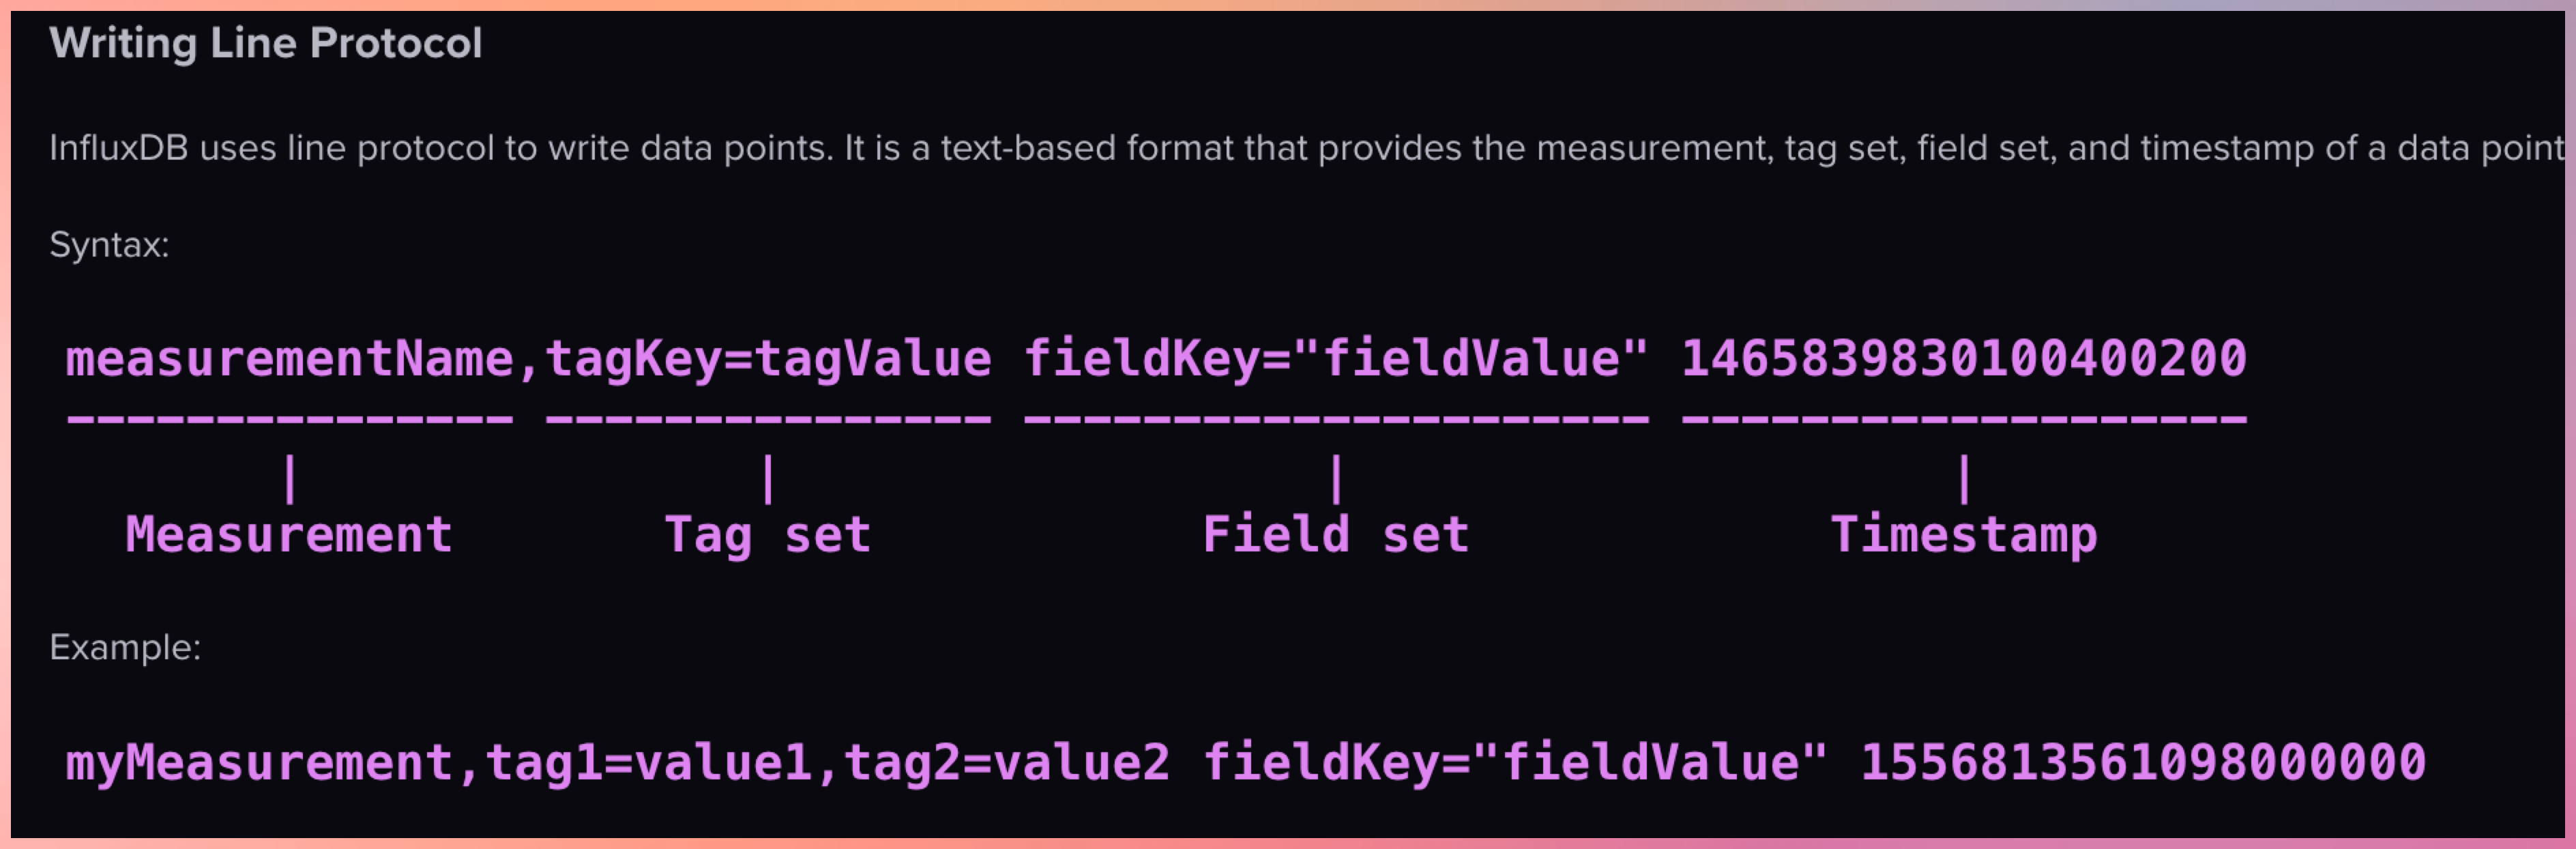
In InfluxDB, a “measurement” is a fundamental concept that represents the data structure that stores time series data. You can think of a measurement as similar to a table in a traditional relational database.
Note:
Use singular form for measurement names (e.g., “temperature” not “temperatures”) Be consistent with tag and field names Consider using a naming convention (e.g., snake_case or camelCase)
Example 1
temperature,location=kitchen value=22.5
- temperature : measurement
- location=kitchen : tags
- value=22.5 : field
- if TimeStamp is missing then it assumes current TimeStamp
Example 2
temperature,location=kitchen,sensor=thermometer value=22.5 1614556800000000000
Example 3
Multiple Tags and Multiple Fields
temperature,location=kitchen,sensor=thermometer temp_c=22.5,humidity_pct=45.2
- location=kitchen,sensor=thermometer : Tags
- temp_c=22.5,humidity_pct=45.2 : Field
Example 4
temperature,location=kitchen,sensor=thermometer reading=22.5,battery_level=98,type="smart",active=true
Copy each section into Line Protocol window, bulk copying will only replace the data as it copies in the same timestamp.
temperature,location=kitchen value=22.5
temperature,location=living_room value=21.8
temperature,location=bedroom value=20.3

temperature,location=kitchen value=23.1
temperature,location=living_room value=22.0
temperature,location=bedroom value=20.7

temperature,location=kitchen value=22.8
temperature,location=living_room value=21.5
temperature,location=bedroom value=20.1

temperature,location=kitchen value=23.5
temperature,location=living_room value=21.9
temperature,location=bedroom value=19.8

temperature,location=kitchen value=24.2
temperature,location=living_room value=22.3
temperature,location=bedroom value=20.5

temperature,location=kitchen value=23.7
temperature,location=living_room value=22.8
temperature,location=bedroom value=21.0

temperature,location=kitchen value=22.9
temperature,location=living_room value=22.5
temperature,location=bedroom value=20.8

humidity,location=kitchen value=45.2
humidity,location=living_room value=42.8
humidity,location=bedroom value=48.3

humidity,location=kitchen value=46.1
humidity,location=living_room value=43.5
humidity,location=bedroom value=49.1

humidity,location=kitchen value=45.8
humidity,location=living_room value=42.3
humidity,location=bedroom value=48.7

humidity,location=kitchen value=46.5
humidity,location=living_room value=44.2
humidity,location=bedroom value=49.8

humidity,location=kitchen value=47.2
humidity,location=living_room value=45.1
humidity,location=bedroom value=50.2

humidity,location=kitchen value=46.8
humidity,location=living_room value=44.8
humidity,location=bedroom value=49.6

humidity,location=kitchen value=45.9
humidity,location=living_room value=43.7
humidity,location=bedroom value=48.5

co2_ppm,location=kitchen value=612
co2_ppm,location=living_room value=578
co2_ppm,location=bedroom value=495

co2_ppm,location=kitchen value=635
co2_ppm,location=living_room value=582
co2_ppm,location=bedroom value=510

co2_ppm,location=kitchen value=621
co2_ppm,location=living_room value=565
co2_ppm,location=bedroom value=488

co2_ppm,location=kitchen value=642
co2_ppm,location=living_room value=595
co2_ppm,location=bedroom value=502

co2_ppm,location=kitchen value=658
co2_ppm,location=living_room value=612
co2_ppm,location=bedroom value=521

co2_ppm,location=kitchen value=631
co2_ppm,location=living_room value=586
co2_ppm,location=bedroom value=508

co2_ppm,location=kitchen value=618
co2_ppm,location=living_room value=572
co2_ppm,location=bedroom value=491
Demo how to Query
Sample queries like MySQL
create database my_db;
CREATE DATABASE my-weather RETENTION 30d;
ALTER DATABASE my-weather SET RETENTION 30d;
select * from system.databases;
show tables;
Write CSV data
Set the measurement as csv_measurement
time,location,value
1741176000,kitchen,22.5
1741176000,living_room,21.8
1741176000,bedroom,20.3
1741176060,kitchen,23.1
1741176060,living_room,22.0
1741176060,bedroom,20.7
1741176120,kitchen,22.8
1741176120,living_room,21.5
1741176120,bedroom,20.1
Write JSON data
Set the measurement as json_measurement
[
  {"time":1741176000,"location":"kitchen","value":22.5},
  {"time":1741176000,"location":"living_room","value":21.8},
  {"time":1741176000,"location":"bedroom","value":20.3},

  {"time":1741176060,"location":"kitchen","value":23.1},
  {"time":1741176060,"location":"living_room","value":22.0},
  {"time":1741176060,"location":"bedroom","value":20.7},

  {"time":1741176120,"location":"kitchen","value":22.8},
  {"time":1741176120,"location":"living_room","value":21.5},
  {"time":1741176120,"location":"bedroom","value":20.1}
]
Login to Client CLI
docker exec -it influxdb3-core bash
Inside Container
export DEFAULT_TOKEN=""

influxdb3 query --database my-db "select * from yourmeasurement" --token $DEFAULT_TOKEN
Telegraf
Telegraf, a server-based agent, collects and sends metrics and events from databases, systems, and IoT sensors. Written in Go, Telegraf compiles into a single binary with no external dependencies–requiring very minimal memory.
Add your host details
Mac / Linux
export MQTT_HOST_NAME=""
export MQTT_PORT=
export MQTT_USER_NAME=""
export MQTT_PASSWORD=""
export INFLUX_TOKEN=""
export INFLUX_DB_BUCKET=""
Windows
set MQTT_HOST_NAME=""
set MQTT_PORT=
set MQTT_USER_NAME=""
set MQTT_PASSWORD=""
set INFLUX_TOKEN=""
set INFLUX_DB_BUCKET=""
telegraf.conf
# Global agent configuration
[agent]
  interval = "5s"
  flush_interval = "10s"
  omit_hostname = true

# MQTT Consumer Input Plugin
[[inputs.mqtt_consumer]]
  servers = ["ssl://${MQTT_HOST_NAME}:${MQTT_PORT}"]
  username = "${MQTT_USER_NAME}"
  password = "${MQTT_PASSWORD}"

  # Set custom measurement name
  name_override = "my_python_sensor_temp"

  # Topics to subscribe to
  topics = [
    "sensors/temp",
  ]

  # Connection timeout
  connection_timeout = "30s"

  # TLS/SSL configuration
  insecure_skip_verify = true

  # QoS level
  qos = 1

  # Client ID
  client_id = "telegraf_mqtt_consumer"

  # Data format
  data_format = "value"
  data_type = "float"

# InfluxDB v2 Output Plugin
[[outputs.influxdb_v2]]
  # URL for your local InfluxDB
  urls = ["http://localhost:8181"]

  # InfluxDB token
  token = "${INFLUX_TOKEN}"

  # Organization name
  organization = ""

  # Destination bucket
  bucket = "${INFLUX_DB_BUCKET}"

  # Add tags - match the location from your MQTT script
  [outputs.influxdb_v2.tags]
    location = "room1"
Run Telegraph
telegraf --config telegraf.conf --debug
Storing output in InfluxDB and S3
export MQTT_HOST_NAME=""
export MQTT_PORT=
export MQTT_USER_NAME=""
export MQTT_PASSWORD=""
export INFLUX_TOKEN=""
export INFLUX_DB_ORG=""
export INFLUX_DB_BUCKET=""
export S3_BUCKET=""
export AWS_REGION=""
export AWS_ACCESS_KEY_ID=""
export AWS_SECRET_ACCESS_KEY=""
telegraf.conf
# Global agent configuration
[agent]
  interval = "5s"
  flush_interval = "10s"
  omit_hostname = true

# MQTT Consumer Input Plugin
[[inputs.mqtt_consumer]]
  servers = ["ssl://${MQTT_HOST_NAME}:${MQTT_PORT}"]
  username = "${MQTT_USER_NAME}"
  password = "${MQTT_PASSWORD}"

  # Set custom measurement name
  name_override = "my_python_sensor_temp"

  # Topics to subscribe to
  topics = [
    "sensors/temp",
  ]

  # Connection timeout
  connection_timeout = "30s"

  # TLS/SSL configuration
  insecure_skip_verify = true

  # QoS level
  qos = 1

  # Client ID
  client_id = "telegraf_mqtt_consumer"

  # Data format
  data_format = "value"
  data_type = "float"

# InfluxDB v2 Output Plugin
[[outputs.influxdb_v2]]
  # URL for your local InfluxDB
  urls = ["http://localhost:8181"]

  # InfluxDB token
  token = "${INFLUX_TOKEN}"

  # Organization name
  organization = ""

  # Destination bucket
  bucket = "${INFLUX_DB_BUCKET}"

  # Add tags - match the location from your MQTT script
  [outputs.influxdb_v2.tags]
    location = "room1"

# S3 Output Plugin with CSV format
[[outputs.remotefile]]
  remote = 's3,provider=AWS,access_key_id=${AWS_ACCESS_KEY_ID},secret_access_key=${AWS_SECRET_ACCESS_KEY},region=${AWS_REGION}:${S3_BUCKET}'

  # File naming
  files = ['{{.Name}}-{{.Time.Format "2025-03-26"}}']
InfluxDB University
#telegraf #docker #measurement
[Avg. reading time: 0 minutes]
Data Visualization libraries
Popular tools
- Grafana
- Tableau
- PowerBI
- StreamLit
- Python MatplotLib
- Python Seaborn
[Avg. reading time: 8 minutes]
Grafana
Grafana is an open-source analytics and visualization platform that allows you to query, visualize, alert on, and understand your metrics from various data sources through customizable dashboards.
- Provides real-time monitoring of IoT device data through intuitive dashboards
- Supports visualization of time-series data (which is common in IoT applications)
- Offers powerful alerting capabilities for monitoring device health and performance
- Enables custom dashboards that can display metrics from multiple IoT devices in one view.
- InfluxDB is optimized for storing and querying time-series data generated by IoT sensors.
- The combination provides high-performance data ingestion for handling large volumes of IoT telemetry.
- InfluxDB’s data retention policies help manage IoT data storage efficiently.
- Grafana can easily visualize the time-series data stored in InfluxDB through simple queries.
- Both tools are lightweight enough to run on edge computing devices for local IoT monitoring.
Deploy InfluxDB/Grafana
Create a network
- Isolation and security - The dedicated network isolates your containers from each other and from the host system, reducing the attack surface.
- Container-to-container communication - Containers in the same network can communicate using their container names (like “myinflux” and “mygrafana”) as hostnames, making connections simpler and more reliable.
- Port conflict prevention - You avoid potential port conflicts on the host, as multiple applications can use the same internal port numbers within their isolated network.
- Simpler configuration - Services can reference each other by container name instead of IP addresses, making configuration more maintainable.
Updated docker-compose.yml
Stop the previous containers
docker compose down
docker-compose.yml
name: influxdb3
services:
  influxdb3-core:
    container_name: influxdb3-core
    image: influxdb:3-core
    ports:
      - 8181:8181
    command:
      - influxdb3
      - serve
      - --node-id=node0
      - --object-store=file
      - --data-dir=/var/lib/influxdb3/data
      - --plugin-dir=/var/lib/influxdb3/plugins
    volumes:
      - ./.influxdb3/core/data:/var/lib/influxdb3/data
      - ./.influxdb3/core/plugins:/var/lib/influxdb3/plugins
    restart: unless-stopped

  influxdb3-explorer:
    image: influxdata/influxdb3-ui:latest
    container_name: influxdb3-explorer
    ports:
      - "8888:80"
    volumes:
      - ./.influxdb3-ui/db:/db:rw
      - ./.influxdb3-ui/config:/app-root/config:ro
    environment:
      SESSION_SECRET_KEY: "${SESSION_SECRET_KEY:-$(openssl rand -hex 32)}"
    restart: unless-stopped
    command: ["--mode=admin"]

  grafana:
    image: grafana/grafana-oss:latest
    container_name: grafana
    ports:
      - "3000:3000"
    volumes:
      - ./.grafana:/var/lib/grafana
    depends_on:
      - influxdb3-core
    restart: unless-stopped
docker compose up -d
InfluxDB UI
http://localhost:8888
Grafana
http://localhost:3000

userid/pwd: admin/admin
InfluxDB Host: http://influxdb3-core:8181 (as all 3 services are in same network)
Demo
Write SQL - Build Dashboards - Alerts
[Avg. reading time: 0 minutes]
Machine Learning with IoT
[Avg. reading time: 5 minutes]
IoT Data Characteristics
What is IoT Data?
IoT data is generated continuously from sensors and devices interacting with the physical world.
Unlike traditional datasets:
- It is time-dependent
- It arrives as a continuous stream
- It reflects real-world conditions, not controlled inputs
Examples
- Temperature readings every second
- Machine vibration signals
- GPS location streams
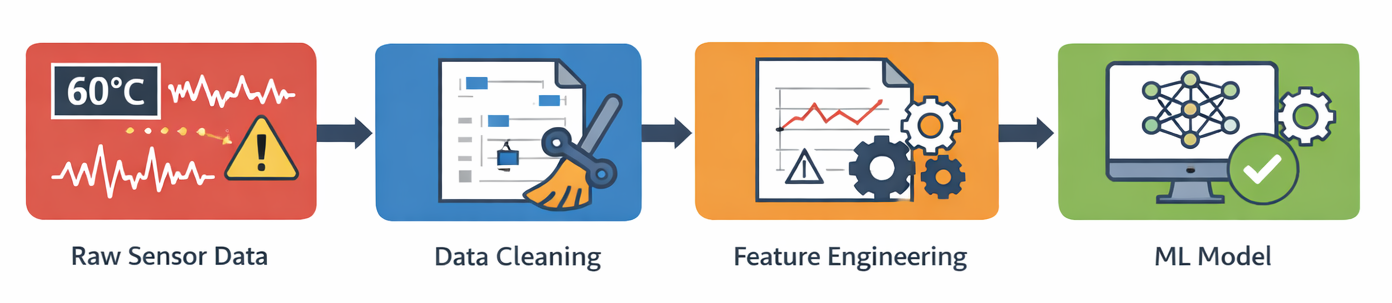
Key Characteristics of IoT Data
1. Time-Series Nature
- Data is ordered by time
- Past values influence future values
Example
- Temperature at 10:01 depends on 10:00
2. High Frequency & Volume
- Data generated every second (or faster)
- Quickly becomes large-scale
3. Noisy Data
- Sensors are imperfect
- External conditions introduce fluctuations
Example
- Temperature spikes due to environment, not actual issue
4. Missing Data
- Network issues
- Device downtime
- Transmission failures
5. Outliers & Spikes
- Sudden jumps or drops
- Could be real events OR sensor errors
6. Correlated Signals
- Multiple sensors interact
Example
- Temperature ↑ → Pressure ↑ → Humidity ↓
7. Continuous & Streaming
- Data is not static
- Always flowing
Data Quality Challenges in IoT
1. Missing Values
- Gaps in data streams
- Need interpolation or handling strategies
2. Duplicate Data
- Common with MQTT QoS1 (at-least-once delivery)
3. Out-of-Order Data
- Events may arrive late
- Timestamp handling becomes critical
4. Sensor Drift
- Sensors degrade over time
- Gradual deviation from true values
5. Noise vs Signal Problem
- Hard to distinguish real events from random fluctuations
Why This Matters for ML
Raw IoT data:
- Is not directly usable
- Leads to poor model performance
- Causes false alerts and missed predictions
Before applying ML, we must transform raw data into meaningful signals using Feature Engineering.
[Avg. reading time: 8 minutes]
Feature Engineering
Feature engineering is the process of transforming raw IoT sensor data into meaningful signals that machine learning models can understand.
Raw sensor data is:
- noisy
- incomplete
- difficult to interpret
Feature engineering converts it into:
- trends
- patterns
- changes over time
One-line takeaway
- Models don’t learn from raw data, they learn from engineered signals.
Why Feature Engineering is Critical in IoT
IoT data is fundamentally different from traditional datasets:
- continuous streams
- time-dependent
- affected by environment
Without feature engineering:
- models produce false alerts
- important patterns are missed
- predictions become unstable
Core Feature Types
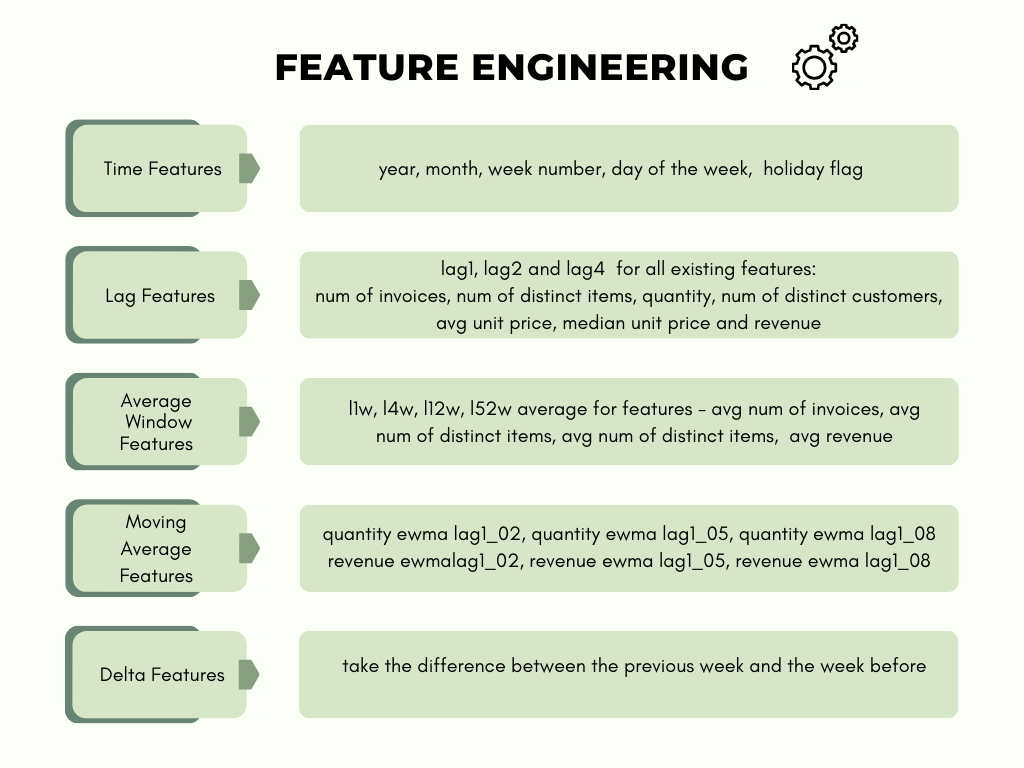
1. Rolling / Window Features
Capture short-term behavior over a time window.
- rolling mean
- rolling standard deviation
- rolling min/max
Example
- average temperature over last 5 minutes
Purpose
- smooth noise
- identify stability vs fluctuation
| hr | temp |
|------|------|
| 1    | 20   |
| 2    | 21   |
| 3    | 35   |
| 4    | 22   |
Rolling Window (window = 2)
| hr | temp | rolling_mean_2 |
|----|------|----------------|
| 1  | 20   | 20             |
| 2  | 21   | 20.5           |
| 3  | 35   | 28             |
| 4  | 22   | 28.5           |
Rolling Window (window = 3)
| hr | temp | rolling_mean_3 |
|----|------|----------------|
| 1  | 20   | 20             |
| 2  | 21   | 20.5           |
| 3  | 35   | 25.3           |
| 4  | 22   | 26             |
window = 2 : current + previous value window = 3 : current + last 2 values
Small window shows spikes.
Large window smoothens the data.
2. Lag Features
Use past values of a signal.
- temp(t-1), temp(t-5), temp(t-10)
Purpose
- help models learn trends
- capture temporal dependencies
| hr | temp | lag_1 |
| -- | ---- | ----- |
| 1  | 20   | -     |
| 2  | 21   | 20    |
| 3  | 35   | 21    |
| 4  | 22   | 35    |
3. Rate of Change (Delta)
Measure how fast a signal changes.
- temp(t) - temp(t-1)
- pressure change per second
Purpose
- detect sudden spikes
- highlight abnormal behavior
Raw Data
| hr | temp |
|------|------|
| 1    | 20   |
| 2    | 21   |
| 3    | 35   |
| 4    | 22   |
Feature Engineering
| hr | temp | rolling_mean | delta |
|------|------|--------------|-------|
| 1    | 20   | 20           | -     |
| 2    | 21   | 20.5         | +1    |
| 3    | 35   | 25.3         | +14   |
| 4    | 22   | 26           | -13   |
Insight
- spike at hr=3
4. Aggregation Features
Summarize behavior over time.
- average over 10 minutes
- count of spikes
- max/min values
Purpose
- capture overall system behavior
5. Time-Based Features
Incorporate time context.
- hour of day
- day of week
Purpose
- capture seasonality patterns
6. Cross-Sensor Features
Combine multiple sensor readings.
- temperature + humidity
- pressure vs vibration
Purpose
- capture relationships between signals
- improve model accuracy
How Feature Engineering Connects to ML in IoT
Predictive Maintenance
- uses trends and long-term patterns
- detects gradual degradation
Anomaly Detection
- uses delta and rolling statistics
- identifies sudden spikes and instability
Classification
- uses patterns of behavior
- distinguishes device states (normal vs faulty)
Key Principle
Feature engineering bridges the gap between:
- raw sensor data
- intelligent ML decisions
#featureengineering #datacleaning
[Avg. reading time: 5 minutes]
Predictive Maintenance
Predictive maintenance uses IoT telemetry to anticipate equipment failure before it happens, enabling intervention at the right time instead of reacting after breakdowns.
This shifts operations from reactive → preventive → predictive.
Core Components
-
Sensor Integration
Capture continuous signals like vibration, temperature, pressure, and acoustic patterns from equipment. -
Data Processing
Clean, normalize, and time-align high-frequency sensor streams for downstream use. -
Condition Monitoring
Track real-time metrics against thresholds or baseline behavior to detect deviations. -
Failure Prediction Models
Apply statistical or ML models (regression, classification, anomaly detection) trained on historical failure patterns.
Implementation Architecture
-
Edge Layer
Perform lightweight filtering and anomaly detection close to the device to reduce latency and bandwidth. -
Fog Layer
Aggregate multiple devices, run near-real-time analytics, and coordinate localized decisions. -
Cloud Layer
Train models, store long-term telemetry, and run deeper analysis across fleets. -
Visualization & Alerting
Dashboards, alerts, and automated triggers for maintenance teams.
Why This Matters in Data Engineering
- Sensor data is high volume, high velocity, time-series heavy
- Requires streaming pipelines (MQTT > Kafka > TSDB / Lakehouse)
- Needs schema evolution + late arriving data handling
- Models depend on feature engineering over time windows (rolling stats, lag features)
- Poor design leads to unreliable predictions
Benefits
-
Reduced Downtime
Failures are prevented, not reacted to -
Cost Optimization
Avoid unnecessary scheduled maintenance -
Extended Asset Life
Early detection prevents irreversible damage -
Improved Safety
Reduces risk of catastrophic failures
git clone https://github.com/gchandra10/python_iot_workflow_predictive_demo.git
Real Example
- Motor vibration increases gradually over time
- Edge detects anomaly spike
- Fog aggregates patterns across similar machines
- Cloud model predicts failure in ~5 days
- Alert triggered → maintenance scheduled
- Downtime avoided
#predictive #iot #edge #fog #timeseries
[Avg. reading time: 15 minutes]
Anomaly Detection
Anomaly detection and predictive maintenance are important parts of the IoT upper stack. They help analyze device and sensor data to detect unusual behavior early and reduce the chance of equipment failure.
Anomaly Detection in IoT
Anomaly detection identifies data points or patterns that do not match normal system behavior.
In IoT systems, this is useful for:
- detecting abnormal sensor readings
- identifying device malfunctions
- spotting unusual operational behavior
- triggering alerts before failures become serious
This is especially valuable in industrial IoT, smart manufacturing, healthcare, logistics, and other environments where sensor data arrives continuously.
Common Approaches
Statistical Methods
Statistical approaches define a baseline of normal behavior and flag values that deviate significantly from it.
Examples:
- mean and standard deviation
- z-score
- moving averages
- seasonal thresholds
These methods are simple and fast, but they may struggle when the data is complex or changes over time.
Machine Learning Techniques
Machine learning models learn patterns from historical data and identify points that do not fit those patterns.
Examples:
- Isolation Forest
- One-Class SVM
- Local Outlier Factor
- clustering-based approaches
These methods are useful when normal behavior is not easy to define with simple rules.
Deep Learning Models
Deep learning models can detect anomalies in high-dimensional or sequential IoT data.
Examples:
- autoencoders
- LSTM-based sequence models
- transformer-based time-series models
These models are powerful, but they usually require more data, more tuning, and more compute.
Isolation Forest
Isolation Forest is one of the most practical algorithms for anomaly detection.
Unlike many other methods, it does not rely on distance or density. Instead, it works on a simple idea:
Anomalies are few and different, so they are easier to isolate than normal points.
Core Idea
Isolation Forest builds many random trees.
In each tree:
- a feature is selected randomly
- a split value is selected randomly
- the data is repeatedly divided until individual points become isolated
A point that gets isolated quickly is more likely to be an anomaly.
A point that needs more splits to isolate is more likely to be normal.
Why It Works
Normal points usually belong to dense regions of the dataset, so they take more splits to separate.
Anomalies are often far away from the bulk of the data, so they get isolated in fewer steps.
That is why:
- shorter path length > more anomalous
- longer path length > more normal
Simple Example
Dataset: [-100, 2, 11, 13, 100]
In practice, Isolation Forest builds many trees (100+).
Here we show only 4 trees for understanding.
Tree 1
                Root
                 |
        [Split at value = 7]
        /                 \
    [-100, 2]        [11, 13, 100]
        |                  |
[Split at value = -49]  [Split at value = 56]
    /         \          /         \
[-100]       [2]    [11, 13]      [100]

Path lengths:
- -100 → 2
- 2 → 2
- 11 → 3
- 13 → 3
- 100 → 2
Tree 2
                Root
                 |
        [Split at value = 1]
        /                 \
    [-100]          [2, 11, 13, 100]
                        |
                  [Split at value = 50]
                  /                 \
            [2, 11, 13]           [100]

Approx path lengths:
- -100 → 1
- 100 → 2
- 2, 11, 13 → 3 to 4
Tree 3
                Root
                 |
        [Split at value = 12]
        /                 \
[-100, 2, 11]         [13, 100]
        |                  |
[Split at value = -40]  [Split at value = 57]
    /         \          /         \
[-100]     [2, 11]     [13]       [100]

Path lengths:
- -100 → 2
- 2 → 3
- 11 → 3
- 13 → 2
- 100 → 2
Tree 4
                Root
                 |
        [Split at value = 80]
        /                 \
[-100, 2, 11, 13]        [100]
        |
[Split at value = -50]
    /         \
[-100]    [2, 11, 13]

Approx path lengths:
- 100 → 1
- -100 → 2
- others → 3+
Average Path Length
- -100 → (2 + 1 + 2 + 2) / 4 = 1.75
- 2 → (2 + 3 + 3 + 3) / 4 = 2.75
- 11 → (3 + 3 + 3 + 3) / 4 = 3.00
- 13 → (3 + 3 + 2 + 3) / 4 = 2.75
- 100 → (2 + 2 + 2 + 1) / 4 ≈ 2.0
Anomaly Score
s(x, n) = 2^(-E[h(x)] / c(n))
Where:
- E[h(x)] = average path length
- c(n) = normalization factor
Score meaning:
- closer to 1 > anomaly
- closer to 0 > normal
Interpretation
The extreme values (-100 and 100) are isolated faster than the middle values.
That means:
- -100 and 100 > anomalies
- 2, 11, 13 > normal points
Key Points
- anomalies are few and different
- random splits isolate anomalies faster
- path length determines anomaly likelihood
- ensemble of trees improves reliability
- no distance calculations required
- scales well for large datasets
Advantages
- simple and intuitive
- fast and scalable
- works with high-dimensional data
- no need for distance calculations
- good for unsupervised learning
Limitations
- struggles with clustered anomalies
- sensitive when anomalies are near normal data
- randomness can cause variation in small datasets
- threshold selection is use-case dependent
Isolation Forest in IoT
Used for:
- temperature anomalies
- vibration anomalies
- pressure irregularities
- device failure prediction
- real-time alerting
Applications:
- predictive maintenance
- fault detection
- industrial monitoring
#anomaly #predictivemaintenance
[Avg. reading time: 17 minutes]
ML Models quick intro

Supervised Learning
In supervised learning, classification and regression are two distinct types of tasks, differing primarily in the nature of their output and the problem they solve.
Labeled historical data (e.g., sensor readings with timestamps of past failures).
Classification
Predicts discrete labels (categories or classes).
Example:
Binary: Failure (1) vs. No Failure (0).
Multi-class: Type of failure (bearing_failure, motor_overheat, lubrication_issue).
Regression
Predicts continuous numerical values.
Example:
Remaining Useful Life (RUL): 23.5 days until failure.
Time-to-failure: 15.2 hours.
Use Cases in Predictive Maintenance
Classification:
Answering yes/no questions:
- Will this motor fail in the next week?
- Is the current vibration pattern abnormal?
- Identifying the type of fault (e.g., electrical vs. mechanical).
Regression:
Quantifying degradation:
- How many days until the turbine blade needs replacement?
- What is the current health score (0–100%) of the compressor?
Algorithms
| Category | Algorithm | Description |
|---|---|---|
| Classification | Logistic Regression | Models probability of class membership. |
| Random Forest | Ensemble of decision trees for classification. | |
| Support Vector Machines (SVM) | Maximizes margin between classes. | |
| Neural Networks | Learns complex patterns and nonlinear decision boundaries. |
| Category | Algorithm | Description |
|---|---|---|
| Regression | Linear Regression | Models linear relationship between features and target. |
| Decision Trees (Regressor) | Tree-based model for predicting continuous values. | |
| Gradient Boosting Regressors | Ensemble of weak learners (e.g., XGBoost, LightGBM). | |
| LSTM Networks | Recurrent neural networks for time-series regression. |
Evaluation Metrics
Classification:
- Accuracy: % of correct predictions.
- Precision/Recall: Trade-off between false positives and false negatives.
- Precision: TP/(TP+FP)
- Recall: TP/(TP+FN)
- F1-Score: Harmonic mean of precision and recall.

Example:
Will the temperatue exceed 90F in 10 mins?
Positive: Yes will cross 90F Negative: Will not cross 90F
True Positive
Model: Temp will cross 90 Actual: It did cross 90
Result: Correct and we are prepared.
False Positive
Model: Temp will cross 90 Actual: Didn’t cross
Result: Predicted heat but it never happened.
True Negative
Model: Temp will be less than 90 Actual: Temp stayed less than 90
Result: Predicted low and it happened.
False Negative
Model: Temp will be less than 90 Actual: Temp went above 90
Result: Missed issue.
In IoT - False Negative are risky, False Positive are annoyance.
Regression:
- Mean Absolute Error (MAE): Average absolute difference between predicted and actual values.
- Mean Squared Error (MSE): Penalizes larger errors.
- R² Score: How well the model explains variance in the data.
Unsupervised Learning
In unsupervised learning, clustering and anomaly detection serve distinct purposes and address different problems.
Primary Objective
Clustering
- Assigns each data point to a cluster (e.g., Cluster 1, Cluster 2).
- Outputs are groups of similar instances.
Goal: Group data points into clusters based on similarity.
- Focuses on discovering natural groupings or patterns in the data.
Example: Segmenting devices into groups based on usage.
| Room | Temp | Humidity | CO₂ | Occupancy |
|---|---|---|---|---|
| R1 | 22 | 40 | 500 | Low |
| R2 | 23 | 42 | 520 | Low |
| R3 | 28 | 60 | 900 | High |
| R4 | 29 | 65 | 950 | High |
Cluster 1 - R1 and R2, Cluster 2 - R3 and R4
Anomaly Detection
- Labels data points as normal or anomalous (binary classification).
- Outputs are scores or probabilities indicating how “outlier-like” a point is.
Goal: Identify rare or unusual data points that deviate from the majority.
Focuses on detecting outliers or unexpected patterns.
Example: Flagging fraudulent credit card transactions.
Algorithms
| Category | Algorithm | Description |
|---|---|---|
| Clustering | K-Means | Partitions data into k spherical clusters. |
| Hierarchical Clustering | Builds nested clusters using dendrograms. | |
| DBSCAN | Groups dense regions and identifies sparse regions as outliers. | |
| Gaussian Mixture Models (GMM) | Probabilistic clustering using a mixture of Gaussians. | |
| Anomaly Detection | Isolation Forest | Isolates anomalies using random decision trees. |
| One-Class SVM | Learns a boundary around normal data to detect outliers. | |
| Autoencoders | Reconstructs input data; anomalies yield high reconstruction error. | |
| Local Outlier Factor (LOF) | Detects anomalies by comparing local density of data points. |
Time Series
Forecasting and Anomaly Detection are two fundamental but distinct tasks, differing in their objectives, data assumptions, and outputs.
| Model | Type | Strengths | Limitations |
|---|---|---|---|
| ARIMA/SARIMA | Classical | Simple, interpretable, strong for univariate, seasonal data | Requires stationary data, manual tuning |
| Facebook Prophet | Additive model | Easy to use, handles holidays/seasonality, works with missing data | Slower for large datasets, limited to trend/seasonality modeling |
| Holt-Winters (Exponential Smoothing) | Classical | Lightweight, works well with level/trend/seasonality | Not good with irregular time steps or complex patterns |
| LSTM (Recurrent Neural Network) | Deep Learning | Learns long-term dependencies, supports multivariate | Requires lots of data, training is resource-intensive |
| XGBoost + Lag Features | Machine Learning | High performance, flexible with engineered features | Requires feature engineering, not “true” time series model |
| NeuralProphet | Hybrid (Prophet + NN) | Better performance than Prophet, supports regressors/events | Heavier than Prophet, still maturing |
| Temporal Fusion Transformer (TFT) | Deep Learning | SOTA for multivariate forecasts with interpretability | Overkill for small/medium IoT data, very heavy |
| Layer | Model(s) | Why |
|---|---|---|
| Edge | Holt-Winters, thresholds, micro-LSTM (TinyML), Prophet (inference) | Extremely lightweight, low latency |
| Fog | Prophet, ARIMA, Isolation Forest, XGBoost | Moderate compute, supports both real-time + near-real-time |
| Cloud | LSTM, TFT, NeuralProphet, Prophet (training), XGBoost | Can handle heavy training, multivariate data, batch scoring |
git clone https://github.com/gchandra10/python_iot_ml_demo.git
[Avg. reading time: 1 minute]
Security
- Introduction
- Application Layer
- Data Layer
- Communication Layer
- Number Systems
- Encryption
- IoT Privacy
- Auditing in IoT
[Avg. reading time: 9 minutes]
Introduction to IoT Security Challenges
IoT Security is not a theory its real.
News articles
MS Azure blocks Largest DDos Attack
Govt CISA Replace EOL Edge Devices
Why IoT Is Hard to Secure
| Reason | Explanation |
|---|---|
| Resource Constraints | Limited CPU, memory → hard to run strong security controls |
| Scale & Diversity | Thousands of devices, different vendors → hard to manage |
| Physical Exposure | Devices can be accessed or tampered with in the field |
| Long Lifespan | Devices run for years with poor or no updates |
| Insecure Defaults | Weak passwords, open ports, outdated firmware |
| Inconsistent Standards | Security exists, but not applied consistently |
What This Means in Practice
- You cannot rely on one layer
- You cannot patch easily
- You must assume devices are compromised
Security Layers in IoT
| Layer | Focus | Key Concerns |
|---|---|---|
| Device-Level | Hardware + firmware | Secure boot, tampering, firmware integrity |
| Upper Stack | Data, APIs, cloud | Auth, encryption, APIs, IAM |
Reality
If device layer fails, upper layers receive fake but valid-looking data.
Your dashboards will lie.
Upper Stack Attack Surfaces
Application
- Insecure APIs
- Weak authentication
- Poor input validation
- No rate limiting
Attack Example: Attacker sends 10,000 fake requests > API crashes > system unavailable
Data
- No encryption (in transit / at rest)
- Public cloud storage
- Weak access control
Attack Example: Open S3 bucket -> attacker downloads sensitive sensor data
Communication
- MITM attacks (MQTT, HTTP)
- Replay attacks
- Weak TLS/cert handling
Attack Example: Captured MQTT message replayed > system thinks event happened again
Fake Publisher Attack
[ Device ]     [ Attacker ]
     \             /
      \           /
       ---> [ MQTT Broker ] ---> [ Cloud ] ---> [ Dashboard ]
Man-in-the-Middle (MITM)
[ Device ] ---> ❌ Attacker ---> [ MQTT Broker ]
Lower Stack Attack Surfaces
Device
- Firmware tampering
- Debug port access
- Insecure boot
Attack Example: Attacker plugs into device > flashes modified firmware > device becomes a bot
Network
- No segmentation
- Open ports
- Weak local protocols (BLE, Zigbee)
Attack Example: Compromise one device -> scan network -> take over others
Supply Chain
- Malicious firmware
- Vulnerable libraries
- Fake/cloned devices
Attack Example: Cheap cloned sensor sends manipulated data from day 1
Summary
- One weak layer breaks everything
- Device -> Network -> Cloud -> App (all connected)
- Example: weak device auth -> attacker sends fake data > corrupts analytics
[Avg. reading time: 7 minutes]
Application Layer
Insecure APIs
Problem: APIs are the control plane of IoT systems. If they are weak, the entire system is exposed.
Common failures:
- No authentication or weak auth
- Over-permissive endpoints
- No encryption (HTTP instead of HTTPS)
- No rate limiting
Real-World Use Case:
- CloudPets breach (2017)
- API had no authentication
- Exposed millions of voice recordings
- Attackers accessed data directly from backend storage
Mitigation:
- Enforce strong auth:
- OAuth2 / JWT / Mutual TLS
- Authorization per endpoint (RBAC)
- Always use HTTPS
- Hide internal APIs behind gateways
- Add API gateway (rate limit + auth + logging)
Demo
git clone https://github.com/gchandra10/python_api_auth_demo.git
Poor Session Management
Sessions are often:
- Long-lived
- Reused across devices
- Stored insecurely
This leads to session hijacking or replay attacks.
Real-World Use Case:
- Smart thermostat app reused same session token
- Attacker reused token -> controlled devices remotely
Mitigation:
- Short-lived access tokens
- Refresh tokens with rotation
- Store tokens securely:
- Avoid localStorage
- Use HTTP-only cookies
- Invalidate sessions:
- Logout
- Password change
- Bind session to device/IP if possible
Weak Input Validation (XSS, Injection)
Without validation -> injection attacks:
- XSS
- SQL Injection
- Command Injection
Real-World Example
- Smart fridge dashboard
- Attacker injected script -> executed on admin panel
- Stole session cookies
Mitigation
- Validate input schema strictly
- Sanitize inputs
- Escape outputs (HTML/JS)
- Use parameterized queries
- Never trust device-originated data
No Rate Limiting or Abuse Detection
Without rate limiting
- Brute force attacks succeed
- APIs get abused
- Devices become botnet nodes
Using Bots hackers cause
- Massive DDoS network
- Millions of IoT devices causes Internet outage
Mitigation
- Rate limit by IP / User / MAC address
- Detect anomalies by too many failures, spikes
- Pause access
Limit to 5 queries for given 60 seconds
from fastapi import Request
from time import time

requests = {}

def rate_limit(ip):
    now=time()
    window=60
    limit=5
    requests.setdefault(ip, [])
    requests[ip]=[t for t in requests[ip] if now-t<window]
    if len(requests[ip])>=limit:
        return False
    requests[ip].append(now)
    return True

@app.get("/login")
def login(req: Request):
    ip=req.client.host
    if not rate_limit(ip):
        raise HTTPException(status_code=429)
    return {"ok":True}
#xss #ratelimiting #insecureapi
[Avg. reading time: 9 minutes]
Data Layer
Data in Transit (No Encryption)
Devices send data over MQTT, CoAP, or HTTP without encryption. Anyone on the network can read or modify it.
Real-World Use Case: A smart water meter system in a municipality was transmitting usage data over plain HTTP. Attackers intercepted and altered readings, affecting billing.
Mitigation:
- Use TLS (HTTPS, MQTT over TLS)
- Use DTLS for UDP-based protocols (CoAP)
- Enforce certificate validation and pinning
- Disable plaintext endpoints completely
import ssl
import paho.mqtt.client as mqtt

client = mqtt.Client()
client.tls_set(ca_certs="ca.crt",
               certfile="client.crt",
               keyfile="client.key",
               tls_version=ssl.PROTOCOL_TLS)

client.connect("broker.hivemq.com", 8883)
client.publish("iot/sensor", "secure message")
client.loop_start()
- ca.crt : Certificate Authority (CA) used to trust broker (on device) AND trust devices (on broker)
- client.crt : device identity (sent to broker)
- client.key : proof device owns that identity
Data at Rest (Unencrypted Databases)
Problem:
- Data stored on devices, gateways, or cloud is not encrypted.
- Anyone with access can extract it.
Real-World Use Case: In 2020, a smart door lock vendor left unencrypted SQLite DBs in devices. Attackers extracted access logs and user PINs directly from flash memory.
- Credential theft
- Sensitive data exposure
- Device compromise
Mitigation:
- Enable AES-based encryption for device-side storage
- Use full-disk encryption on gateways or fog nodes
- Enforce encryption at rest (e.g., AWS KMS, Azure SSE) in cloud databases
from cryptography.fernet import Fernet

key = Fernet.generate_key()
cipher = Fernet(key)

data = b"temperature=25"
encrypted = cipher.encrypt(data)
decrypted = cipher.decrypt(encrypted)
Insecure Cloud Storage (e.g., Public S3 Buckets)
Problem: Cloud object storage like AWS S3 or Azure Blob often gets misconfigured as public, leaking logs, firmware, or user data.
Real-World Use Case: A fitness tracker company exposed terabytes of GPS and health data by leaving their S3 bucket public and unprotected — affecting thousands of users.
Mitigation:
- Use least privilege IAM roles for all cloud resources
- Audit and scan for public buckets (AWS Macie, Prowler)
- Enable object-level encryption and access logging
- Set up guardrails and policies (e.g., SCPs, Azure Blueprints)
Lack of Data Integrity Checks
Problem: Without integrity checks, even if data is encrypted, an attacker can alter it in transit or at rest without detection.
Real-World Use Case: A smart agriculture system relied on soil sensor readings to trigger irrigation. An attacker tampered with packets to falsify dry-soil readings, wasting water.
Mitigation:
- Use Hash-based Message Authentication Code (HMAC) or digital signatures with shared secrets
- Implement checksums or hashes (SHA-256) on stored data
- Validate data consistency across nodes/cloud with audit trails
import hmac, hashlib

secret = b"key"
message = b"sensor_data=25"

signature = hmac.new(secret, message, hashlib.sha256).hexdigest()

# verify
valid = hmac.compare_digest(
    signature,
    hmac.new(secret, message, hashlib.sha256).hexdigest()
)

print(valid)
Sender:
- Generates HMAC using secret key
- Sends: message + signature
Receiver:
- Recomputes HMAC using same key
- Compares
#dataintransit #dataatrest #dataintegrity
[Avg. reading time: 5 minutes]
Communication Layer
MITM on MQTT / CoAP
Problem
MQTT and CoAP are lightweight protocols and are often deployed without strong encryption or authentication.
This makes them vulnerable to Man-in-the-Middle (MITM) attacks, where an attacker intercepts, reads, or alters traffic between the device and the broker/server.
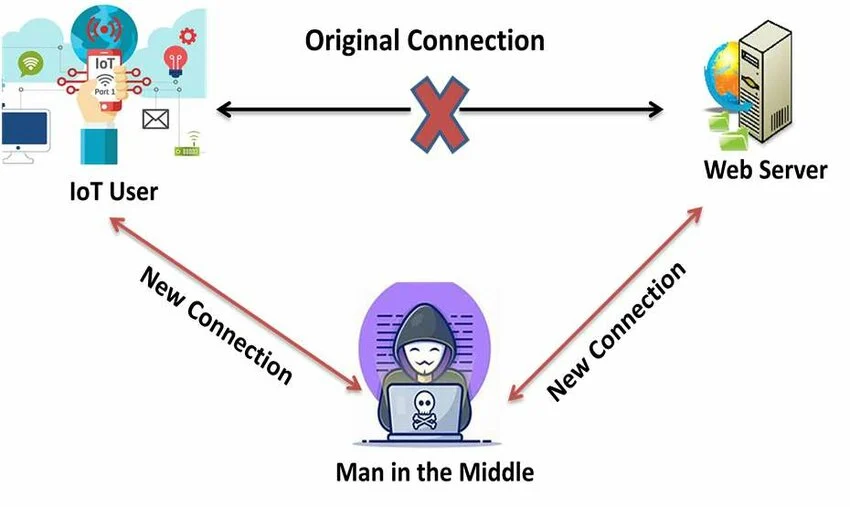
Example Scenario
A smart lighting system uses MQTT over plain TCP without TLS.
An attacker on the same network spoofs the broker and sends fake commands, causing all lights to turn off remotely.
Mitigation
- Use MQTT over TLS on port 8883
- Use CoAP over DTLS
- Enable mutual authentication using client and server certificates
- Verify broker/server identity before accepting a connection
- Use certificate pinning where appropriate
- Disable anonymous access on MQTT brokers
Replay Attacks Due to Lack of Freshness
Problem
Some IoT systems do not check whether a message is fresh.
If timestamps, nonces, or sequence numbers are missing, an attacker can capture a valid message and replay it later.
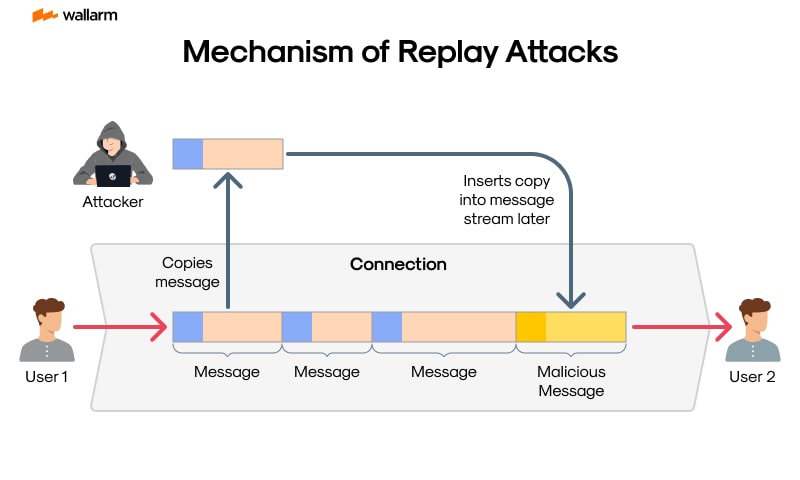
Example Scenario
A smart lock accepts an unlock command without checking whether the message is new.
An attacker records a valid unlock message and replays it later to gain unauthorized access.
Mitigation
- Add a timestamp, nonce, or message counter to each request
- Reject duplicate or expired messages
- Track recently used nonces or counters
- Use challenge-response for critical actions
- Use short-lived tokens with expiration checks
Example
{
  "device_id": "lock01",
  "command": "unlock",
  "nonce": "839275abc123",
  "timestamp": "2025-04-01T10:23:00Z"
}
[Avg. reading time: 8 minutes]
Number Systems
Binary
0 and 1
Octal
0-7
Decimal
Standard Number system.
Hex
0 to 9 and A to F
Base36
A-Z & 0-9
Great for generating short uniqut IDs. Packs more information into fewer characters.
An epoch time stamp 1602374487561 (14 characters long) will be converted to 8 character long Base36 string “kg4cebk9”
Popular Use Cases:
Base 36 is used for Dell Express Service Codes and many other applications which have a need to minimize human error.
Example : Processing 1 billion rows each hour for a day
Billion rows x 14 = 14 billion bytes = 14 GB x 24 hrs = 336 GB Billion rows x 8 = 8 billion bytes = 8 GB x 24 hrs = 192 GB
pip install base36
import base36
base36.dumps(1602374487561)
base36.loads('kg4cebk9') == 1602374487561
Base 64:
Base64 encoding schemes are commonly used when there is a need to encode binary data that needs be stored and transferred over media that are designed to deal with textual data. This is to ensure that the data remains intact without modification during transport.
Base64 is a way to encode binary data into an ASCII character set known to pretty much every computer system, in order to transmit the data without loss or modification of the contents itself.
2 power 6 = 64
So Base64 Binary values are six bits not 8 bits.
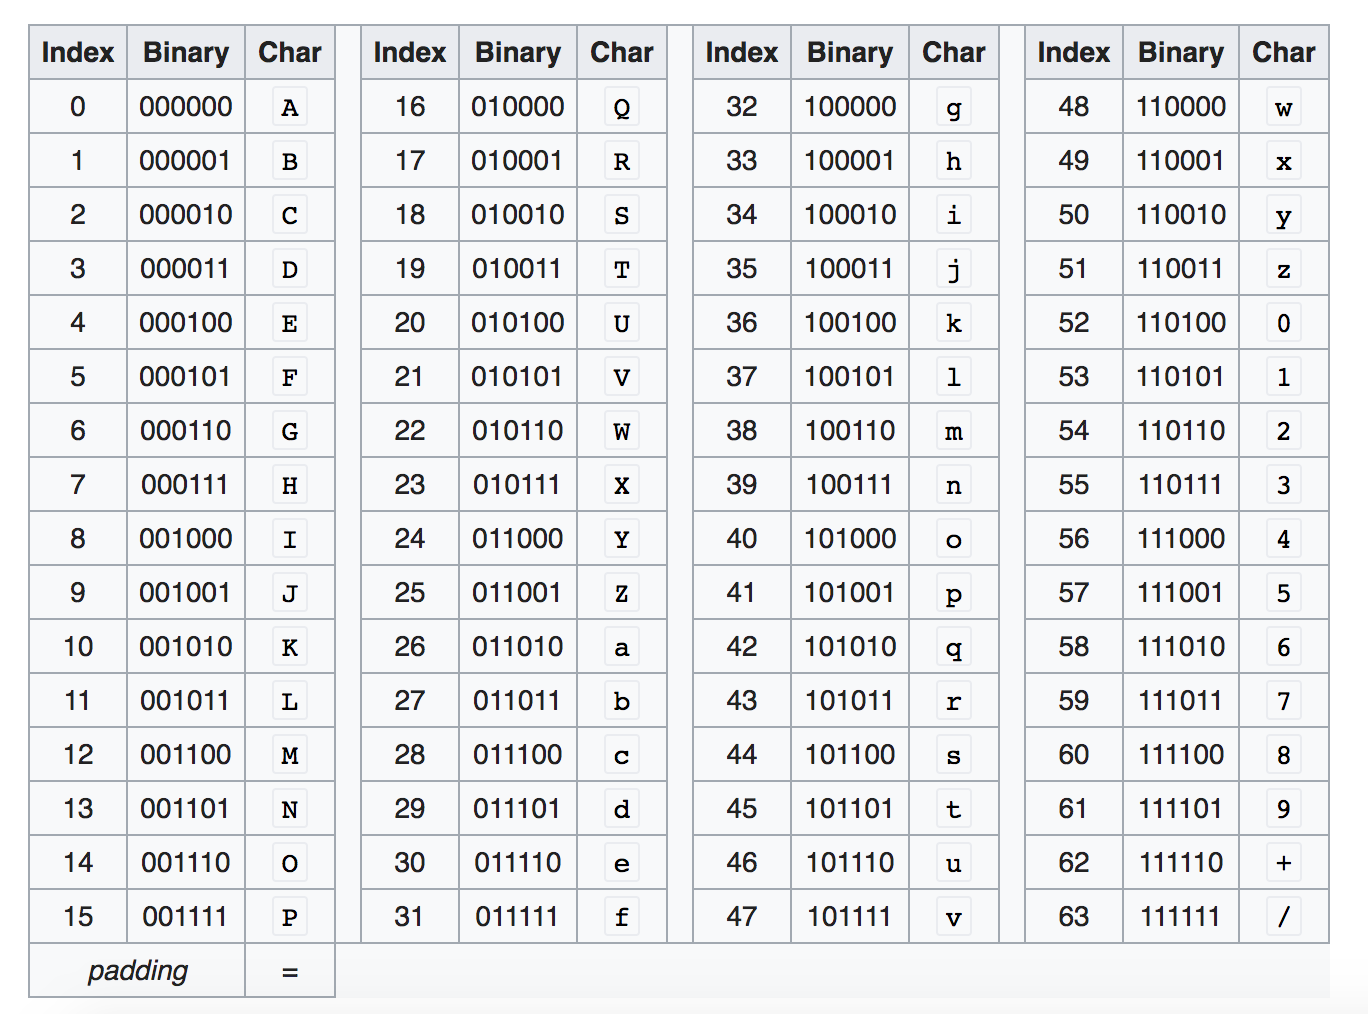
Base64 encoding converts every three bytes of data (three bytes is 3*8=24 bits) into four base64 characters.
Example:
Convert Hi! to Base64
Character - Ascii - Binary
H= 72 = 01001000
i = 105 = 01101001
! = 33 = 00100001
Hi! = 01001000 01101001 00100001
010010 000110 100100 100001 = S G k h
https://www.base64encode.org/
How about converting Hi to Base64
010010 000110 1001
Add zeros in the end so its 6 characters long
010010 000110 100100
Base 64 is SGk=
= is the padding character so the result is always multiple of 4.
Another Example
convert f to Base64
102 = 01100110
011001 100000
Zg==
Think about sending Image (binary) as JSON, binary wont work. But sending as Base64 works the best.
Image to Base64
https://elmah.io/tools/base64-image-encoder/
View Base64 online
https://html.onlineviewer.net/
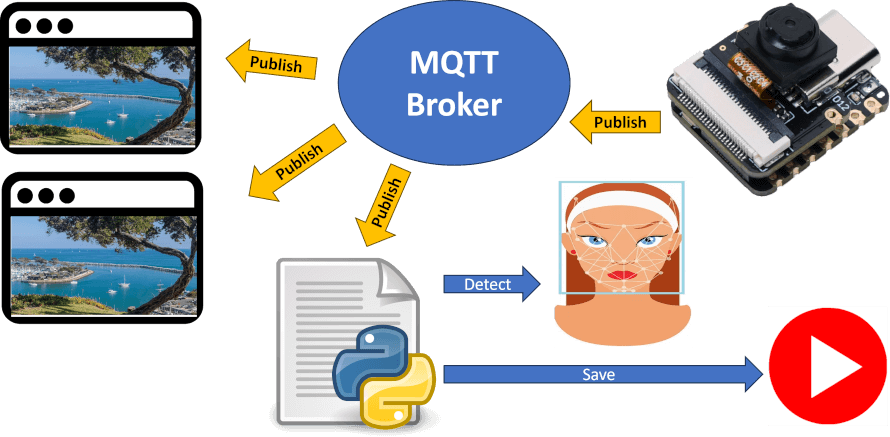
[Avg. reading time: 6 minutes]
Encryption in IoT Upper Stack
Two foundational concepts that help protect data are hashing and encryption.
Hashing
Hashing is like creating a digital fingerprint of data. It takes input (e.g., a message or file) and produces a fixed-length hash value.
- One-way function: You can’t reverse a hash to get the original data.
- Deterministic: Same input = same hash.
- Common use: Password storage, data integrity checks.
Use-case: When sending firmware updates to IoT devices, the server also sends a hash. The device re-hashes the update and compares — if it matches, the data wasn’t tampered with.
import hashlib
print(hashlib.sha256(b"iot-data").hexdigest())
Encryption
Encryption transforms readable data (plaintext) into an unreadable format (ciphertext) using a key. Only those with the key can decrypt it back.
Two Types
Symmetric
- Same key to encrypt and decrypt. Example: AES
ASymmetric
- Public key to encrypt, private key to decrypt. Example: RSA
Use-case: Secure communication between sensors and cloud, protecting sensitive telemetry, encrypting data at rest.
sequenceDiagram
    participant Sensor
    participant Network
    participant Cloud

    Sensor->>Network: Temp = 28.5 (Plaintext)
    Network-->>Cloud: Temp = 28.5

    Note over Network: Data can be intercepted

    Sensor->>Network: AES(TLS): Encrypted Payload
    Network-->>Cloud: Encrypted Payload (TLS)
    Cloud-->>Cloud: Decrypt & Store
Encryption plays a critical role in securing IoT systems beyond the device level. Here’s how it applies across the upper layers of the stack:
- Data in Transit
- Data at Rest
Cloud & IAM Layer – Secrets and Identity
Purpose: Secure identity tokens, secrets, and environment variables.
Best Practices:
- Encrypt secrets using cloud-native KMS (e.g., AWS KMS, Azure Key Vault)
- Use tools like HashiCorp Vault to manage secrets
- Apply token expiration and rotation policies
[Avg. reading time: 8 minutes]
IoT Data Privacy
- IoT devices continuously collect highly sensitive data
- Location, biometrics, behavior, health signals
- Data collection is often passive and invisible
- Users lack: Control, Visibility, Consent clarity Risk is not theoretical
- Regulatory fines, Legal exposure, Reputation damage
Popular Regulations
GDPR (EU)
Applies if data subjects are EU citizens.
Focus: Consent, Right to access/erase, Data minimization, Security by design, Data portability.
HIPAA (USA)
Applies to Protected Health Information (PHI).
Focus: Confidentiality, Integrity, Availability of electronic health data.
Requires Business Associate Agreements if third parties handle data.
How to Implement Privacy in IoT Systems
Privacy by Design
- Collect only necessary data
- Anonymize/pseudonymize where possible
- Use edge processing to reduce data sent to cloud
Security Practices
- Encrypted storage & transport (TLS 1.3)
- Mutual authentication (cert-based, JWT)
- Secure boot & firmware validation
User Controls
- Explicit opt-in for data collection
- Transparent data usage policies
- Easy delete/download of personal data
Audit & Monitoring
- Logging access to sensitive data
- Regular privacy impact assessments
What Industry is Doing Now
| Company/Platform | What They Do |
|---|---|
| Apple | Local processing for Siri; minimal cloud usage |
| Google Nest | Centralized cloud with opt-out data sharing |
| AWS IoT Core | Fine-grained access policies, audit logging |
| Azure IoT | GDPR-compliant SDKs; data residency controls |
| Fitbit (Google) | HIPAA-compliant services for health data |
Pros & Cons of IoT Privacy Measures
| Pros | Cons |
|---|---|
| Builds trust with users | May increase latency (edge compute) |
| Avoids fines & legal issues | Higher infra cost (storage, encryption) |
| Enables secure ecosystems | Limits on innovation using personal data |
| Competitive differentiator | Complex to manage cross-border compliance |
Data Masking
This is about obfuscating sensitive info during storage, transit, or access.
Types
- Static masking: Permanent (e.g., obfuscating device ID at ingestion)
- Dynamic masking: At query time (e.g., show only last 4 digits to analysts)
- Tokenization: Replacing values with reversible tokens
Use Cases
- Sharing data with 3rd parties without exposing PII
- Minimizing insider threats
- Compliance with HIPAA/GDPR
Tools & Approaches
- Telegraf Preprocessor modules (Static Masking)
- SQL-level masking (e.g., MySQL, SQL Server)
- API gateways that redact fields
- Custom middleware that masks data at stream-level (e.g., MQTT → InfluxDB)
[ IoT Device ]
    |  (Sensor Data)
    |  + TLS + Cert Auth
    v
[ Edge Layer ]
    - Filtering
    - Aggregation
    - Static Masking
    - Anonymization
    |
    v
[ Message Broker (MQTT/Kafka) ]
    - Encrypted Transport (TLS)
    - AuthN/AuthZ
    |
    v
[ Stream Processing Layer ]
    - Data Validation
    - Tokenization
    - Enrichment
    |
    v
[ Storage Layer ]
    - Encrypted Storage
    - Partitioned Data
    - Masked Fields
    |
    v
[ Access Layer ]
    - Dynamic Masking
    - Role-Based Access
    |
    v
[ Applications / Dashboard ]
    - Limited Views
    - User Consent Controls
[Avg. reading time: 11 minutes]
Auditing in IoT
Auditing in IoT means recording who did what, when, from where, and to which device or data so incidents can be investigated and compliance requirements can be met.
Why Auditing Matters
IoT environments are hard to trust because devices are distributed, long-lived, and often remotely managed.
Without proper audit trails, you cannot reliably answer:
- Who accessed sensitive data
- Who changed device configuration
- Which API triggered a device action
- Whether a firmware update was authorized
- How an incident spread across systems
What to Audit
Device Activity
- Device boot and shutdown events
- Sensor status changes
- Configuration changes
- Local authentication attempts
- Connectivity loss and recovery
- Error and fault conditions
Data Access
- Who accessed sensitive data
- What data was accessed
- When it was accessed
- Whether it was viewed, exported, modified, or deleted
API Usage
- Authentication attempts
- Token usage
- Read and write operations
- Bulk exports
- Failed requests
- Rate limit violations
Firmware and Remote Control
- Firmware update start and completion
- Firmware version changes
- Update source and signature verification result
- Remote commands issued to devices
- Command success or failure
Best Practices
Use Tamper-Resistant Logging
- Store logs in append-only or write-once storage
- Restrict log deletion and modification
- Digitally sign critical audit records where needed
Standardize Time
- Sync systems with NTP
- Use UTC timestamps consistently
- Record time with enough precision for investigations
Add Correlation IDs
- Attach a correlation ID to each request or workflow
- Propagate that ID across device, broker, API, processing, and dashboard layers
- This makes incident tracing much easier
Log Enough, But Not Everything
- Capture security-relevant actions
- Avoid dumping unnecessary personal data into logs
- Mask or hash sensitive values when possible
Separate Audit Logs from Application Logs
- Application logs help debugging
- Audit logs support accountability, forensics, and compliance
- Do not mix them carelessly
Common Tools
ELK Stack
- Elastic for indexing and search
- Logstash for ingest and transformation
- Kibana for dashboards and investigation
Good for:
- Large-scale search
- Centralized log analytics
- Security investigations
Grafana
- Lightweight alternative for log aggregation and visualization
- Often simpler to operate than a full ELK stack
Good for:
- Smaller teams
- Cost-conscious environments
- Fast operational dashboards
Retention Policies
Retention should balance:
- Compliance needs
- Security investigation needs
- Storage cost
- Privacy risk
Example Retention Guidelines
| Data Type | Retention Period |
|---|---|
| Raw sensor data | 7 to 30 days |
| Aggregated metrics | 6 to 12 months |
| User consent logs | 5 to 7 years |
| Health-related regulated data | 6+ years, depending on policy and law |
Storage Strategy
Use tiered storage so data moves through stages over time:
- Hot for recent searchable data
- Warm for less frequently accessed data
- Cold for long-term retention
- Delete after policy expiry
Enforcement Mechanisms
- Object storage lifecycle policies
- Blob storage lifecycle rules
- Database TTL where supported
- Scheduled archival and purge jobs
InfluxDB and TTL
For time-series workloads, TTL-style retention is useful because raw IoT telemetry grows fast.
Typical pattern:
- Keep high-resolution raw data for a short period
- Downsample into hourly or daily aggregates
- Retain aggregates much longer
- Expire raw data automatically
This reduces:
- Storage cost
- Query load
- Compliance risk from over-retention
[Avg. reading time: 0 minutes]
Edge Computing
[Avg. reading time: 6 minutes]
Introduction
Edge computing enables data processing closer to the data source, reducing latency, bandwidth usage, and dependency on centralized cloud systems.
It is increasingly critical in systems that require real-time decision-making, offline capability, and AI inference at the edge.
Use Cases
Autonomous Vehicles
Process sensor data locally for real-time decisions (braking, steering), while periodically syncing models and telemetry with the cloud.
Smart Cities
Traffic lights and surveillance systems process data locally to reduce latency, while aggregated insights are sent to the cloud for planning.
Industrial Automation
Machines perform real-time monitoring and anomaly detection at the edge, with cloud used for long-term analytics and optimization.
Healthcare
Wearables and medical devices analyze patient vitals locally for immediate alerts, reducing reliance on continuous connectivity.
Agriculture
IoT sensors process soil and weather data locally to trigger irrigation decisions, minimizing cloud dependency in remote areas.
Supply Chain / Warehousing
Edge systems track inventory and movement in real time, while cloud systems handle forecasting and optimization.
Edge vs Cloud Responsibility
| Layer | Responsibility |
|---|---|
| Edge | Real-time processing, filtering, immediate decisions |
| Fog | Aggregation, intermediate processing |
| Cloud | Storage, analytics, model training, long-term insights |
Popular Tools & Technologies
- AWS Greengrass
- Azure IoT Edge
- K3s (Lightweight Kubernetes for edge clusters)
- NVIDIA Jetson (Edge AI hardware)
- TensorFlow Lite / ONNX Runtime (Edge ML inference)
- Apache IoTDB (Time-series storage for IoT)
Challenges in Edge Computing
Security Risks
Devices are physically exposed and harder to secure than centralized systems.
Device Management
Firmware updates, patching, and lifecycle management across thousands of devices is complex.
Scalability
Coordinating distributed edge nodes requires robust orchestration.
Interoperability
Heterogeneous devices and protocols complicate integration.
Observability
Monitoring and debugging distributed edge systems is difficult.
Network Reliability
Systems must handle intermittent connectivity and operate offline.
Model Drift (AI Systems)
Edge-deployed models can degrade over time without proper retraining and updates.
[Avg. reading time: 8 minutes]
Edge Decision Patterns
Edge systems are not just about processing data, but deciding what to do locally vs what to send to cloud.
Patterns
Filter at Edge
- Send only important data
- Example: Send temperature only if > 50°C
Aggregate at Edge
- Combine data before sending
- Example: Send hourly average instead of raw stream
Act at Edge
- Immediate action without cloud
- Example: Turn off machine if overheating
Forward to Cloud
- Send raw or enriched data for analytics
- Example: ML training data
Why it matters
- Reduces bandwidth
- Improves latency
- Avoids cloud dependency
Offline-First Edge Systems
Edge systems must assume network failure is normal.
Key Concepts
Local Buffering
- Store data locally when network is down
Retry Mechanisms
- Send data when connection is restored
Eventual Sync
- Edge and cloud will sync later
Example
A delivery truck loses connectivity:
- Continues tracking locally
- Syncs data when back online
Risk
- Data duplication
- Out-of-order events
Data Reduction at Edge
Sending all raw data to cloud is expensive and unnecessary.
Techniques
Sampling
- Send every Nth record
Thresholding
- Send only when values cross limits
Compression
- Reduce payload size
Feature Extraction
- Send insights instead of raw data
- Example: send “anomaly detected” instead of full signal
Benefit
- Lower bandwidth cost
- Faster processing
Edge AI (Inference at Edge)
Edge devices can run ML models locally.
What runs at Edge
- Image classification
- Anomaly detection
- Voice recognition
What stays in Cloud
- Model training
- Heavy computation
- Model updates
Example
Security camera:
- Detects person locally
- Sends alert instead of full video
Challenge
- Limited compute power
- Model updates across devices
Edge Failure Scenarios
Edge systems fail differently than cloud systems.
Common Failures
Device Failure
- Hardware crash
Network Loss
- No connectivity to cloud
Data Loss
- Buffer overflow or corruption
Clock Drift
- Incorrect timestamps
Design Considerations
- Retry logic
- Local storage
- Idempotent processing
- Time synchronization
Edge vs Fog vs Cloud
Edge
- Closest to device
- Real-time decisions
- Limited compute
Fog
- Intermediate layer
- Aggregation and coordination
Cloud
- Centralized
- Storage, analytics, ML training
Example
Smart factory:
- Edge: machine sensor detects anomaly
- Fog: aggregates factory data
- Cloud: long-term analytics
Event-Driven Edge Systems
Edge systems are typically event-driven.
What is an Event?
A change or trigger:
- Temperature exceeds threshold
- Motion detected
- Device status change
Flow
Device → Event → Edge Processing → Action / Cloud
Example
Motion sensor:
- Detects movement
- Triggers camera recording
- Sends alert
Benefit
- Efficient processing
- Real-time response
[Avg. reading time: 7 minutes]
Edge Data & Consistency Challenges
Edge systems introduce unique challenges in how data is generated, transmitted, and synchronized across distributed environments.
Unlike centralized systems, edge devices operate independently and may not always be connected to the cloud.
Latency vs Consistency Tradeoff
Edge systems prioritize low latency over strict consistency.
- Decisions must be made instantly at the edge
- Cloud may receive delayed or stale data
Example
Smart thermostat:
- Adjusts temperature immediately (edge)
- Cloud dashboard updates later
Key Insight
You cannot have both:
- Real-time responsiveness
- Perfect global consistency
Time and Ordering Issues
Edge-generated data may arrive out of order.
Why it happens
- Network delays
- Offline buffering
- Device clock differences
Example
Sensor readings:
- Event at 10:05 arrives first
- Event at 10:01 arrives later
Impact
- Incorrect analytics
- Misleading dashboards
Approach
- Use event time instead of arrival time
- Apply windowing or reordering logic
Idempotency and Duplicate Handling
Edge systems often retry sending data, leading to duplicates.
Why duplicates occur
- Network retries
- Device reconnects
- Message acknowledgment failures
Problem
- Same event processed multiple times
Solution
- Use unique event IDs
- Ensure operations are idempotent
Example
Inventory update should not be applied twice for the same scan.
State Management at Edge
Edge devices maintain local state that may differ from cloud state.
Types of State
Transient State
- Buffers, queues, temporary storage
Persistent State
- Device configuration
- Local logs
Challenge
- Keeping edge and cloud in sync
Example
Warehouse scanner:
- Updates stock locally
- Syncs later with central system
Offline Data Synchronization
Edge systems must handle delayed synchronization with the cloud.
Behavior
- Store data locally
- Sync when connectivity is restored
Risks
- Duplicate data
- Conflicts between edge and cloud state
Strategy
- Conflict resolution rules
- Versioning or timestamps
Data Integrity and Loss
Data can be lost or corrupted at the edge.
Causes
- Power failure
- Storage limits
- Device crashes
Mitigation
- Local persistence
- Checkpointing
- Retry mechanisms
Summary
Edge systems require careful handling of:
- Inconsistent data
- Out-of-order events
- Duplicate messages
- Local vs global state
Designing for these challenges is critical for building reliable edge architectures.
[Avg. reading time: 9 minutes]
Edge System Design Checklist
Designing edge systems requires balancing latency, reliability, cost, and complexity.
This checklist provides a structured way to evaluate and design edge architectures.
1. Define the Objective
- What decision needs to be made at the edge?
- What is the acceptable latency?
- What happens if the system is offline?
Example
- Real-time alert → must run at edge
- Daily report → can be handled in cloud
2. Decide What Runs Where
Clearly separate responsibilities across layers.
| Layer | Responsibility |
|---|---|
| Edge | Real-time processing, filtering, immediate action |
| Fog | Aggregation, coordination |
| Cloud | Storage, analytics, model training |
Key Question
- Does this require immediate action?
- Yes → Edge
- No → Cloud
3. Handle Offline Scenarios
Assume network failure is normal.
- Can the system operate without cloud?
- How long can data be stored locally?
- What happens when storage is full?
Design Patterns
- Local buffering
- Retry with backoff
- Eventual synchronization
4. Design for Data Flow
Define how data moves through the system.
- What data is filtered at edge?
- What is aggregated?
- What is sent to cloud?
Checklist
- Avoid sending raw high-volume data
- Send only meaningful events or summaries
5. Plan for Failures
Edge systems fail frequently and unpredictably.
Common Failures
- Device crash
- Network loss
- Data corruption
Design Requirements
- Retry logic
- Local persistence
- Graceful degradation
6. Ensure Idempotency
Duplicate events are unavoidable.
- Can the same message be processed multiple times safely?
- Are unique IDs used for events?
Rule
- Every operation should be safe to repeat
7. Handle Time and Ordering
Data may arrive out of order.
- Are you using event time or arrival time?
- Can late-arriving data be handled?
Approach
- Use timestamps
- Allow reordering or windowing
8. Manage State
Edge devices maintain local state.
- What state is stored locally?
- How is it synced with the cloud?
Considerations
- State conflicts
- Versioning
- Recovery after restart
9. Design for Security
Edge devices are exposed and vulnerable.
- Is data encrypted in transit?
- Are devices authenticated?
- Can devices be compromised physically?
Minimum Requirements
- Secure communication (TLS)
- Device identity
- Access control
10. Plan Observability
You cannot fix what you cannot see.
- Can you monitor device health?
- Are logs available centrally?
- Can failures be traced?
Metrics to Track
- Device uptime
- Data throughput
- Error rates
11. Consider Cost Tradeoffs
Edge shifts cost from cloud to devices.
- Is edge hardware justified?
- Is bandwidth reduction significant?
Example
- Video streaming → process at edge, send alerts only
12. Think About Scale
Edge systems grow fast.
- Can you manage thousands of devices?
- How are updates deployed?
Challenges
- Firmware updates
- Configuration management
- Fleet monitoring
Final Thought
A good edge system is not just about processing data locally.
It is about designing for:
- Unreliable networks
- Distributed state
- Continuous failure
The best designs assume things will break and still work.
[Avg. reading time: 1 minute]
IoT Cloud Computing
- Introduction
- Consistency Models
- Cloud Services
- IoT Cloud Services
- High Availability
- Disaster Recovery
- Pros and Cons
- IFTTT
[Avg. reading time: 9 minutes]
IoT Cloud Computing
Definitions
Hardware: physical computer / equipment / devices
Software: programs such as operating systems, Word, Excel
Web Site: Readonly web pages such as company pages, portfolios, newspapers
Web Application: Read Write - Online forms, Google Docs, email, Google apps
Advantages of Cloud for IoT
| Category | Advantage | Description |
|---|---|---|
| Scalability | Elastic infrastructure | Easily handle millions of IoT devices and sudden traffic spikes |
| Storage | Virtually unlimited data storage | Ideal for time-series sensor data, logs, images, video streams |
| Processing Power | High compute availability | Offload heavy ML, analytics, and batch processing to cloud |
| Integration | Seamless with APIs, services | Easily connect to AI/ML tools, databases, event processing |
| Cost Efficiency | Pay-as-you-go model | No upfront infra cost; optimize for usage |
| Global Reach | Edge zones and regional data centers | Connect globally distributed devices with low latency |
| Security | Built-in IAM, encryption, monitoring | Token-based auth, TLS, audit logs, VPCs |
| Rapid Development | PaaS tools and SDKs | Build, test, deploy faster using managed services |
| Maintenance-Free | No server management | Cloud handles uptime, patches, scaling |
| Disaster Recovery | Redundancy and backup | Automatic replication and geo-failover |
| Data Analytics | Integrated analytics platforms | Use BigQuery, Databricks, AWS Athena etc. for deep insights |
| Updates & OTA | Easy over-the-air updates to devices | Roll out firmware/software updates via cloud |
| Digital Twins | Model, simulate, and control remotely | Create cloud-based digital representations of devices/systems |
Types of Cloud Computing in IoT Context
Public Cloud (AWS, Azure, GCP, etc.)
Usage: Most common for IoT startups, scale-outs, and global deployments.
- Easy to onboard devices via managed IoT hubs
- Global reach with edge zones
- Rich AI/ML toolsets (SageMaker, Azure ML, etc.)
Example: A smart home company using AWS IoT Core + DynamoDB.
Private Cloud
Usage: Enterprises with strict data policies (e.g., manufacturing, healthcare).
- More control over data residency
- Can comply with HIPAA, GDPR, etc.
- Custom security and network setups
Example: A hospital managing patient monitoring devices on their private OpenStack cloud.
Hybrid Cloud
Usage: Popular in industrial IoT (IIoT) and smart infrastructure.
- Store sensitive data on-prem (private), offload non-critical analytics to cloud (public)
- Low latency control at the edge, cloud for training ML models
Example: A smart grid using on-prem SCADA + Azure for demand prediction.
Cloud Types in IoT – Comparison
| Cloud Type | Description | IoT Example | Advantages | Ideal For |
|---|---|---|---|---|
| Public Cloud | Hosted by providers like AWS, Azure, GCP | Smart home devices using AWS IoT Core | Scalable, global reach, pay-as-you-go | Startups, large-scale consumer IoT |
| Private Cloud | Dedicated infra for one org (e.g., on-prem OpenStack) | Hospital storing patient monitoring data securely | More control, security, compliance | Healthcare, government, regulated industries |
| Hybrid Cloud | Mix of public + private with data/apps moving between | Factory with local control + cloud analytics | Flexibility, optimized costs, lower latency | Industrial IoT, utilities, smart cities |
[Avg. reading time: 10 minutes]
Consistency Models
Eventual Consistency
A model where updates to data propagate across distributed nodes asynchronously. Temporary inconsistencies are allowed, but all replicas will eventually converge to the same state.
Example A smart vehicle updates its GPS location while offline. The cloud reflects the update once connectivity is restored.
Use Cases
- Smart home devices
- Vehicle tracking systems
- Environmental monitoring
Limitations
- Not suitable for financial systems or real-time critical decisions
Read-Your-Writes (RYW)
Once a client performs a write, all subsequent reads by that client must reflect that write.
Example A user turns OFF a smart light and immediately sees the updated OFF state in the app.
Use Cases
- Device control systems
- User-facing dashboards
Limitations
- Requires session or client-level tracking
Monotonic Reads
Once a value is read, subsequent reads should never return an older value.
Example
| Time | Reading |
|---|---|
| 10:00 | 102 kWh |
| 10:01 | 103 kWh |
| 10:02 | 101 kWh ❌ |
| 10:03 | 104 kWh |
Use Cases
- Energy meters
- GPS tracking
- Time-series monitoring
Limitations
- Requires ordering guarantees across replicas
Causal Consistency
Ensures that causally related operations are observed in the correct order across the system.
Example
Door opened > Alarm disabled
If reversed, system behavior becomes incorrect.
Use Cases
- Security systems
- Workflow-based automation
Limitations
- Harder to implement than eventual consistency
Last Write Wins (LWW)
When multiple updates occur, the update with the most recent timestamp overwrites previous values.
Example Two users control the same smart light. The latest command determines the final state.
Use Cases
- Smart home controls
- IoT dashboards
Limitations
- Risk of losing valid updates due to clock skew
Optimistic Concurrency
Allows multiple updates without locking resources. Conflicts are detected after execution, and one operation may need to retry.
Example
| item_id | item_nm | stock |
|---|---|---|
| 1 | Apple | 10 |
Two users update simultaneously:
- +5 and -3 applied concurrently
- Conflict detected > one retries
Use Cases
- Low-conflict environments
- User-driven updates
Limitations
- Not suitable for high-frequency concurrent writes
Strong Consistency
All reads return the most recent write immediately across all nodes.
Example Bank transaction reflects instantly across all systems.
Use Cases
- Financial systems
- Critical control systems
Limitations
- Higher latency
- Reduced availability in distributed systems
Session Consistency
Guarantees consistency within a single session but not across different clients.
Example A user sees consistent device state during a session, but another user may see stale data.
Use Cases
- Mobile apps
- User-specific IoT dashboards
Limitations
- Not globally consistent
Bounded Staleness
Allows reads to lag behind writes by a defined time or number of versions.
Example A dashboard may show data up to 5 seconds old.
Use Cases
- Monitoring dashboards
- Analytics systems
Limitations
- Requires defining acceptable staleness window
Term Mapping in IoT Context
| Concept | Relevance in IoT |
|---|---|
| Eventual Consistency | Edge devices syncing after offline periods |
| Read-Your-Writes | Immediate feedback for device control |
| Monotonic Reads | Prevents backward movement in sensor readings |
| Causal Consistency | Maintains correct event order in automation |
| Last Write Wins | Resolves conflicting device updates |
| Optimistic Concurrency | Handles rare update conflicts |
| Strong Consistency | Required for critical operations |
| Session Consistency | Ensures stable user experience |
| Bounded Staleness | Balances freshness and performance |
[Avg. reading time: 5 minutes]
Cloud Services
SaaS – Software as a Service
SaaS provides ready-to-use cloud applications. Example: Google Docs, Gmail. In IoT, it offers real-time dashboards, alerts, and analytics.
Pros
- No infrastructure management
- Fast deployment
- Built-in analytics and alerts
Cons
- Limited customization
- Possible vendor lock-in
- Data stored in vendor cloud
PaaS – Platform as a Service
PaaS provides the tools and services to build and deploy IoT apps, including SDKs, APIs, device management, rules engines, and ML pipelines.
Example: HiveMQ (MQTT)
Pros
- Scalable and customizable
- Device lifecycle and security handled
- Integration with ML, analytics tools
Cons
- Learning curve
- Requires cloud expertise
- Still dependent on vendor ecosystem
IaaS – Infrastructure as a Service
IaaS gives you virtual machines, storage, and networking. In IoT, it lets you build fully custom pipelines from scratch.
Example: Virtual Machine
Pros
- Full control over environment
- Highly customizable
- Can install any software
Cons
- You manage everything: scaling, patching, backups
- Not beginner-friendly
- Higher ops burden
FaaS – Function as a Service
FaaS lets you run small pieces of code (functions) in response to events, like an MQTT message or sensor spike. Also called serverless computing.
Example: AWS Lambda, Azure Functions
When a temperature sensor sends a value > 90°C to MQTT, a Lambda function triggers an alert and stores the value in a DB.
Pros
- No need to manage servers
- Scales automatically
- Event-driven and cost-effective
Cons
- Cold start delays
- Limited execution time and memory
- Stateless only
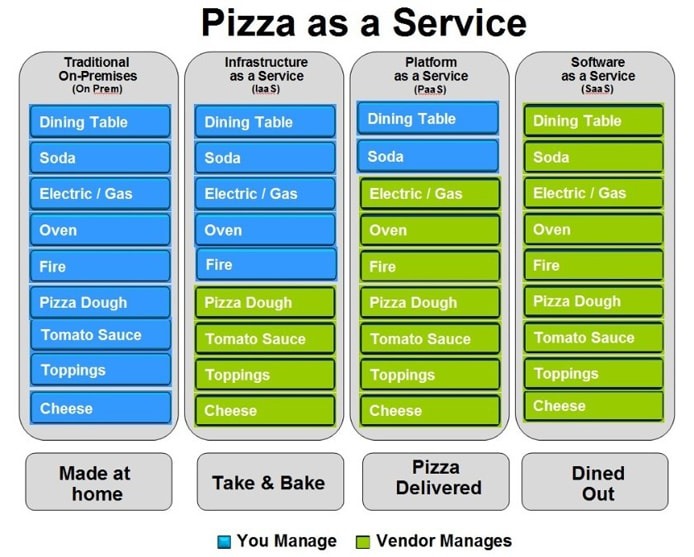
[Avg. reading time: 10 minutes]
IoT Cloud Services
BaaS – Backend as a Service
BaaS provides backend features like authentication, real-time databases, and cloud functions, useful for mobile or lightweight IoT apps.
Example: Firebase. To some extent OAuth services like Google.
Pros
- Easy to integrate with mobile/web apps
- Realtime sync and authentication
- Fast prototyping
Cons
- Not designed for heavy industrial use
- Vendor limitations on structure/storage
- Less control over backend logic
DaaS – Device as a Service
DaaS bundles hardware devices with software, support, and cloud services, often with subscription billing.
A logistics company rents connected GPS from a provider, who also offers a dashboard and device monitoring as part of the plan.
Renting (house, car etc..)
Pros
- No hardware management
- Subscription model (OpEx > CapEx)
- Full-stack support
Cons
- Ongoing cost
- Tied to specific hardware/software ecosystem
- Less flexibility
Edge-aaS – Edge-as-a-Service
Edge-aaS enables local processing at the edge, closer to IoT devices. It reduces latency and bandwidth usage by handling logic locally.
Example: AWS Greengrass
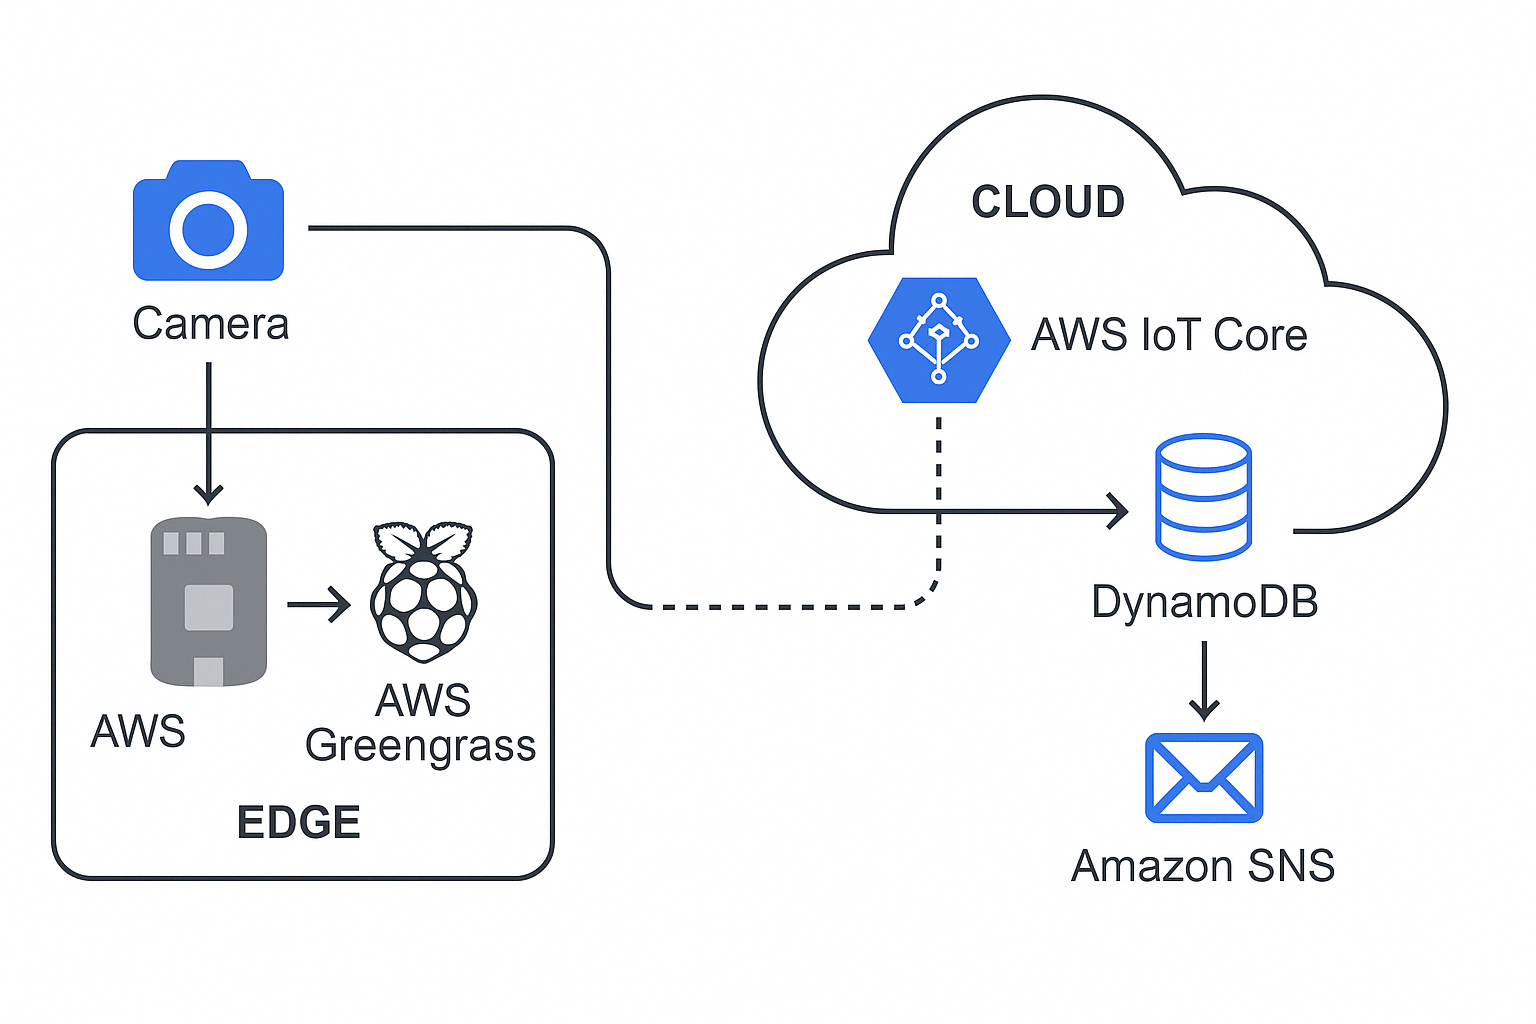
Run Everything Locally
- Camera sends input to Pi
- Greengrass Lambda processes it in real time
- Result (e.g., “object: person”) can be:
- Logged locally
- Sent to AWS via MQTT
- Triggered to send message
Pros
- Low latency, offline capable
- Reduces cloud traffic and cost
- Supports on-device inference
Cons
- More complex deployment
- Device resource limitations
- Must sync carefully with cloud
DTaaS – Digital Twin as a Service
DTaaS offers cloud-hosted platforms to create, manage, and simulate digital replicas of physical systems (machines, buildings, etc.).
Example: Siemens MindSphere
A manufacturing firm models its conveyor system using MindSphere to monitor, predict failures, and optimize throughput using simulated conditions.
For understanding - Flight / Video Game Simulator
Pros
- Powerful simulation and monitoring
- Real-time mirroring of assets
- Integrates well with AI/ML
Cons
- Complex to model accurately
- Requires continuous data flow
- Can be costly at scale
Cloud Service Models for IoT
| Service Model | Full Form | IoT-Specific Role/Usage | Examples |
|---|---|---|---|
| SaaS | Software as a Service | Ready-to-use IoT dashboards, analytics, asset tracking | Ubidots, ThingSpeak, AWS SiteWise, Azure IoT Central |
| PaaS | Platform as a Service | Build, deploy, manage IoT apps with SDKs and device APIs | Azure IoT Hub, AWS IoT Core, Google Cloud IoT (legacy), Kaa IoT |
| IaaS | Infrastructure as a Service | Run VMs, store raw sensor data, scale infra | AWS EC2, Azure VMs, GCP Compute Engine |
| FaaS | Function as a Service | Event-driven micro-processing (e.g., react to MQTT events) | AWS Lambda, Azure Functions, Google Cloud Functions |
| DaaS | Device as a Service | Subscription-based hardware + cloud updates | Cisco DaaS, HP DaaS |
| BaaS | Backend as a Service | Auth, DB, messaging backend for IoT apps | Firebase, Parse Platform |
| Edge-aaS | Edge-as-a-Service | Run ML + logic at the edge, sync with cloud | AWS Greengrass, Azure IoT Edge, ClearBlade |
| DTaaS | Digital Twin as a Service | Simulate, monitor, and control physical devices virtually | Siemens MindSphere, PTC ThingWorx |
[Avg. reading time: 9 minutes]
High Availability
High Availability refers to how much uptime (availability) a system guarantees over a period — usually per year.
It’s expressed using “nines” — like 99%, 99.9%, etc. More 9’s = Less downtime.
Availability Formula
- Availability = (Total Time - Downtime) / Total Time
This formula is used in SLAs and monitoring systems to measure system reliability.
High Availability – Nines and Downtime
| Availability | name | Allowed Downtime per Year | Per Month | Use Case Example |
|---|---|---|---|---|
| 99% | “Two nines” | ~3.65 days | ~7.2 hours | Small apps, dev/test environments |
| 99.9% | “Three nines” | ~8.76 hours | ~43.8 mins | Basic web services |
| 99.99% | “Four nines” | ~52.6 minutes | ~4.38 mins | Payment systems, APIs |
| 99.999% | “Five nines” | ~5.26 minutes | ~26.3 seconds | Medical, Telco, IoT control loops |
| 99.9999% | “Six nines” | ~31.5 seconds | ~2.63 seconds | Mission-critical systems |
How High Availability is Achieved
- Redundancy (multiple servers or instances)
- Failover mechanisms (automatic switching)
- Load balancing
- No single point of failure
- Multi-region deployments
- Continuous monitoring and auto-recovery
For IoT
- Smart Home Light Bulb → 99% is okay (a few hours of downtime is fine)
- Smart Grid Control System → 99.999% is essential (every second counts)
- Medical IoT (e.g., Heart Monitor) → Needs high availability
Beyond Just Nines
| Concept | Why It Matters in IoT + Cloud |
|---|---|
| Redundancy | Backup sensors, edge nodes, and cloud instances ensure system keeps running if one fails |
| Failover Systems | Automatically switch to standby components during failure |
| Load Balancing | Spreads traffic across devices or cloud zones to prevent overload |
| Latency vs Availability | A service may be “up” but still slow — availability ≠ performance |
| Disaster Recovery (DR) | Ensures systems and data can recover from outages or disasters |
| Geographic Distribution | Spreading across regions/availability zones improves uptime and resilience |
| SLA (Service Level Agreement) | Understand what cloud vendors promise and what downtime you’re actually allowed |
| Edge Processing | Enables critical operations to continue even if cloud is unreachable (e.g., AWS Greengrass) |
| Monitoring & Alerting | Detect and respond to failures fast using tools like CloudWatch, Datadog, Prometheus |
| Cost vs HA Tradeoff | Higher availability usually means higher costs — design smart based on use case |
Fun Discussion Pointers
To design each system, do we need Edge computing or Fog computing, should we go to Cloud if so how many 9’s we need.
- How many 9’s we need for smart light switch at home?
- How many 9’s we need for smart light switch at Bank ATM?
- A temperature sensor on a cold-storage truck is sending data to the cloud.
- You’re designing an IoT wearable for elderly patients that detects falls. What should be the design?
- What happens if the MQTT broker goes down? How would you make it fault-tolerant?
- A weather station publishes sensor data every 15 minutes. Do they need Highly Available system?
[Avg. reading time: 12 minutes]
Disaster Recovery
What is Disaster Recovery in IoT?
Disaster Recovery (DR) in IoT refers to the process of restoring devices, communication, and data pipelines after failures affecting both physical and digital components.
These failures include:
- Device crashes or firmware corruption
- Network outages (edge ↔ cloud disconnect)
- Gateway / Fog node failures
- Cloud region outages
- Cyberattacks (e.g., ransomware, botnets)
Disaster Recovery vs High Availability (HA)
-
High Availability (HA)
Focuses on preventing downtime
Systems continue running with minimal interruption -
Disaster Recovery (DR)
Focuses on recovering after failure
Accepts downtime but minimizes recovery impact
Simple View:
- HA = Avoid failure
- DR = Recover from failure
Why Disaster Recovery is Important in IoT
-
Physical Impact
Failures can affect real-world systems
Example: Smart grid, healthcare devices -
Device State Recovery
Requires restoring firmware, configs, and device identity -
Connectivity Constraints
Devices may go offline frequently -
Data Integrity
Missing telemetry can impact analytics and ML models
Types of Disaster Recovery Strategies
1. Backup and Restore
- Periodic backups of data and configurations
- Systems restored after failure
Pros:
- Low cost
- Simple implementation
Cons:
- High recovery time
- Possible data loss
Example:
Smart home system restoring device configs from cloud backup
2. Pilot Light
- Minimal system always running in another region
- Scaled up during disaster
Pros:
- Faster recovery than backup
- Cost-efficient
Cons:
- Requires scaling during recovery
Example:
IoT backend with minimal services active in secondary region
3. Warm Standby
- Fully functional but scaled-down system running
Pros:
- Faster recovery
- Moderate cost
Cons:
- Not instant failover
Example:
Industrial monitoring system with standby cloud environment
4. Active-Active (Multi-Region)
- Systems run simultaneously across regions
Pros:
- Near-zero downtime
- High resilience
Cons:
- High cost
- Complex architecture
Example:
Healthcare IoT system monitoring patients in real time
IoT-Specific Recovery Layers
Device-Level Recovery
- Local buffering of data
- Firmware rollback
- Auto-reconnect mechanisms
Example:
Sensor stores readings locally during outage and syncs later
Edge / Fog Recovery
- Redundant gateways
- Local processing fallback
- Sync to cloud after recovery
Example:
Factory continues operations using edge analytics
Cloud Recovery
- Multi-region deployment
- Broker failover (MQTT cluster)
- Stream processing recovery
Example:
Traffic rerouted to secondary region after outage
End-to-End Recovery
- Restore full pipeline (Device → Edge → Cloud)
- Replay missed data
- Restore dashboards and alerts
Example:
Fleet tracking system reconstructs missed routes
Key Concepts
RTO (Recovery Time Objective)
- Maximum acceptable time to restore system
Examples:
- Smart home: Minutes
- Healthcare device: Seconds
RPO (Recovery Point Objective)
- Maximum acceptable data loss
Examples:
- Weather station: Few minutes acceptable
- ICU monitor: Near zero
Backup Types
- Full Backup – Entire dataset and configurations
- Incremental Backup – Changes since last backup
- Differential Backup – Changes since last full backup
Replication
-
Synchronous Replication
Data written to multiple locations simultaneously
Low data loss, higher latency -
Asynchronous Replication
Data replicated with delay
Faster, but risk of data loss
Disaster Recovery in Cloud for IoT
- Multi-region deployments
- Managed IoT services and brokers
- Automated backups
- Infrastructure as Code (IaC)
Example:
- Primary region processes IoT data
- Secondary region maintains backup/standby system
Common Challenges
- Device firmware inconsistencies
- Offline data conflicts during sync
- Broker single point of failure
- Data consistency issues
- Human error during recovery
Best Practices
- Define clear RTO and RPO targets
- Design offline-first devices
- Implement edge buffering and replay mechanisms
- Use multi-region deployments
- Maintain device state/shadow in cloud
- Automate backups and recovery
- Regularly test disaster recovery plans
Summary
Disaster Recovery in IoT ensures systems can recover across:
- Devices
- Communication layers
- Data pipelines
- Cloud infrastructure
A strong DR strategy minimizes downtime, protects data, and maintains continuity of real-world operations.
[Avg. reading time: 9 minutes]
IoT Cloud – Pros and Cons
Pros
1. Scalability
Cloud platforms can automatically scale to handle millions of devices and events.
Example:
A smart city traffic system can scale from 1,000 sensors to 1 million without redesigning infrastructure.
2. Data Storage & Processing
Virtually unlimited storage with built-in analytics and processing capabilities.
Example:
A fleet management system stores years of GPS and telemetry data to analyze driving patterns and fuel efficiency.
3. Integrated Services
Cloud providers offer ready-made services like ML, streaming, APIs, and dashboards.
Example:
An IoT healthcare app uses cloud ML services to detect anomalies in patient heart rate data in real time.
4. Rapid Development
Developers can build and deploy solutions quickly without managing infrastructure.
Example:
A startup builds a smart irrigation system using managed MQTT brokers and serverless functions within days.
5. Remote Access
Devices and data can be accessed from anywhere.
Example:
A factory manager monitors machine health across multiple plants using a centralized dashboard.
6. Built-in Security Features
Cloud platforms provide encryption, IAM, monitoring, and compliance tools.
Example:
Devices authenticate using certificates, and all data is encrypted using TLS before reaching the cloud.
7. Disaster Recovery & Reliability
Cloud systems offer high availability, backups, and failover mechanisms.
Example:
If one region fails, IoT data pipelines automatically switch to another region with minimal downtime.
Cons
1. Latency
Cloud communication introduces delays, especially for real-time or critical operations.
Example:
An autonomous vehicle cannot rely on cloud decisions for braking due to network delay.
2. Connectivity Dependency
IoT systems depend heavily on stable internet connectivity.
Example:
A smart home system fails to respond if the internet goes down.
3. Privacy Concerns
Sensitive data is transmitted and stored externally, increasing exposure risk.
Example:
Wearable devices sending health data to cloud servers may raise compliance concerns (HIPAA/GDPR).
4. Recurring Costs
Cloud usage incurs ongoing costs for storage, compute, and data transfer.
Example:
A video surveillance system streaming continuously to the cloud results in high monthly bills.
5. Vendor Lock-In
Heavy reliance on a specific cloud provider makes migration difficult.
Example:
Using proprietary IoT services (like device twins or rules engine) makes switching providers complex.
6. System Complexity
Managing distributed systems across device, edge, and cloud increases architectural complexity.
Example:
Debugging data loss across device → gateway → cloud pipeline can be challenging.
7. Data Transfer Costs
Frequent data movement between devices and cloud can become expensive.
Example:
Streaming raw sensor data every second instead of aggregating at the edge increases bandwidth costs significantly.
Summary
| Pros | Cons |
|---|---|
| Scalability | Latency |
| Data Storage | Connectivity Dependency |
| Integrated Services | Privacy Concerns |
| Rapid Development | Recurring Costs |
| Remote Access | Vendor Lock-In |
| Security Features | Complexity |
| Disaster Recovery | Data Transfer Costs |
[Avg. reading time: 2 minutes]
IFTTT
If This Then That
IFTTT (If This Then That) is primarily a cloud-based automation platform that connects various web services and devices to enable users to create simple conditional statements, known as applets. These applets allow one service or device to trigger actions in another, facilitating automation across different platforms.
IFTTT facilitates communication between cloud services and edge devices, enabling users to create automations that leverage both cloud-based processing and local edge computing capabilities. However, the core functionality of IFTTT itself remains cloud-centric.
[Avg. reading time: 4 minutes]
Good Reads
ESP32 - MicroPython : https://github.com/gchandra10/esp32-demo
IoT Arduino Projects
IoT Related Tools
MQTT Explorer
GUI desktop tool for inspecting MQTT topics & messages
Wokwi
Online Arduino + ESP32 simulator. No hardware needed. VSCode / JetBrains supported.
Node Red
Visual flow-based tool for IoT logic and automation
Career Path
Example: RoadMap for Python Learning
Cloud Providers
Run and Code Python in Cloud. Free and Affordable plans good for demonstration during Interviews.
Cheap/Affordable GPUs for AI Workloads
AI Tools
---
[Avg. reading time: 4 minutes]
Notebooks vs IDE
| Feature | Notebooks (.ipynb) | Python Scripts (.py) |
|---|---|---|
| Use Case - DE | Quick prototyping, visualizing intermediate steps | Production-grade ETL, orchestration scripts |
| Use Case - DS | EDA, model training, visualization | Packaging models, deployment scripts |
| Interactivity | High – ideal for step-by-step execution | Low – executed as a whole |
| Visualization | Built-in (matplotlib, seaborn, plotly support) | Needs explicit code to save/show plots |
| Version Control | Harder to diff and merge | Easy to diff/merge in Git |
| Reusability | Lower, unless modularized | High – can be organized into functions, modules |
| Execution Context | Cell-based execution | Linear, top-to-bottom |
| Production Readiness | Poor (unless using tools like Papermill, nbconvert) | High – standard for CI/CD & Airflow etc. |
| Debugging | Easy with cell-wise changes | Needs breakpoints/logging |
| Integration | Jupyter, Colab, Databricks Notebooks | Any IDE (VSCode, PyCharm), scheduler integration |
| Documentation & Teaching | Markdown + code | Docstrings and comments only |
| Unit Tests | Not practical | Easily written using pytest, unittest |
| Package Management | Ad hoc, via %pip, %conda | Managed via requirements.txt, poetry, pipenv |
| Using Libraries | Easy for experimentation, auto-reloads supported | Cleaner imports, better for dependency resolution |
[Avg. reading time: 5 minutes]
Assignments
Note 1: LinkedIn Learning is Free for Rowan Students.
Note 2: Submission should be LinkedIn Learning Certificate URLs. (No Screenshots or Google Docs or Drives)
Assignment 1 - Python
Assignment 2 - Ethical Hacking IoT Devices
Assignment 3 - Learning Git and GitHub
Assignment 4 - Raspberry Pi
– Raspberry Pi Essential Training
Assignment 5 - Cloud
Extra Credit Choices (Optional)
(Extra credit should be submitted before the Finals.)
[Avg. reading time: 3 minutes]
Answers
Chapter 1
- For each of the following IoT components, identify whether it belongs to the upper stack or the lower stack and explain why.
- 1.1 Upper stack - It deals with user interaction and control applications.
- 1.2 Lower stack - It involves data collection from the environment.
- 1.3 Lower stack - It handles data transport and protocol translation.
- 1.4 Upper stack - It focuses on data processing and analytics.
- 1.5 Lower stack - It manages device operations and hardware control.
- Determine whether the following statements are true or false.
- 2.1 False - Edge computing is generally considered part of the lower stack.
- 2.2 False - These are aspects of the upper stack.
- 2.3 True - It involves hardware (lower stack) and application (upper stack) components.
- 2.4 False - They are used for low-bandwidth, short-range communication.
- 2.5 True - Predictive maintenance uses processed data and analytics from the upper stack.
Tags
amd
/Data Processing/CPU Architecture
anomaly
/Machine Learning with IoT/Anomaly Detection
api
/Data Processing/Application Layer
applicationlayer
/Data Processing/Application Layer
architecture
/Data Processing/CPU Architecture
arm
/Data Processing/CPU Architecture
auditing
/Security/Auditing in IoT
aws
/IoT Cloud Computing/Introduction
azure
/IoT Cloud Computing/Introduction
baas
/IoT Cloud Computing/IoT Cloud Services
base64
/Security/Number Systems
broker
/Data Processing/Application Layer/MQTT
cbor
/Data Processing/Application Layer/CBOR
centralized
/IoT Introduction/Computing Types
challenge
/Edge Computing/Edge Data & Consistency Challenges
checklist
/Edge Computing/Edge System Design Checklist
cloud
/IoT Cloud Computing/Introduction
/IoT Cloud Computing/Pros and Cons
codequality
/Data Processing/Python Environment/Code Quality & Safety
communicationlayer
/Security/Communication Layer
computing
/IoT Introduction/Computing Types
cons
/IoT Cloud Computing/Pros and Cons
consistency
/IoT Cloud Computing/Consistency Models
container
/Data Processing/Containers/Docker
/Data Processing/Containers/Docker Examples
/Data Processing/Containers/VMs or Containers
/Data Processing/Containers/What Container does
containers
/Data Processing/Containers
damm
/Data Processing/Python Environment/Faker
data
/IoT Introduction/Upper Stack
dataatrest
/Security/Data Layer
datacleaning
/Machine Learning with IoT/Feature Engineering
dataecosystem
/IoT Introduction/JOBS
dataformat
/Data Processing/Application Layer/CBOR
/Data Processing/Application Layer/JSON
/Data Processing/Application Layer/MessagePack
/Data Processing/Application Layer/XML
dataintegrity
/Security/Data Layer
dataintransit
/Security/Data Layer
dataviz
/Data Processing/Data Visualization libraries
debug
/Data Processing/Python Environment/Logging
decimal
/Security/Number Systems
docker
/Data Processing/Containers
/Data Processing/Containers/Container in IOT
/Data Processing/Containers/Docker
/Data Processing/Containers/Docker Examples
/Data Processing/Containers/VMs or Containers
/Data Processing/Containers/What Container does
/Data Processing/Time Series Databases/InfluxDB Demo
dockerhub
/Data Processing/Containers/Docker Examples
dr
/IoT Cloud Computing/Disaster Recovery
edge
/Machine Learning with IoT/ML with IoT
/Machine Learning with IoT/Predictive Maintenance
edgecomputing
/Edge Computing/Introduction
edgeconsistency
/Edge Computing/Edge Data & Consistency Challenges
edgedesign
/Edge Computing/Edge System Design Checklist
encryption
/Security/Encryption
environmental
/IoT Introduction/IoT Use Cases
error
/Data Processing/Python Environment/Error Handling
eventual
/IoT Cloud Computing/Consistency Models
evolution
/IoT Introduction/Evolution of IOT
faas
/IoT Cloud Computing/Cloud Services
/IoT Cloud Computing/IoT Cloud Services
faker
/Data Processing/Python Environment/Faker
featureengineering
/Machine Learning with IoT/Feature Engineering
firmware
/Security/Introduction
fog
/Machine Learning with IoT/Predictive Maintenance
formats
/Data Processing/Application Layer
gcp
/IoT Cloud Computing/Introduction
google
/Data Processing/Application Layer/Protocol Buffers
grafana
/Data Processing/Data Visualization libraries
/Data Processing/Data Visualization libraries/Grafana
ha
/IoT Cloud Computing/High Availability
hashing
/Security/Encryption
hex
/Security/Number Systems
hipaa
/Security/IoT Privacy
http
/Data Processing/Application Layer/HTTP & REST API
/Data Processing/Application Layer/MQTT
/IoT Introduction/Protocols
hub
/Data Processing/Containers/Docker
iaas
/IoT Cloud Computing/Cloud Services
/IoT Cloud Computing/IoT Cloud Services
ifttt
/IoT Cloud Computing/IFTTT
importance
/IoT Introduction/Introduction
influxdb
/Data Processing/Data Visualization libraries/Grafana
/Data Processing/Time Series Databases
/Data Processing/Time Series Databases/InfluxDB
/Security/Auditing in IoT
info
/Data Processing/Python Environment/Logging
insecureapi
/Security/Application Layer
integrationlayer
/IoT Introduction/Upper Stack
iot
/Data Processing/Containers/Container in IOT
/IoT Introduction/Computing Types
/IoT Introduction/Evolution of IOT
/IoT Introduction/Introduction
/IoT Introduction/Puzzle
/Machine Learning with IoT/ML with IoT
/Machine Learning with IoT/Predictive Maintenance
iotarchitects
/IoT Introduction/JOBS
iotdata
/Machine Learning with IoT/IoT Data Characteristics
iotdevelopers
/IoT Introduction/JOBS
iotusecases
/IoT Introduction/IoT Use Cases
jobs
/IoT Introduction/JOBS
json
/Data Processing/Application Layer/JSON
lint
/Data Processing/Python Environment
logging
/Data Processing/Python Environment/Logging
logistics
/IoT Introduction/IoT Use Cases
lowerstack
/IoT Introduction/Lower Stack
luhn
/Data Processing/Python Environment/Faker
masking
/Security/IoT Privacy
measurement
/Data Processing/Time Series Databases/InfluxDB Demo
messagepack
/Data Processing/Application Layer/MessagePack
microservices
/Data Processing/Application Layer/HTTP & REST API
mitm
/Security/Communication Layer
ml
/Machine Learning with IoT/ML with IoT
monolithic
/Data Processing/Application Layer/HTTP & REST API
mqtt
/Data Processing/Application Layer/MQTT
/IoT Introduction/Protocols
mypy
/Data Processing/Python Environment
network
/IoT Introduction/Introduction
noise
/Machine Learning with IoT/IoT Data Characteristics
octal
/Security/Number Systems
paas
/IoT Cloud Computing/Cloud Services
/IoT Cloud Computing/IoT Cloud Services
patterns
/Edge Computing/Edge Decision Patterns
pdoc
/Data Processing/Python Environment/Code Quality & Safety
pep
/Data Processing/Python Environment
physicaldevices
/IoT Introduction/Lower Stack
predictive
/Machine Learning with IoT/Predictive Maintenance
predictivemaintenance
/Machine Learning with IoT/Anomaly Detection
privacy
/Security/IoT Privacy
prometheus
/Data Processing/Time Series Databases
pros
/IoT Cloud Computing/Pros and Cons
protobuf
/Data Processing/Application Layer/Protocol Buffers
protocol
/IoT Introduction/IOT Stack Overview
/IoT Introduction/Protocols
protocols
/Data Processing/Application Layer
publisher
/Data Processing/Application Layer/MQTT
puzzle
/IoT Introduction/Puzzle
ratelimiting
/Security/Application Layer
repositories
/Data Processing/Containers/Docker
rest
/Data Processing/Application Layer/HTTP & REST API/REST API
restapi
/Data Processing/Application Layer/HTTP & REST API/REST API
rpo
/IoT Cloud Computing/Disaster Recovery
rto
/IoT Cloud Computing/Disaster Recovery
ruff
/Data Processing/Python Environment
saas
/IoT Cloud Computing/Cloud Services
/IoT Cloud Computing/IoT Cloud Services
safety
/Data Processing/Python Environment/Code Quality & Safety
secrets
/Security/Encryption
security
/Security/Introduction
services
/Data Processing/Application Layer
sla
/IoT Cloud Computing/High Availability
smart
/IoT Introduction/Introduction
sql
/Data Processing/Data Visualization libraries/Grafana
/Data Processing/Time Series Databases/InfluxDB
stack
/IoT Introduction/IOT Stack Overview
statefulness
/Data Processing/Application Layer/HTTP & REST API/Statefulness
statelessness
/Data Processing/Application Layer/HTTP & REST API/Statelessness
status
/Data Processing/Application Layer/HTTP & REST API
subscriber
/Data Processing/Application Layer/MQTT
telegraf
/Data Processing/Time Series Databases/InfluxDB
/Data Processing/Time Series Databases/InfluxDB Demo
timeseries
/Machine Learning with IoT/Predictive Maintenance
try
/Data Processing/Python Environment/Error Handling
tsdb
/Data Processing/Time Series Databases
/Data Processing/Time Series Databases/InfluxDB
ttl
/Security/Auditing in IoT
upperstack
/IoT Introduction/Upper Stack
vm
/Data Processing/Containers/VMs or Containers
worksforme
/Data Processing/Containers/What Container does
xml
/Data Processing/Application Layer/XML
xss
/Security/Application Layer